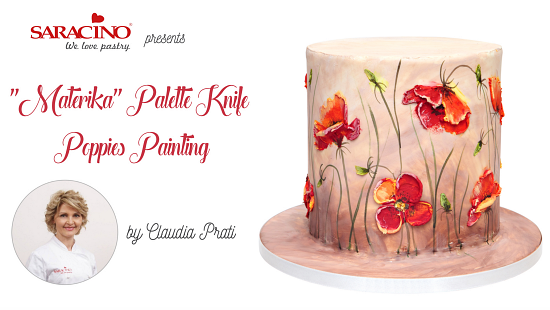
ROYAL ICING POPPIES

ROYAL ICING POPPIES

Skill level: INTERMEDIATE

You will need:

  • A round cake of 20cm diameter/15cm high covered with 300g Saracino white top paste
  • A 30cm round cake board covered with 150g of Saracino white top paste
  • Saracino Dust colors: white, brown, green, black
  • Saracino Dust or gel colors: red, yellow, green
  • 500g Saracino royal icing mix
  • 100 ml Vodka
  • One pointed and one square shaped plastic (or metal) palette knives
  • 2 flat brushes: one medium and one large
  • 1 small pointed brush

Step 1

Cover the cake with the sugarpaste.

Step 2

Cover the cake board with white sugar paste.

Step 3

Mix some brown dust color with a few drops of vodka, achieve a “paste” consistency.  Do the same with some white color.

Step 4

Start painting the bottom of the cake with brown using a large brush.

Step 5

Start painting the top of the cake with white using a large brush.

Step 6

Start to blend the two colors together in the middle of the cake creating a mid-tone color (light brown).

Step 7

Work fast covering one area of the cake at a time without letting the colors dry then switch to another area until you have colored all the surface.

Step 8

Mix 500g of Saracino royal icing (firm peak consistency) and color a spoon of royal icing with Saracino Red gel or dust color (with dust you will have a “matt” finish effect, with gel a more “shiny” effect). Put it on the left side of a plastic mixing palette.

Step 9

On the same plastic mixing palette, to the right side mix a spoon of royal icing with yellow color. Mix the two colors together in the middle of the palette creating a nice orange.
Step 10

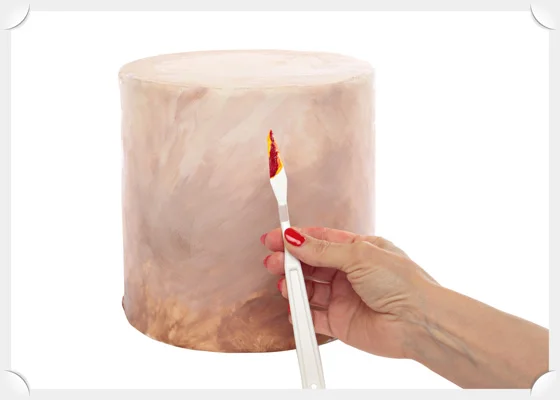
Take some orange, red and yellow with the back of the plastic palette knife filling it in this way
Step 11

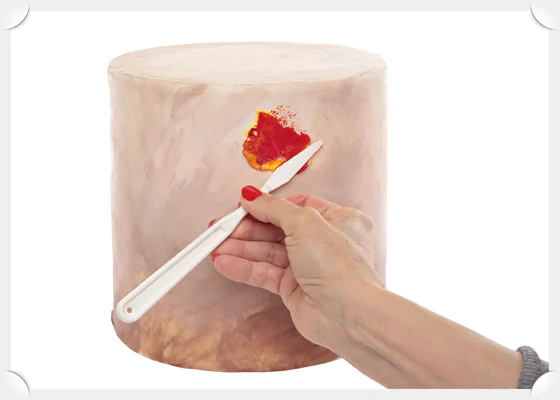
First flower: with a circular motion create a small “fan” shape. This will be our first simple flower. Make 3 or 4 of these ‘one petal’ flowers on the cake make it larger or smaller changing position on the cake.
Step 12

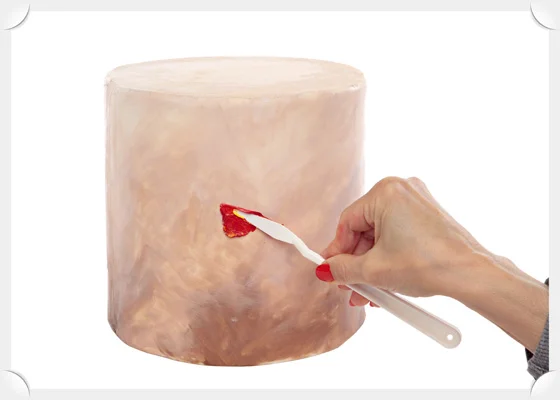
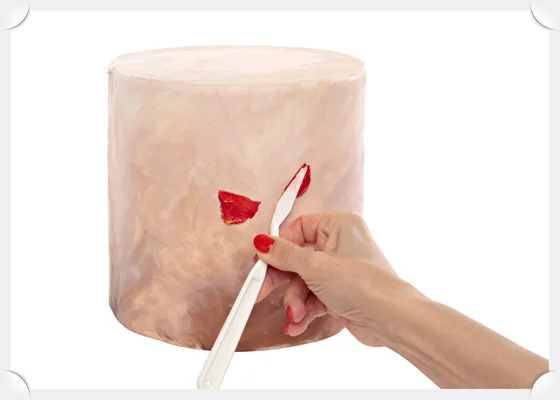
Second flower: Composed of 4 petals. The first petal starts from bottom left and work up with a circular motion. For this petal fill the palette knife only with red.
Step 13

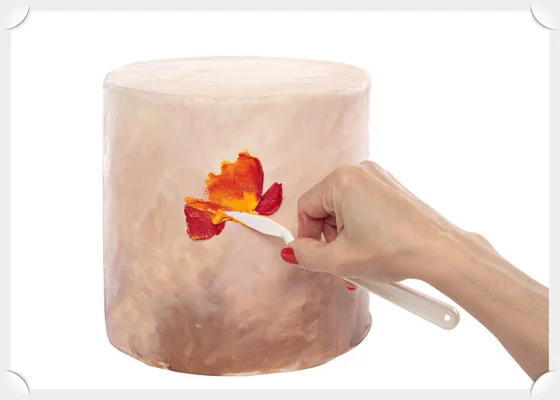
Form another red small petal on the right side of the first petal leaving a space between the two. This second petal starts from the bottom right and work up with a circular motion
Step 14

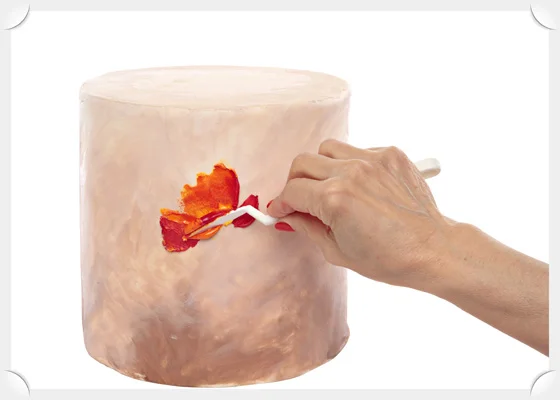
Fill the palette knife mixing some yellow, orange and red and place a third petal in the middle of the previous petals, create the same shape as the first petal we made in step 11
Step 15

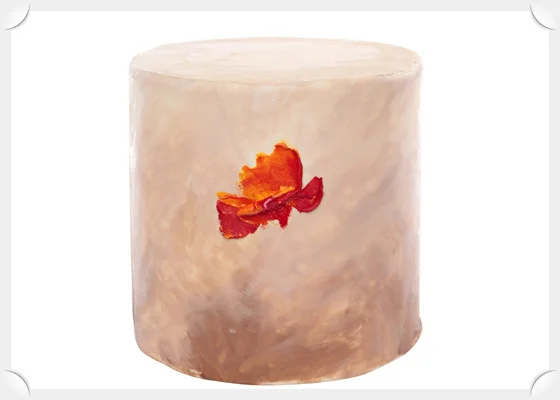
Create a thicker petal filling the palette knife with a large amount of royal icing and holding the palette knife sideways on the cake and not flat as before. Twist the palette knife without moving it from the sideways position.
Step 16

With a medium brush paint underneath the fourth petal to create a “cone shape” for the center of the flower. Make 3 or 4 of these flowers on the cake in different positions.
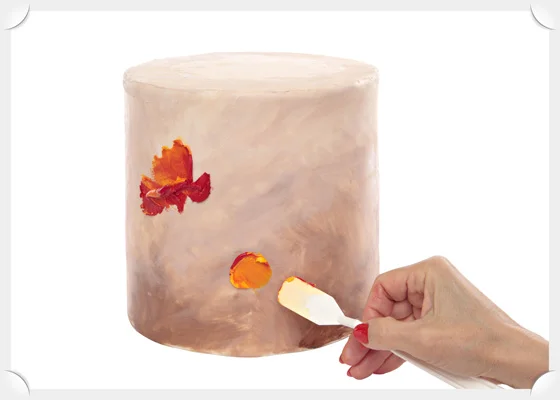
Step 17

Open flower made of 4 petals: Switch to the square palette knife and fill it with some yellow and orange royal icing. Create one petal starting from one point and working down, applying pressure at the beginning and releasing the pressure while moving down.

Step 18

In the same way do another petal on the opposite side of the first petal. Leave some space in the center.
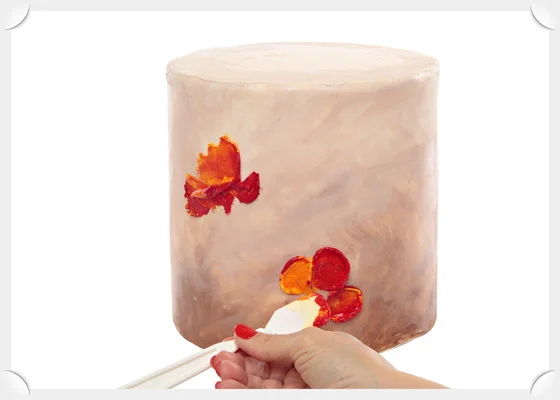
Step 19

Put a third petal between the first two on the right side of the flower. Leave some space in the center.
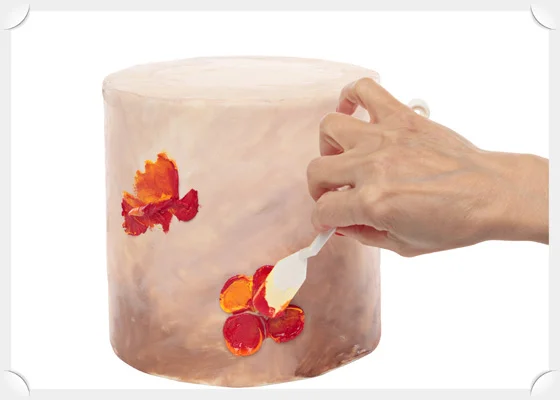
Step 20

Complete the flower with the 4thpetal that is positioned on the left side of the flower. Leave some space in the center of the flower. Make a couple of these open flowers on the cake
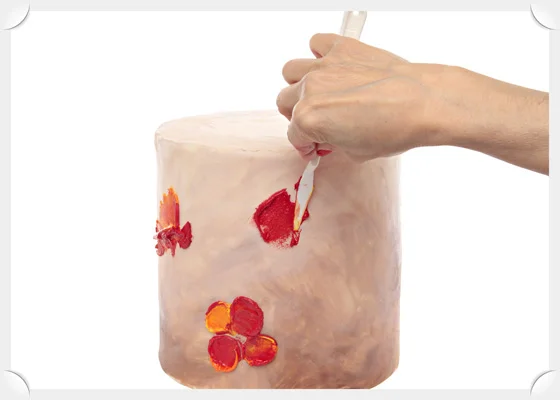
Step 21

Fill the pointed palette knife with red royal icing and create the same petal as Step 11 but turned upside-down.
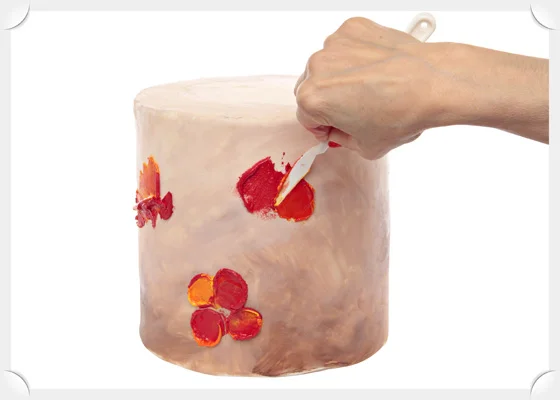
Step 22

Put an orange petal close to the first one on the right side. The movement is always the same as the first petal (Step 11)
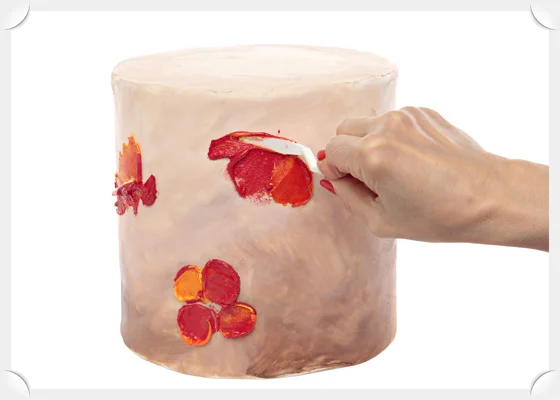
Step 23

Create a third petal on the left side using the edge of the pointed palette knife working from the outside to the inside of the flower with a flat motion
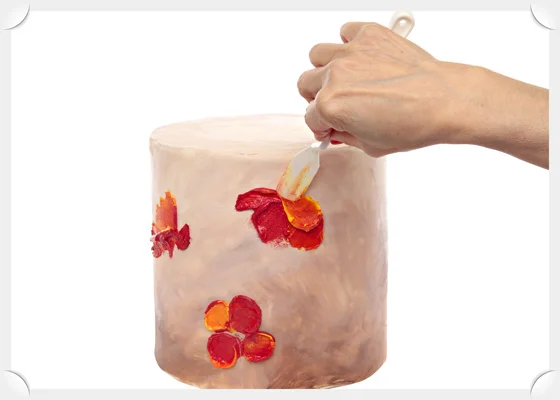
Step 24

With the square palette knife create an open petal like the one you made in step 20 overlapping the second petal

Step 25

Form another small red petal between the third and the fourth petal filling just the edge of the palette knife with enough royal icing to create a thicker petal
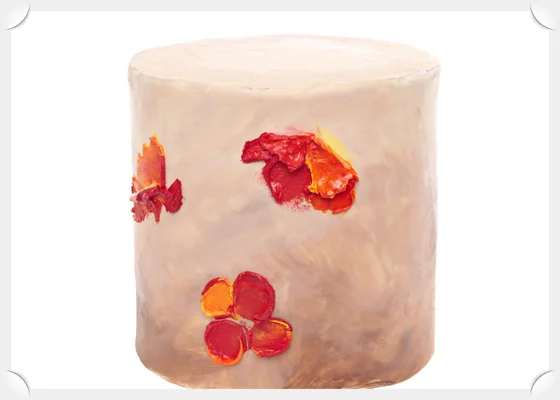
Step 26

Model and form the edge of last two petals with a damp medium brush
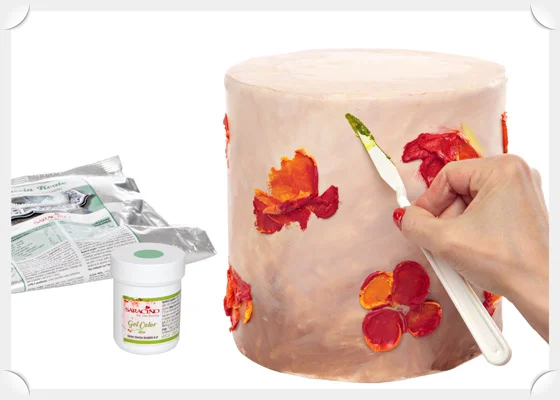
Step 27

Mix some gel (or dust) green color with a spoon of royal icing. Fill just the edge of the pointed palette knife with a small quantity of royal icing. Touch the cake just with the edge of the spatula going down from top to bottom.
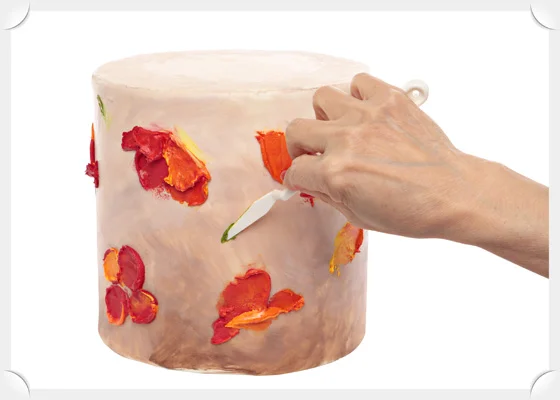
Step 28


Form green buds on the other side, from bottom to top.
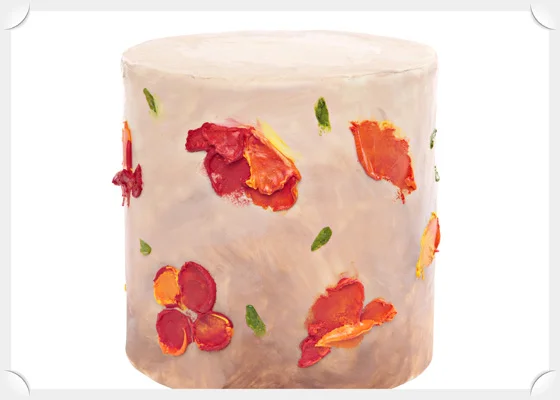
Step 29

Fill the empty spaces with some green buds changing position and direction.
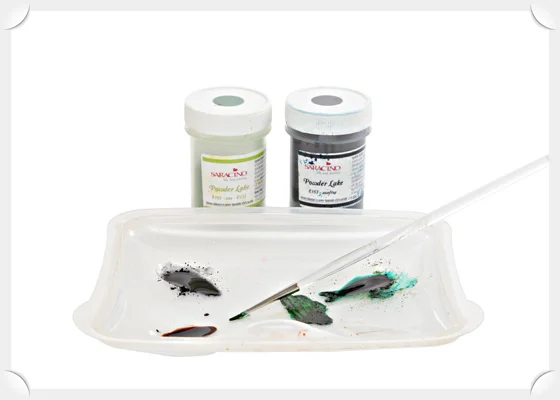
Step 30

Dissolve some green, black and brown dust colors with a few drops of vodka to obtain three different colors.
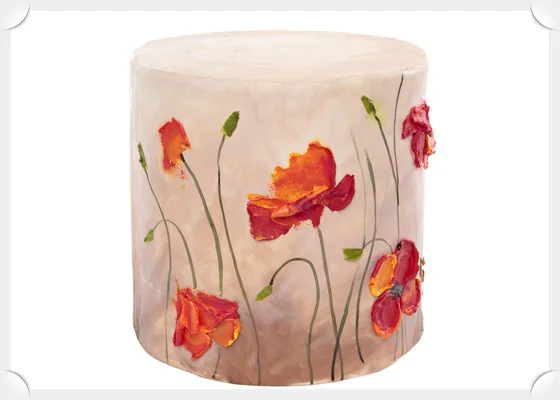
Step 31

With a small brush create some long and thin lines that start from the bottom and reach the flowers and buds, add other blades of grass all around.
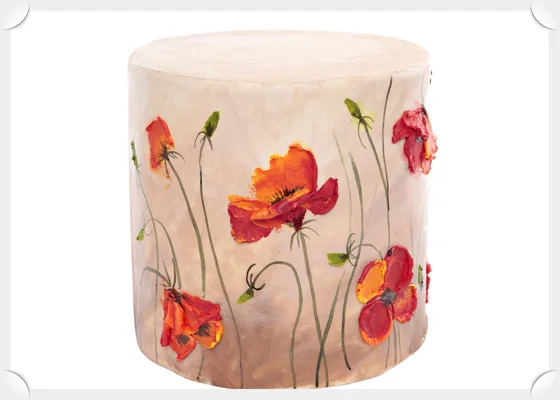
Step 32

Paint the dark parts of the flower starting from the base of the calyx with green and in the center of the flowers with black.  Create some small threads at the base of each flower and bud.
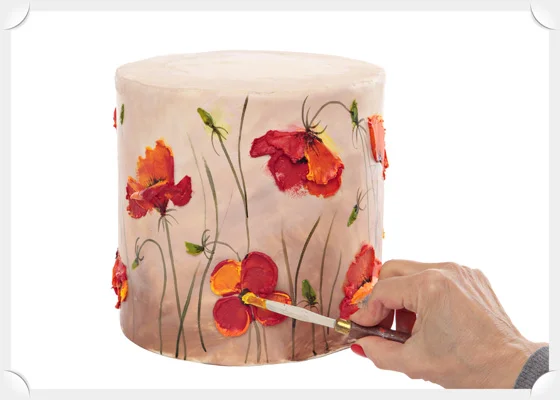
Step 33

With a pinch of yellow royal icing and a small knife create the center of the open flowers
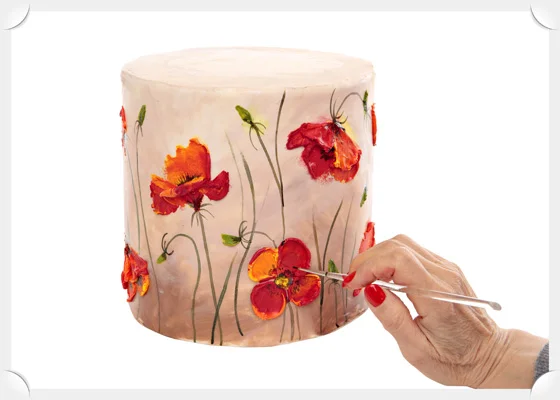
Step 34

Create some black dots all around the center of the open flowers.
Step 35

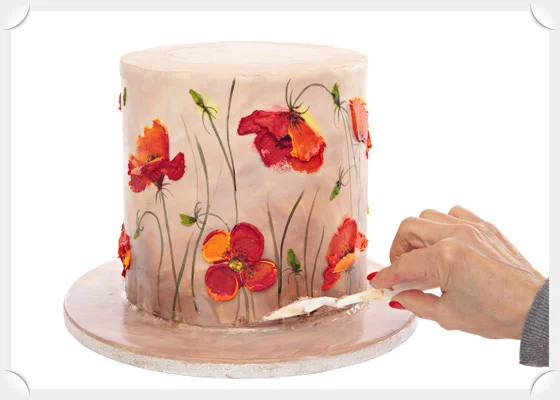
Color some royal icing with a pinch of brown dust and use it to fix the cake to the cake board, filling any gaps with the palette knife. Allow to dry.
Step 36

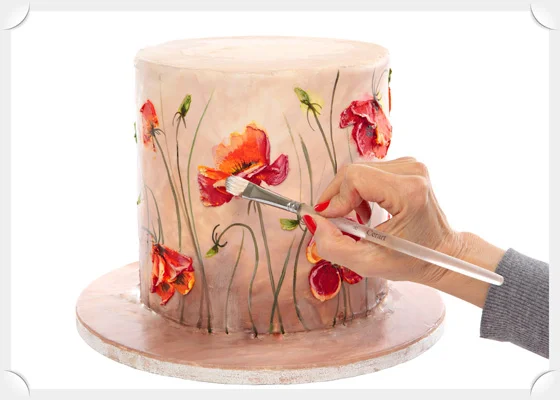
Mix some white dust with vodka. Put some touches of white on the flowers with the large brush (only on the parts that are more in relief).
Step 37

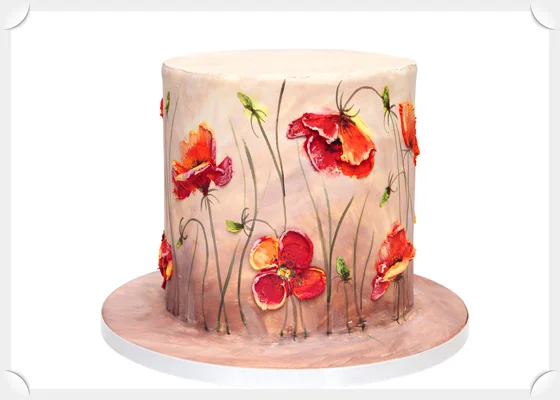
Fix an ivory ribbon around the cake board.
MISS MOLLY TUTORIAL

MISS MOLLY TUTORIAL

Author: VICKY TEATHER


FB Page : Yellow Bee Cake Co.

Skill Level: Beginner
You will need:
  • 2 Wooden skewers
  • 2mm thick aluminium wire (I purchase it from the florist section in Hobbycraft)
  • Hot glue gun
  • Thick cardboard
  • Scissors
  • White florist tape
  • Polystyrene dummy
  • 80g Saracino White modelling chocolate
  • Saracino modelling paste: Black, Brown, Red, 175g Skin Tone, 55g White
  • Saracino gel colour: Brown, Skin Tone, Yellow
  • Saracino Dust colour: Black, Brown, Pink, Red
  • Craft knife
  • Dresden tool
  • Small ball tools
  • Rolling pin
  • 5mm Circle cutter.
  • Colour 175g of Skin Tone modelling paste with the Skin Tone gel colour.

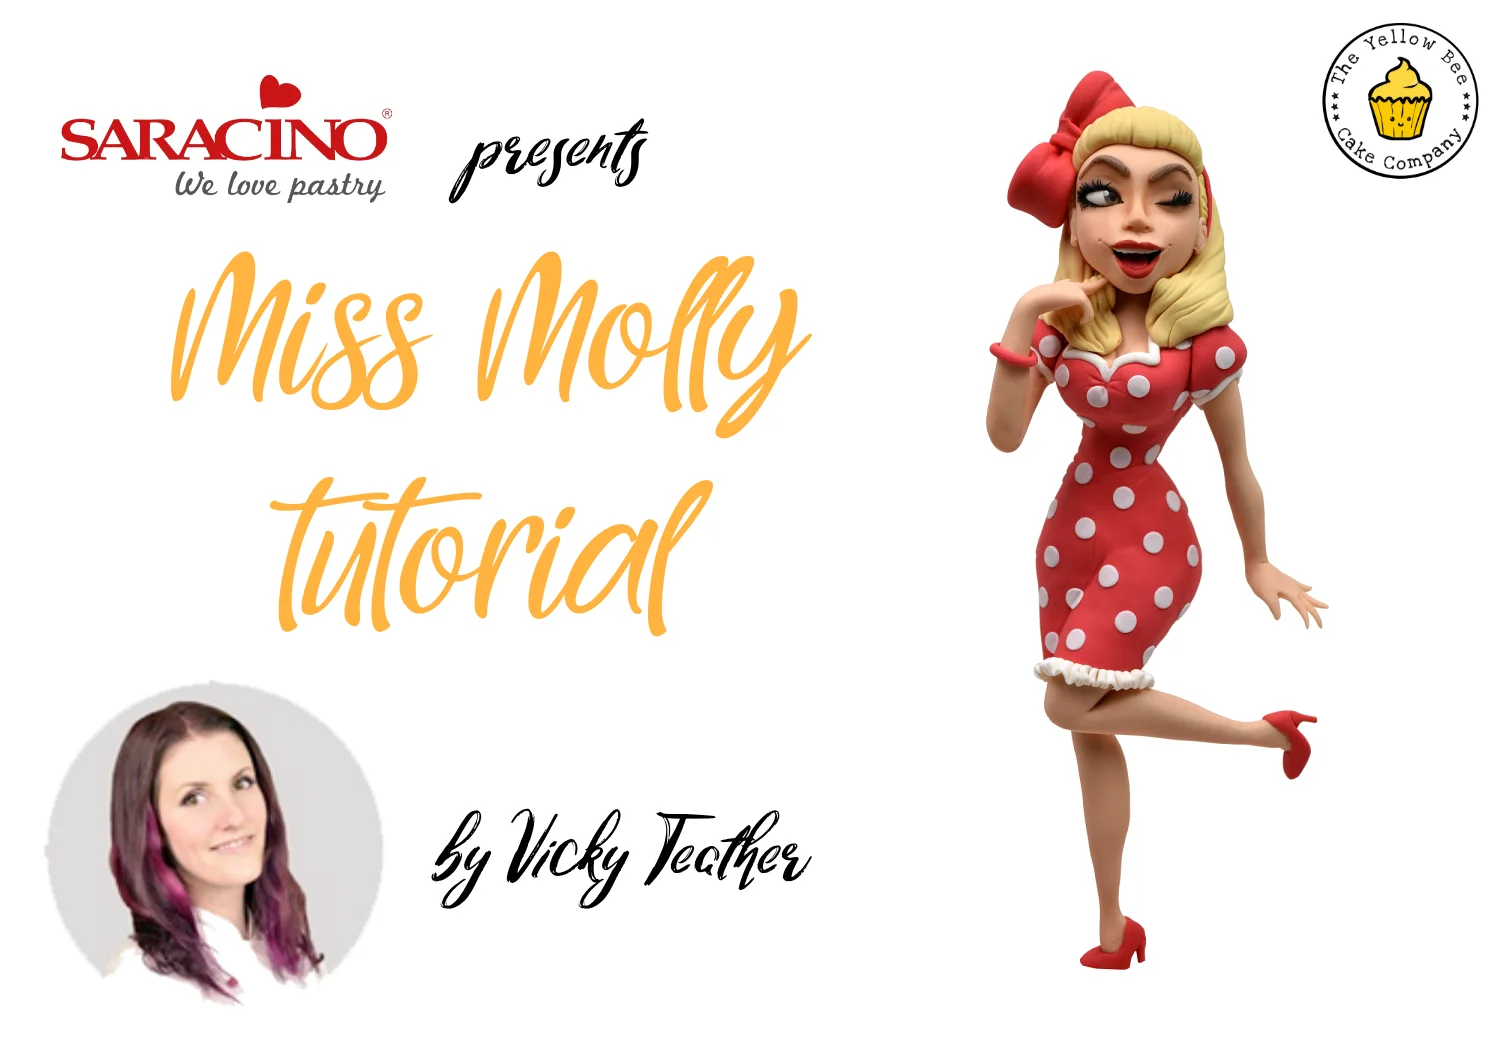
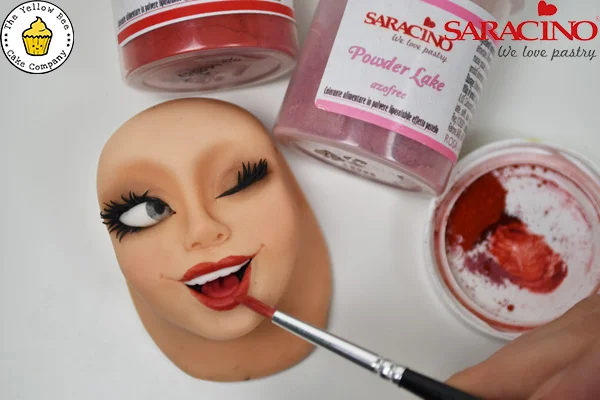
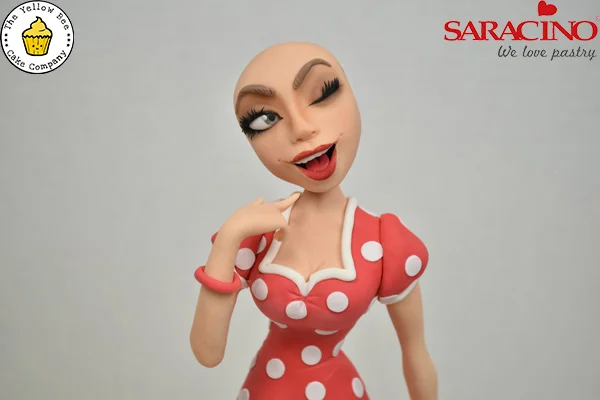
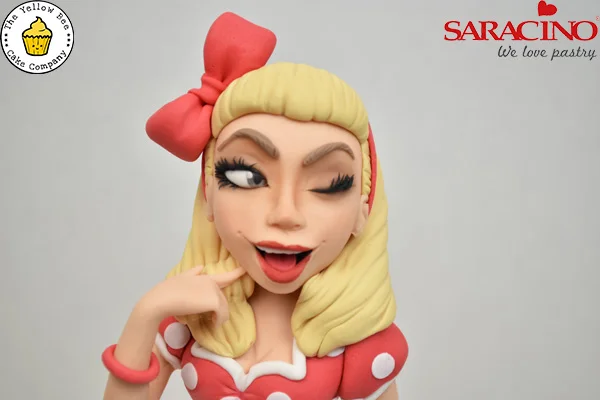
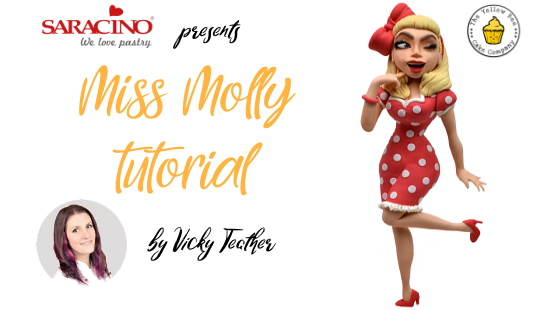
In this tutorial Vicky Teather from the Yellow Bee Cake Co shows you how to create Miss Molly. You’ll learn to work with armatures to create a gravity defying model.

Tip: If you’re a bit clumsy, like me, let each section dry and harden before moving onto the next. It’ll mean you’re less likely to damage the work you’ve already done.

Step 1

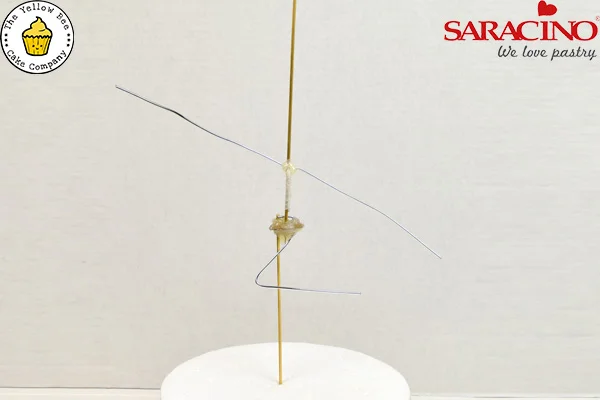
Cut out a 2.5 x 1.5cm oval from the carboard. Push a skewer (A) through the card towards the left side and the wire through the right side. Push the other skewer (B) through the centre of the card. Add a layer of hot glue around the top and bottom edge of the card to seal the skewer and wire in place. Trim the skewer (A) to 15cm in length plus the depth of the dummy. And the wire to 15cm. Cut two lengths of wire and attach to skewer (B) 6cm above the cardboard using the florist tape. Bend the wire at a right angle. Add more hot glue to keep it in place.
Step 2

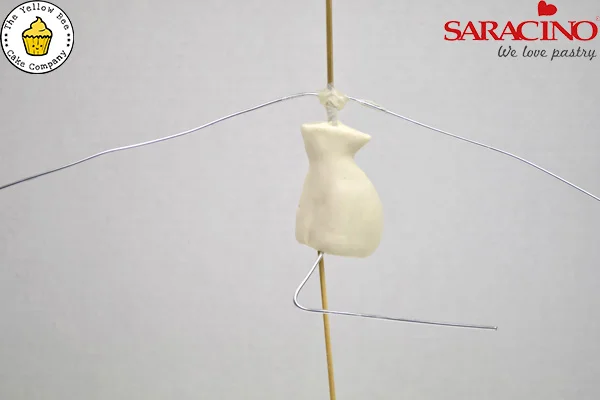
Mould 80g of White Modelling Chocolate around the centre of the armature. We will trim this later, so just get it as smooth as you can for now.

Step 3

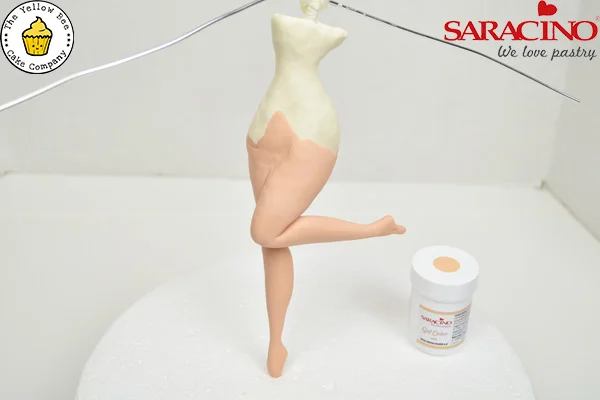
Dip the end of skewer (A) into edible glue. Push a 30g sausage of Skin Tone modelling paste up the length of the skewer until it reaches the modelling chocolate. Add a little glue to attach the modelling paste to the chocolate and then shape the paste into a leg. Trim away excess paste from the top and bottom of the leg.

Step 4

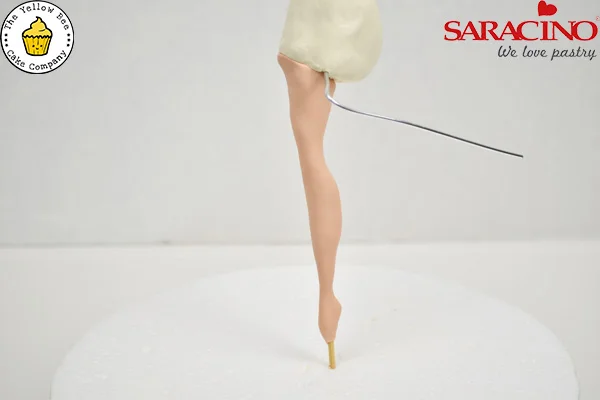
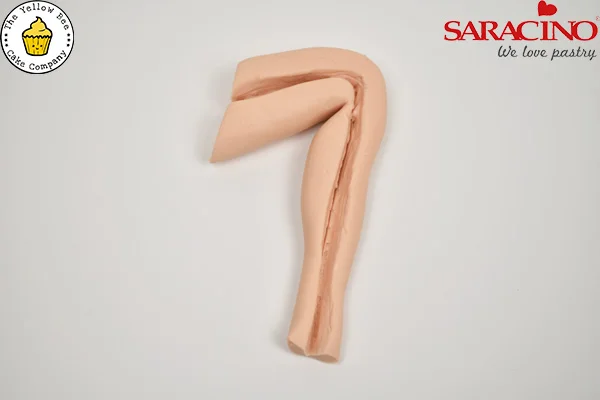
Shape 30g of Skin Tone modelling paste into a bent leg shape. Use the craft knife to cut a line into the back of the leg. Paint glue inside the cut and then glue in place around the 15cm long wire. Use your fingers to blend the seam, followed by a dresden or silicone tipped tool.

Step 5

Shape the tops of the legs up onto the modelling chocolate body to create a flush surface. Trim away any excess modelling chocolate to achieve a smooth silhouette.

Step 6

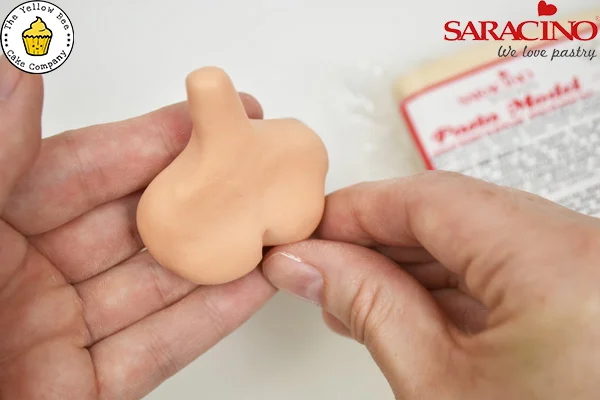
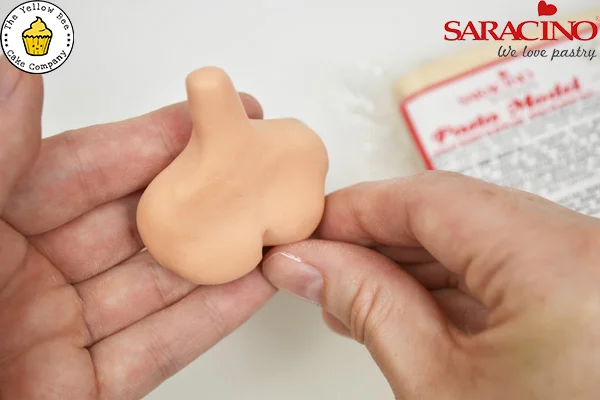
Roll 35g of Skin Tone modelling paste into a ball. From one edge begin to pinch and roll the paste to form a neck. Flatten the opposite edge from the neck and press a dresden tool into the paste to create the beginnings of the bust.

Step 7

Use your fingers to round off and shape the bust. Shape the neck line by flattening and squaring off the shoulders.

Step 8

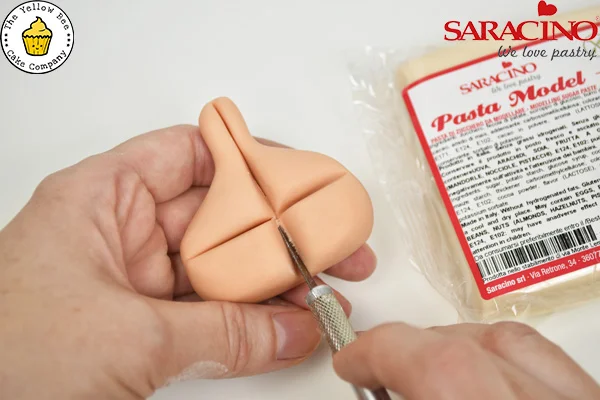
Flip the body chest over and press against the wire frame to indent the pattern from the armature. Cut along the marks and then attach with a little glue to the armature.

Step 9

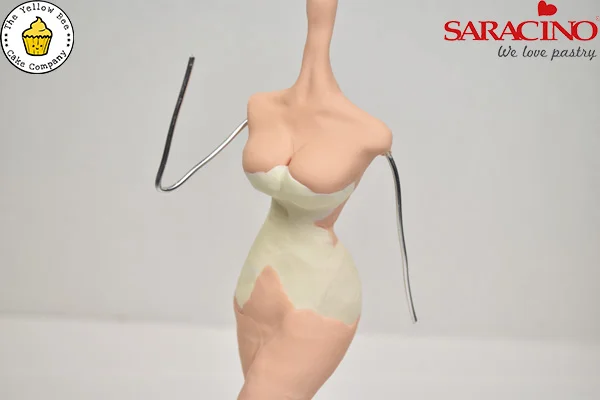
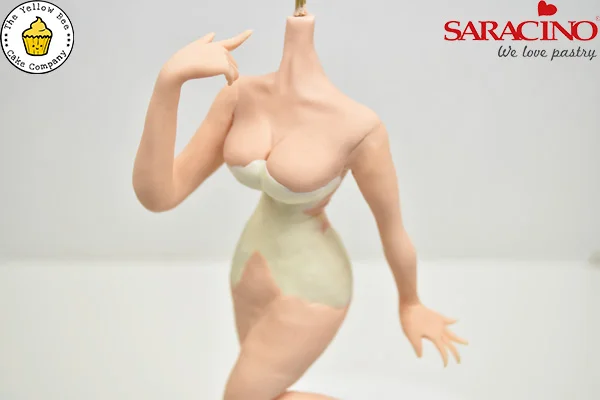
Blend the chest into the modelling chocolate body to create a smooth silhouette. Add more modelling chocolate underneath the bust to round them off. Use the dresden tool to mark the cleavage lines and the collarbone. Bend the arm wire into position.

Step 10

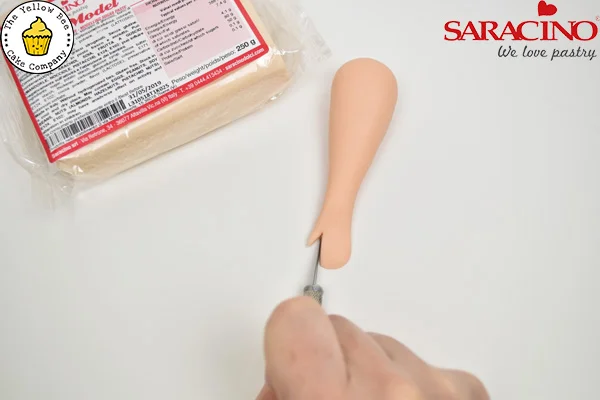
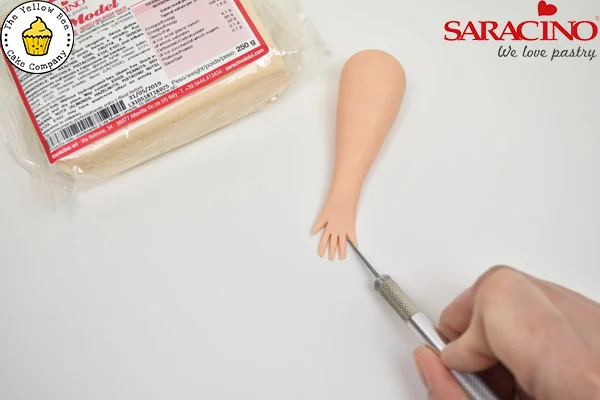
Shape 20g of Skin Tone modelling paste into a spoon shape. Gently flatten the wide spoon end into a hand shape. Cut away a triangle from the left side of the hand. Use your fingers to smooth around the cut edges to round them off.
Step 11

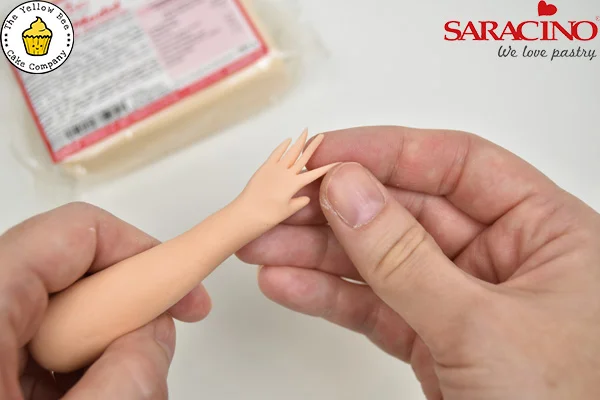
Stretch out the area of the hand where the fingers will be. Then cut in half and then half again to reveal the fingers.


Step 12

Roll each finger in between your fingers to round off the cut edges. Flip the hand over and press the wide end of the dresden tool into the palm between the thumb and index finger.

Step 13

Cut the arm wires to 7cm in length, bend the left wire half way along. Dip the right arm wire into edible glue and then feed the arm up over the wire. Use your fingers to shape the arm and wrist, cutting away any excess paste. Blend the top of the arm to the chest. Create a second arm, but this time follow step 4 to attach to the bent wire.


Step 14

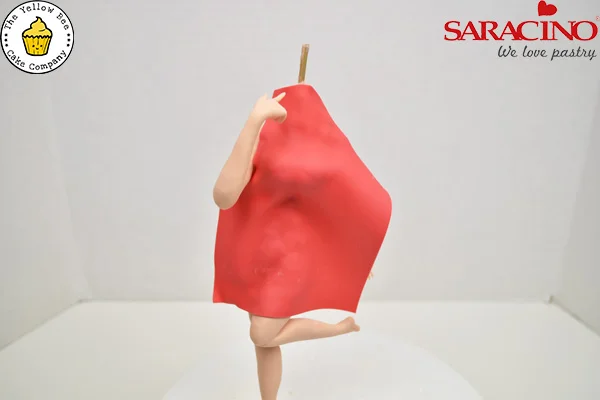
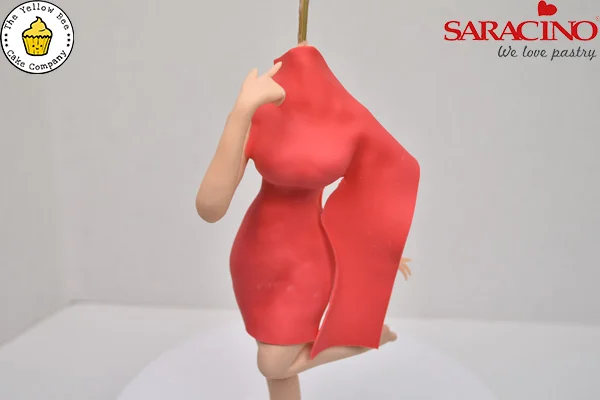
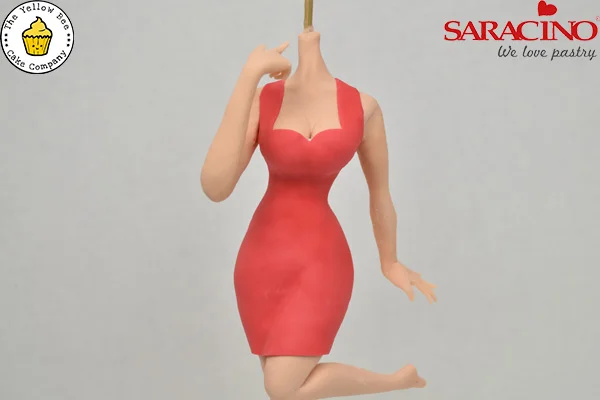
Roll out Red modelling paste to a 1mm thickness. Cut out a rectangle of paste and attach to the front of the model. Use your fingers to shape the paste, so that it fits around her curves.

Step 15

Use the craft knife to trim the paste, so that the seam lies against her side. Just like you would find in actual clothes.


Step 16

Trim the paste to reveal the neckline and sleeves. Cover the back of the model in the same way.

Step 17

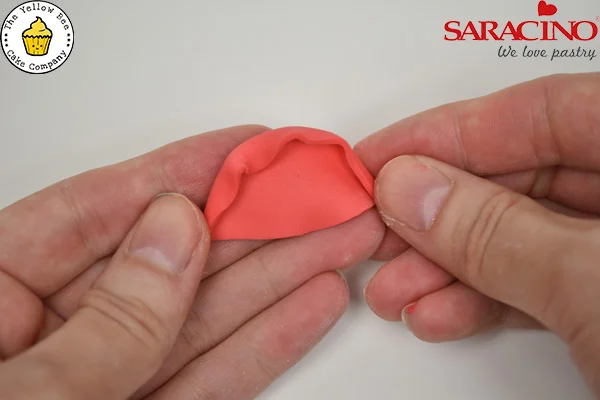
Roll out the Red modelling paste to a 1mm thickness. Cut out a semi-circle and fold the rounded edge over with your fingers.


Step 18

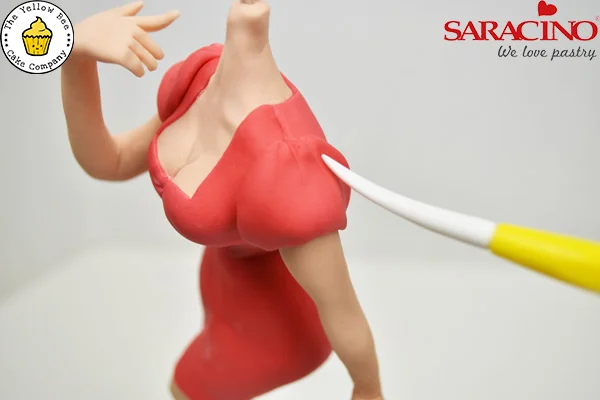
Glue the semi-circle in place at the top of the arms and use the dresden tool to mark creases. Repeat with the second arm. Roll out White modelling paste as thinly as possible and cut out 5mm circles. Glue the circles in place over the dress and sleeves. And add small sausages of paste around the sleeves and neckline. Roll a long thin sausage of White modelling paste and flatten with a rolling pin. Trim the paste to around a 1cm width and then gently gather into a concertina shape. Trim away one edge and then glue in place around the base of the dress.

Step 19

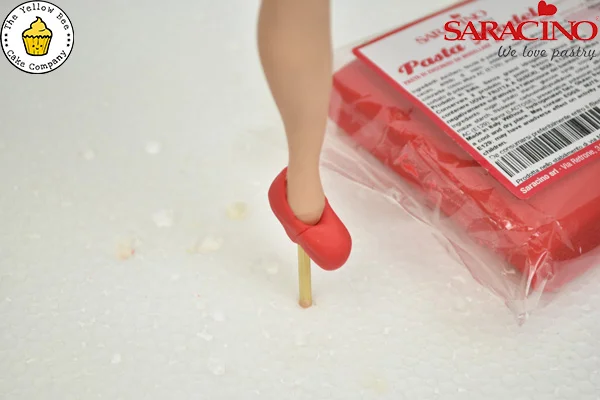
Shape a small marble of Red modelling paste into a sausage. Glue in place around the bottom of the foot. Use your fingers to blend the seam created. Shape the paste into a shoe. Add a small cone for the heel.


Step 20

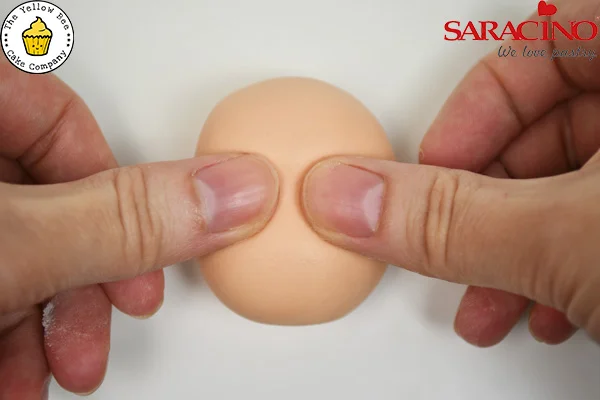
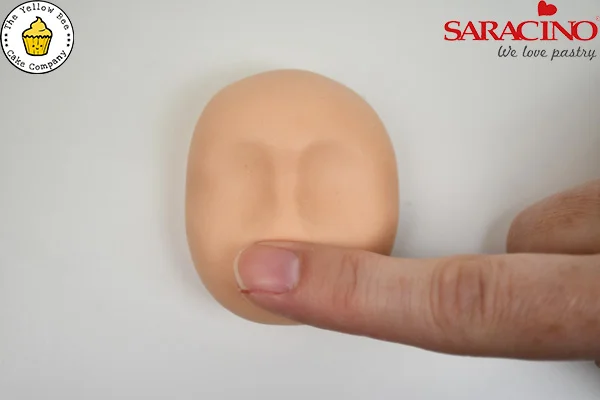
Roll 40g of Skin Tone modelling paste into a ball. Place the side of your finger half way up the ball and rock back and forth to create a shallow groove. Place your thumbs or a ball tool into the groove, leaving a 5mm gap between and lightly press to create the eye sockets.

Step 21

Lightly press down to create the bridge of the nose. Then use your fingers to shape the tip of the nose and define the bridge.


Step 22

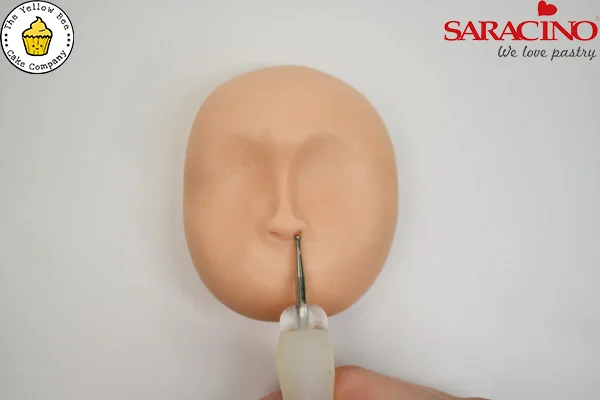
Lightly press down on either side of the tip of the nose to shape the nostrils, then press a small ball tool into the nostril. Use the wide end of the dresden tool to mark the crease around the edge of the nostril.

Step 23

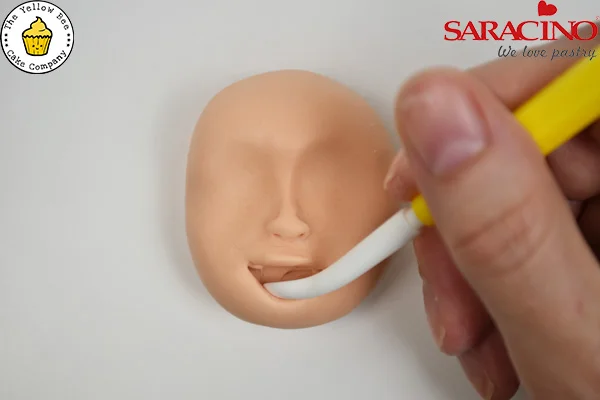
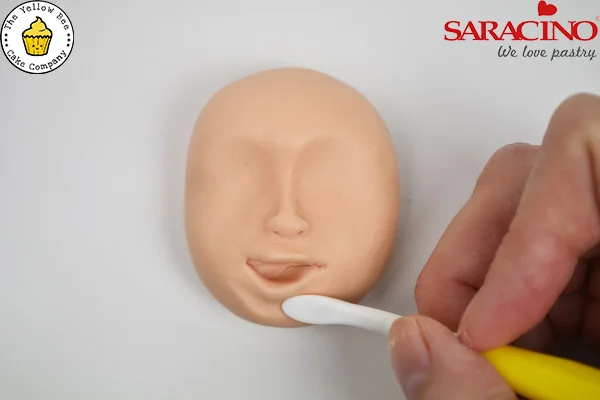
Use the craft knife to cut a smile line half way between the nose and chin. Press the blade into the cut and gently prise the lips apart. Use your finger to gently press the top edge upwards to create the upper lip. Pull the mouth open with the dresden tool.


Step 24

Press the dresden tool into the chin to create the bottom lip and chin area.

Step 25

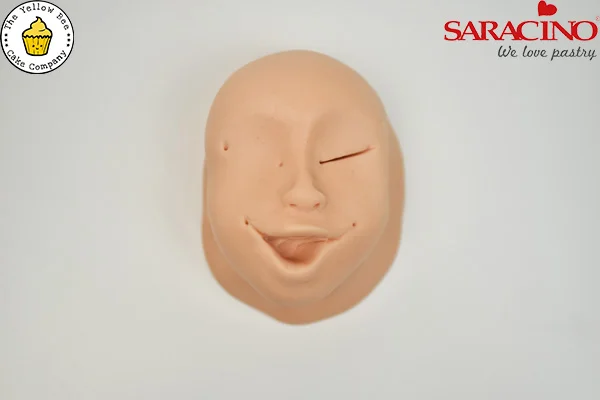
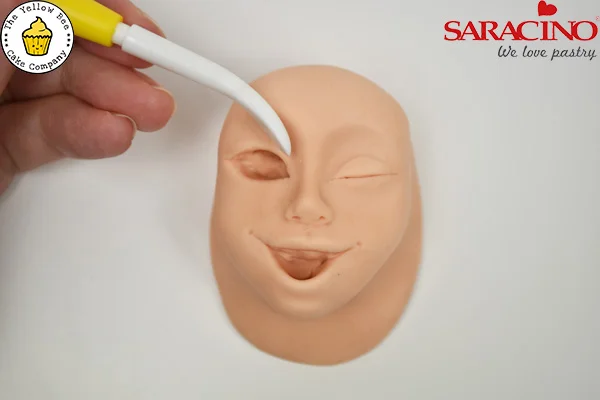
Use a scribe tool to mark the creases in the side of the smile and then press a small ball tool in to add the dimples. Use your fingers to shape the chin and sides of the face by pushing the paste down and away. For the eyes press the mini ball tool into the eye sockets to create guide lines for where the edges of the eyes will sit. Cut a straight line between the two dots on the right eye.


Step 26

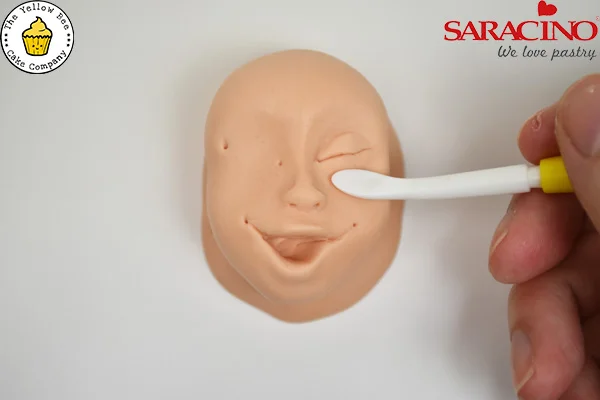
Place the blade into the cut and gently pull the paste away from the central line. Then use the dresden tool to mark a crease for the upper eyelid and the same for the lower eyelid.

Step 27

Cut out an almond shape using the two dots for guidelines and then use the dresden tool to shape the eye socket.


Step 28

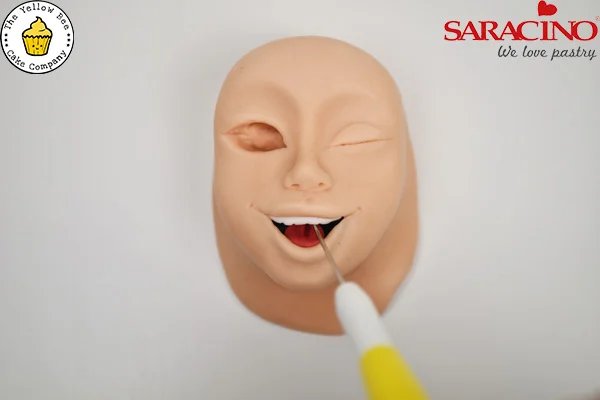
Fill the mouth with a small amount of Black modelling paste. Then roll a small cone from Red modelling paste and glue in place on the lower edge of the mouth. Add a fine strip of White modelling paste along the top edge and use the scribe tool to mark the teeth. Press the dresden tool into the centre of the tongue to mark the central groove.

Step 29

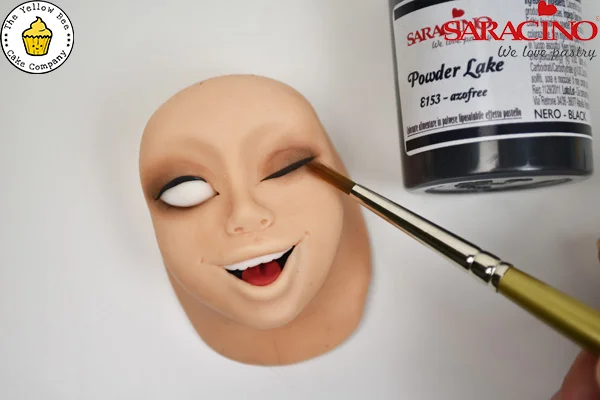
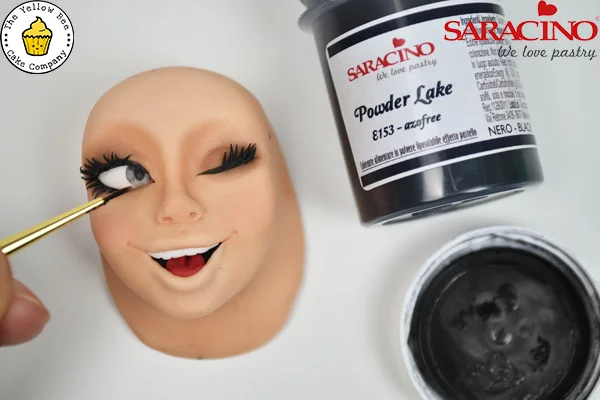
Fill the open eye socket with a small piece of White modelling paste. Add a thin tapered sausage of Black modelling paste to the lash line on both eyes. Lightly dust around both eyes with the Black dust colour.


Step 30

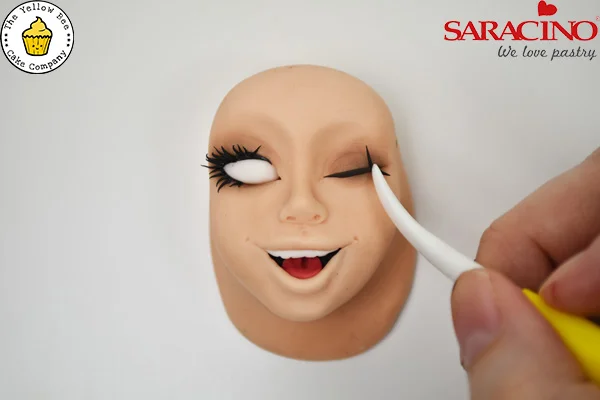
Roll very, very fine tapered sausages. Paint a little glue onto the lashline and then press the centre of the sausage in place. Use the dresden tool to fold the two ends in place.

Step 31

Mix a little clear alcohol with the Black dust colour to create paint. Paint the outer edge of the eye, and then pull the colour in towards the centre of the pupil. Add a pupil to the centre. Then finish with a small dot of White modelling paste.


Step 32

Mix Pink and Red dust colour together and add a little clear alcohol. Paint the lips. Then dust the cheeks and tip of the nose with the Pink dust colour.

Step 33

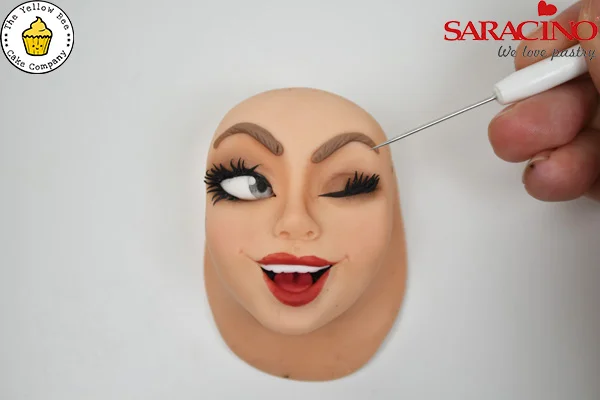
Combine a small amount of Brown modelling paste with White modelling paste. Roll into two fine tapered sausages and glue in place above the eyes. Use the scribe tool to mark hair lines over the surface.


Step 34

Trim away the excess paste on the back of the head and then attach the head to the body. Trim the neck if required. Shape two ears from tiny balls of Skin Tone paste and glue in place.

Step 35

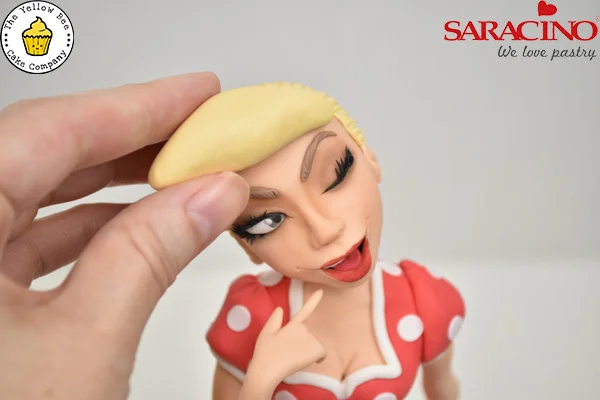
Cover the back of the head with a thin layer of golden paste (mix Yellow and Brown gel colour to achieve this shade). Use the dresden tool to add texture to the paste. Shape 5g of golden paste to cover the forehead. Add lines to the paste and then glue in place.


Step 36

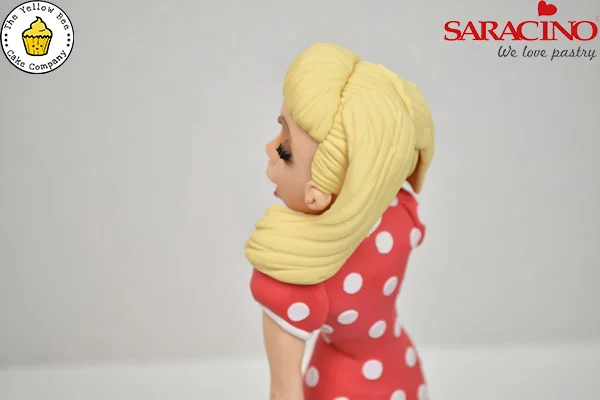
Roll three tapered sausages from 10g of golden paste each. Flatten between your hands and then draw lines with the dresden tool. Attach one on either side of the head, folding and twisting the paste as you work and the third to the back.

Step 37

Add a thin strip of Red modelling paste to cover the join lines in the hair and then add a small decorative bow to the left side of the head.


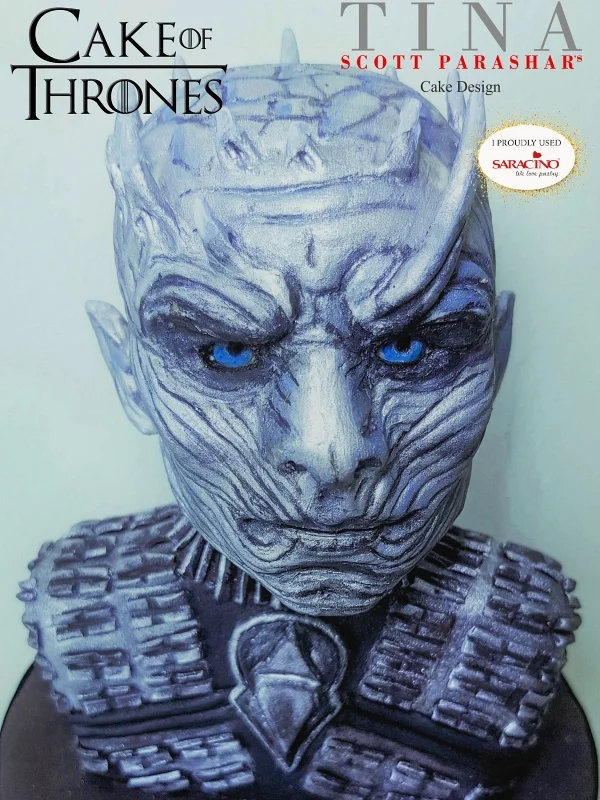
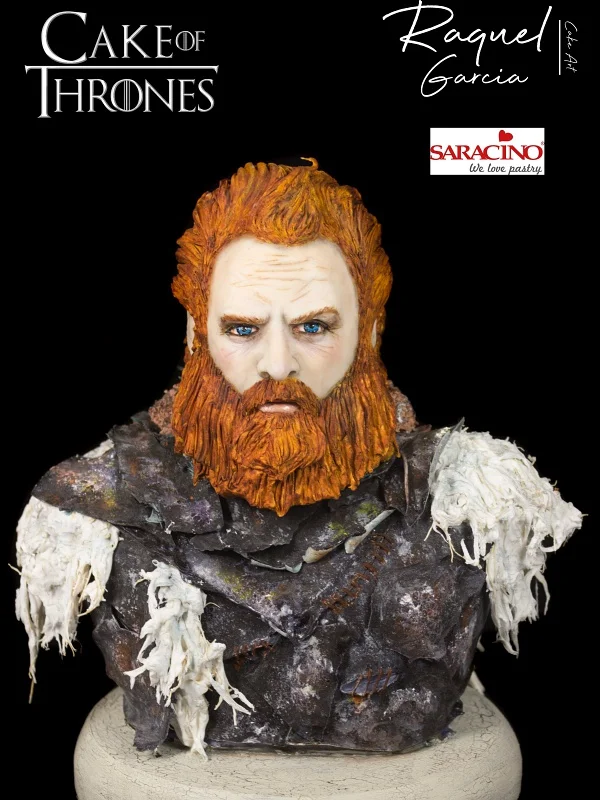
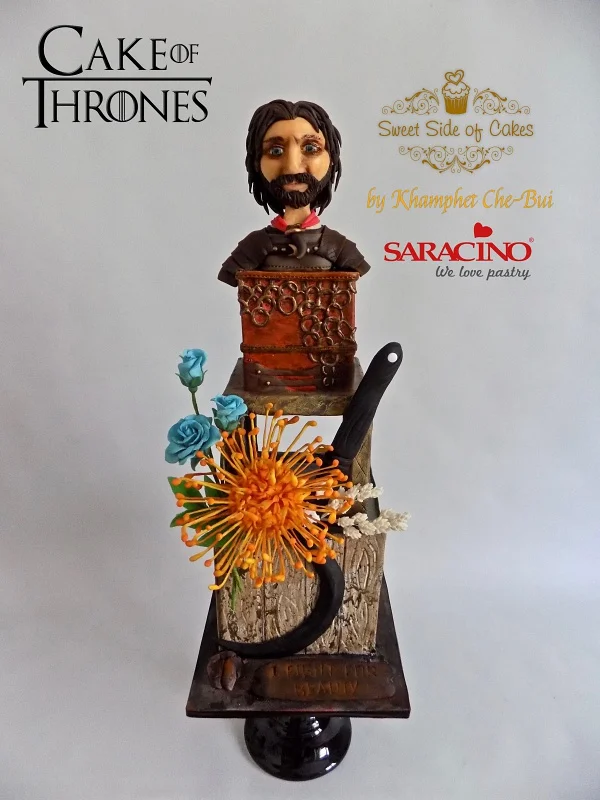
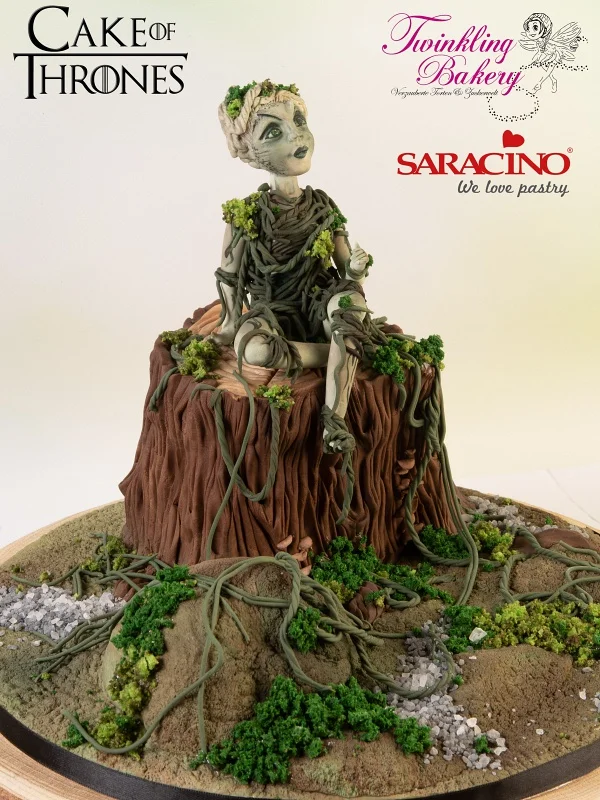
Cake Of Thrones

Cake Of Thrones

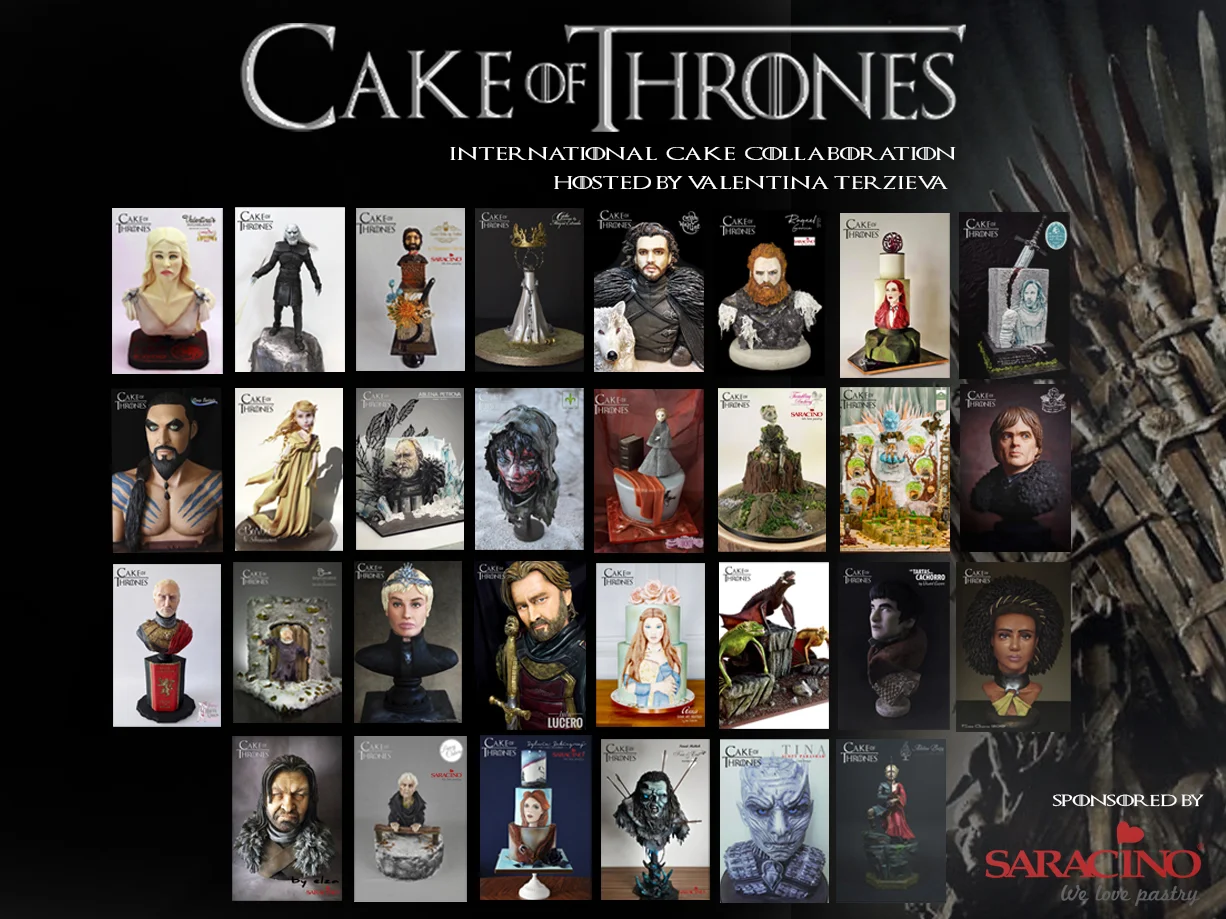
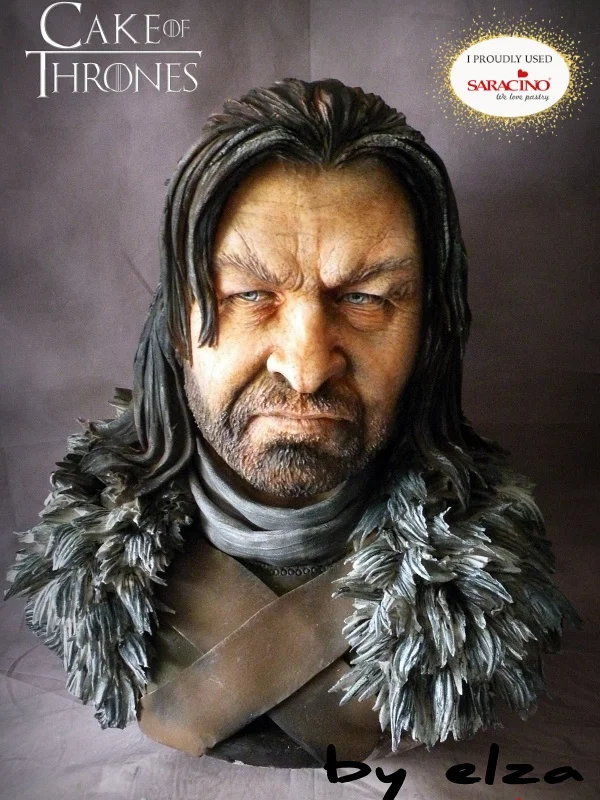
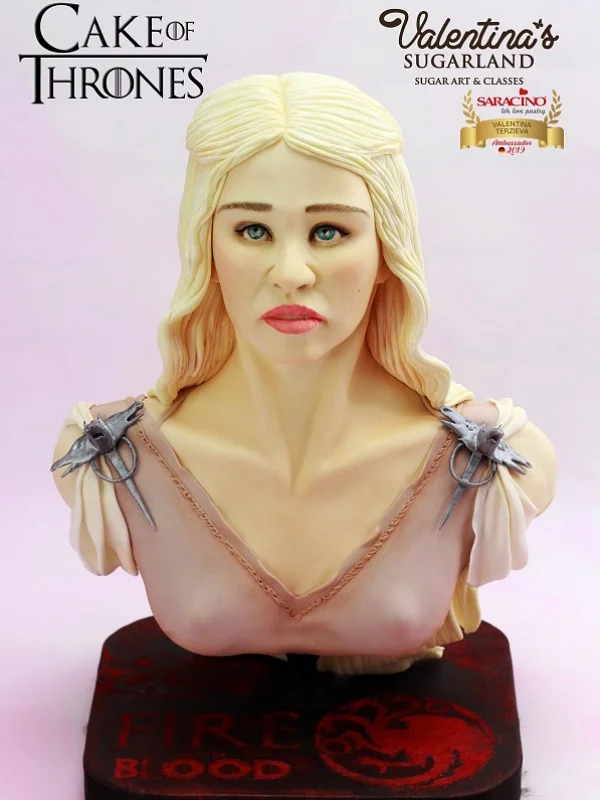
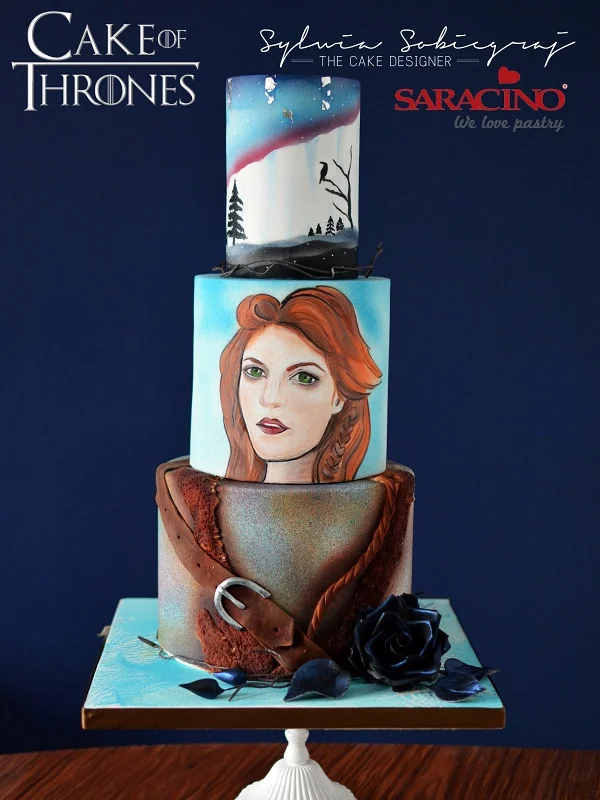
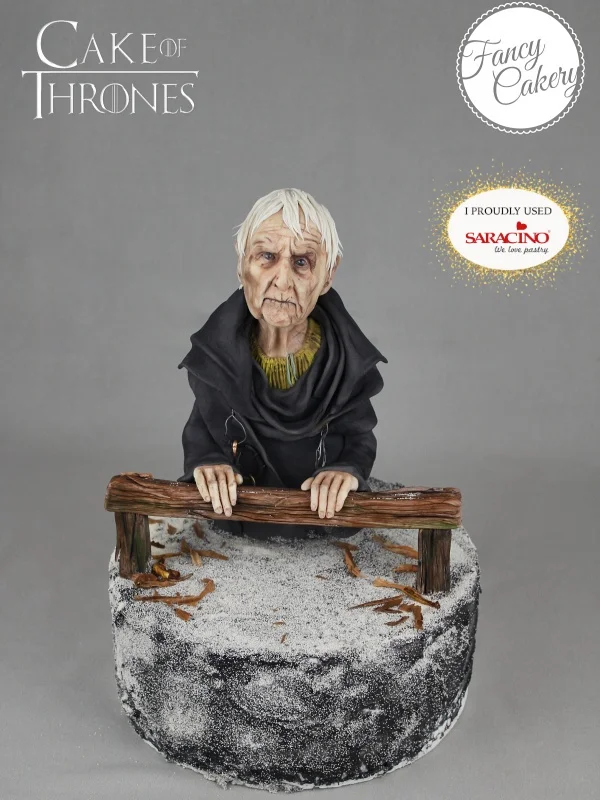
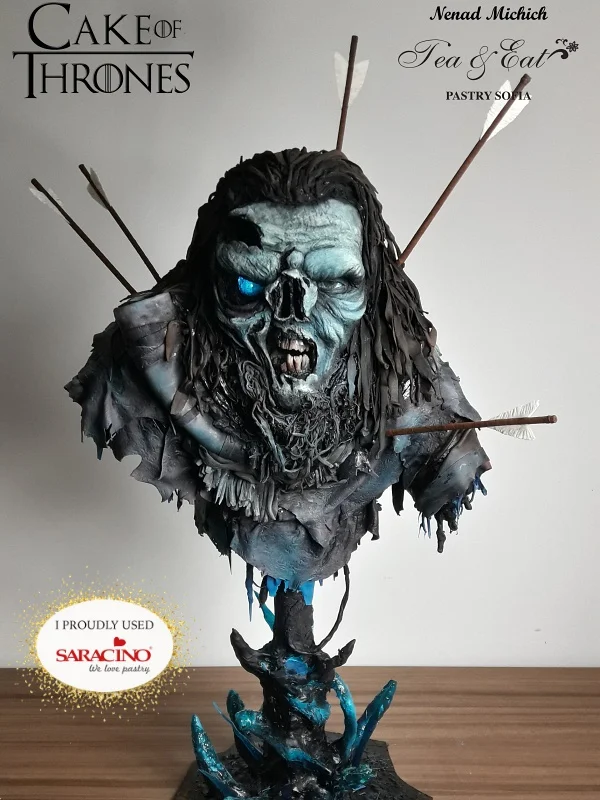
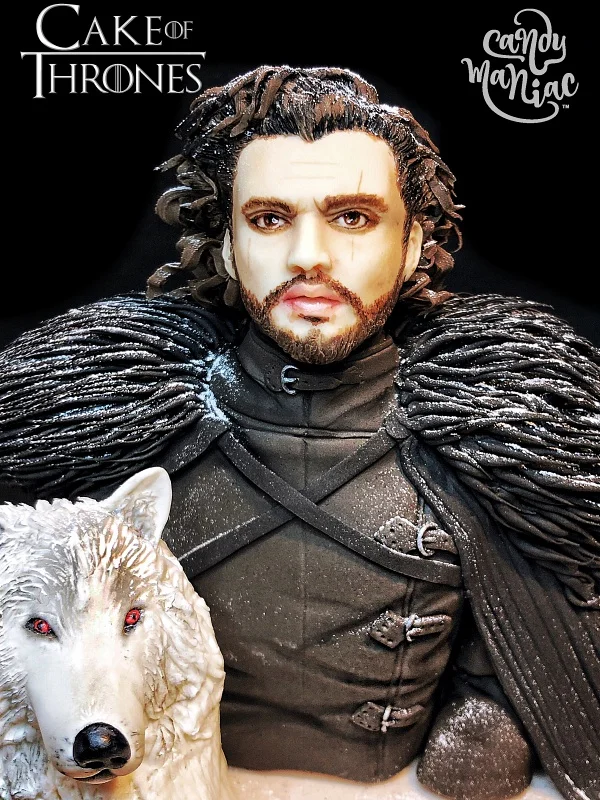
Saracino is extremely proud to be a Sponsor of this amazing Game of Thrones collaboration hosted by our Ambassador Valentina Terzieva.

See all the amazing pieces made using our products from amazing sugar Artist’s from around the world. All to celebrate one of the most popular shows on TV ‘Game of Thrones’.

‘Winter has come’ Thanks to


Elza Baldzhiyska aka The Nightwitch ‘s cakes

Valentina Terzieva aka Valentia’s Sugarland

Ainta Cappello aka Fancy Cakery

Tina Scott Parashar aka Tina Parashar’s Cake Design

Raquel GarcĂ­a aka Raquel GarcĂ­a – Cake Art 

Khamphet Che-Bui aka Sweet Side of Cakes

Nadine Globig aka Twinkling Bakery 

Nena Michich – Tea & Eat Pastry Sofia

Mania Mistiloglou aka Candymaniac

Congratulations On Your Amazing Creations!

Take Your Time And Enjoy Looking At These Amazing Cakes And Creations.

To Watch Click HERE

Join Our Newsletter

We’d love to send you the latest news, discounts & exclusive offers via email! By signing up below you are confirming you are happy for Saracino to send you marketing emails. We will always treat your personal details with the upmost respect & will never sell your details to other companies for marketing purposes.

• All the latest industry news   • FREE video tutorials   • Exclusive product offers

Products         Tutorials          Ambassadors           Events           Blog           Showcase         Contact


SARACINO Ambassadors – Team UK 2019

SARACINO Ambassadors – Team UK 2019

You may have noticed on Social Media that recently we have been sharing profiles of our amazing team of Ambassadors. We are proud to have Ambassadors from all over the world and thought you may like to learn a bit more about some of them. If so, please read on….

You may ask why and how we choose our Ambassadors?

One reason is we love working with different artists who all have differing opinions and views of the cake decorating world. People who have various talents, people who have different views on art and present it in various ways. We choose Artists that use Saracino products because they love working with them.

Our team has been built with Artists who love using Saracino products. As individuals they have their own styles and preferences and all enjoy working in differing ways with various materials. We try to provide them with the chance to grow and promote themselves on our ever growing social media to give themselves and Saracino positive publicity.

This post is dedicated to some of our team. Artists who regularly blow us and you away with their talent, people you follow daily, Artists you learn from, and, people that are proving that almost everything is possible if you really want it. Hard work and dedication always leads to results and this group of Ambassadors are a perfect example of it.

We would like to take this opportunity to introduce them to you once again. We have a team of world class Artists whom we are immensely proud of.

This blog is about our UK Team that currently consists of 12 Ambassadors. They all possess differing skills that hopefully demonstrates the versatility of the products available in the Saracino range. We are also finding that using our products these Artists are branching out to learn new skills as new products become available. Such as flower making, modelling, wafer paper work and sculpting.

So here goes! Let us introduce you to our UK team. Trumpet fanfare please……….

Please don’t forget to LIKE their Facebook pages and follow them (if you don’t already).

Anjali Tambde aka Global Cake Toppers –

Anjali joined us in 2017.

Anjali Tambde is a multi award winning cake artist who won Best in Show and several other Gold awards at Cake International and the Irish Sugarcraft Show. She is also one of the few artists whose tutorials regularly featured in Cake International and currently in various other Magazines. Her award-winning fantasy flower techniques have featured in many international magazines and have been immensely popular.

Anjali came to our attention with beautiful toppers created using Saracino Modelling Paste. Within a few years she has expanded to create beautiful fantasy flowers using Saracino Top Paste. Anjali is also a teacher. We had the privilege to welcome Anjali to our stand at the Cake International Show In Birmingham for the last 2 years where she ran mini classes that quickly sold out.

Anjali has also recently become a Cake International Judge. A high achievement indeed!

Calli Hopper aka Calli Creations –

Calli joined the Saracino team in 2017.

Calli has been cake decorating since 2010 and is hugely passionate with her art.

In that time she has won many awards at shows and has been featured in several magazines globally. Her highlight is the prestigious Cake Masters “Cake Artist of The Year 2015”.

Calli stole our hearts when we saw her love to Saracino and using all our products. Calli is a world leader when it comes to hand painting cakes and flowers. A true Artist.

Cassie Brown aka Cassie Brown –

Cassie joined Saracino family this year.

Her love of Saracino started using our Flower Paste. She started cake decorating just aged 13 and won her first award just aged 14, she has been hooked on cake decorating ever since.

After running a successful wedding cake business and winning several “Best in Shows” she started to teach. Cassie is also a Senior Cake International Judge. At the moment Cassie’s focus is on YouTube and giving more talks and workshops worldwide to share her love of our product and promote her amazing skills.

Oh and we should also add that Cassie is a successful published Author of beautiful books.

Gareth Davies aka Let The See Cake–

Gareth joined our team this year.

Gareth is the owner of LetThemSeeCake and is a multi award winning Sugarcraft Artist.

His love of Saracino started when he used Modelling Paste for the first time. Since then he has not looked back. Gareth successfully runs classes where he passes on his passion and enthusiasm to cake designing. His whimsical work has brought him many awards including winning five Gold Awards and one Bronze at Cake International in London and Birmingham.

Lynsey Wilton-Eddleston aka Sugarwhizz–

Lynsey joined our family in 2017.

Lynsey is the creator of Sugarwhizz.

She is a multi award winning cake artist from St Helens, England. A self taught creator of Sugarwhizziness who discovered the world of cake art purely by chance back in 2010. Lynsey has been introduced to Saracino products in 2017 and since then never looked back.

Lynsey regularly creates amazing tutorials that are available on her website. She is also very proud to have been asked to be a trainee judge for Cake International.

Melanie Williamson aka The Custom Cakery–

Melanie joined Saracino at the beginning of this year.

Melanie has been working with cakes for 6 years. Mostly self-taught she began making cakes for her own children and gradually her passion lead to her business, The Custom Cakery, being formed.

Specialising mostly in fun celebration cakes she also enjoys teaching classes from her studio in Doncaster. Her love of Saracino products started a few years back. Melanie creates beautiful models but has also recently started her adventure with hand painting cakes using Saracino Cocoa Butter and Saracino Powder Colours.

Sarah Bray aka Daisy Cakes–

Sarah joined us this year.

Sarah enjoyed cake decorating for a number of years and has been running Daisy Cakes since 2012 making novelty cakes and cupcakes.

She has entered many competitions in the cupcake and miniature wedding cake category winning a number of golds, silvers and being placed several times. She was also a finalist in the 2018 Cake Master Awards in the cupcake category. Her miniature creations are the sweetest art you can imagine. Everything is incredibly tiny and cute. Sarah loves to use Saracino products such as Modelling Paste, Gel and Powder Colours that help her make the impossible possible.

Vicky Teather aka Yellow Bee Cake Co–

Joined our family in 2017.

Vicky aka Yellow Bee Cake Company, is an award winning cake artist. She spends the majority of her time creating tutorials and teaching sugarcraft classes at her home in Basingstoke, Hampshire. She is a multi award winning artist creating models and sculpting.

Her work is eye catching and very cute. Vicky believes in Saracino products and proudly uses them to create her pieces.

Zee Chik aka Zee Chik Designs–

Zee joined us back in 2017.

Zee is a multi award winning cake artist and innovative sugarcraft equipment designer. She creates lots of free tutorials that are available on YouTube so make sure you follow her channel. Zee is also an inventor of various cake tools that can make your life easier. Zee loves the wide variety of Saracino products. Her strengths are modelling and flowers. As a qualified Architect she has a real eye for detail.

Zlatina Lewis aka ZL Cake Boutique –

Zlatina joined the Saracino team beginning of this year.

Cake decorating started in 2010 as a hobby for Zlatina but had been the love of her life since childhood when she baked her first cake at the age of 7. She is a multi award winning artist having won many gold medals. Since 2013 Zlatina has been running various classes teaching modelling, flowers and covering cakes. She uses a wide variety of Saracino products and proudly shares this love with her students.

Zoe Smith aka Bluebird-cakes –

Zoe joined us this year.

Zoe started cake decorating ten years ago making cakes for her two daughters. She now creates tutorials for Cake Decoration and Sugarcraft magazine, and has started to teach students from her cake studio.

Zoe is a true Instagram star with 670K followers which she uses to feed her interest in fairy tales and animation and find inspiration for her Sugarcraft figures. Her love of Saracino products started a few years ago.

Well that is our UK team.

You will have noticed they are a team of artists with various talents and skills. People that believe in Saracino products as much as we do. We are very proud to have this group of talented people in our family.

We asked our Ambassadors how they see their role of being a Saracino Ambassador. This is a sample of some of the comments we had back –

“A Saracino Ambassador is someone who loves the product and wants to share that and convince others to use it”. – Vicky

“Apart from the honour of being part of such an awesome team of talented people, it’s the chance to share how great the products are and what a difference they make to your creations” – Zoe Smith

“I think it’s about showing others what fantastic products they are and helping encourage people to try them out too. After all it’s easy to promote a product that you use all the time and actually sells itself. Oh and one more thing, like Zoe said being part of such a ridiculously talented team is a real privilege” – Sarah Bray

“It’s about showcasing Saracino products but also encouraging people to enjoy their creativity, to support their endeavours, whatever their skill level. I’ve loved Saracino since hosting Barbara here for a class a few years ago so to be able to endorse something with integrity and honesty was really important to me. Saracino makes my job as a cake decorator much easier and I want to share that far and wide” – Melanie Williamson

“Saracino gives me an opportunity to explore so many areas of cake decorating that I never felt confident to try before. Love the products and their versatility, and of course being among such inspiring talented artists.” – Calli Hopper

“To be an ambassador you have to believe in something completely. Not just the incredible products but the amazing people behind the products, the people you work closest with and the team as a whole. I believe completely in our Saracino family. So it’s an absolute honour being able to share my skills and knowledge with people who love our products as much as we do. I am inspired each and every day seeing what magic people can achieve with Saracino, I never stop learning. It’s a privilege to be an ambassador for a company I adore!” – Lynsey Wilton-Eddleston

“Love Saracino’s products! I have been using them since 2014 and the quality has never failed.. Just as Cali mentioned, the top quality and versatility gives me so much confidence when exploring new feelds and most of all when working with my students. I promote the products and the company with pride.. and being in a team with the most talented decorators is a privilege” – Zlatina Lewis

Please make sure you check the pages and profiles our incredibly talented team and follow their work.

You will soon be able to meet them in person at the next Cake International Show in Birmingham where they will be running free demonstrations at the Saracino Stand. So come along and join us.

We believe in our Artists and we believe that with Saracino everything is possible.