PASTA BOUQUET

PASTA BOUQUET

PASTA BOUQUET – sugar paste designed for making flowers


PASTA BOUQUET DESCRIPTION

Saracino Pasta Bouquet is a ready-to-use product. It must be rolled very thinly with the help of a rolling pin to make very realistic flowers. Our Pasta Bouquet is extremely elastic and does not crack, adapting perfectly to flower moulds while retaining all the veins. This is also given by an initial stiffening of the paste whilst the flowers are forming but does not dry out immediately, offering time to correct any imperfections or mistakes.  It has a light vanilla aroma and taste and can be easily coloured using gel or powder food colourants.

FAQ – PASTA BOUQUET

FAQ – PASTA BOUQUET

  1. IS IT A NEW VERSION OF SARACINO MODELLING PASTE?No, it isn’t. It is a brand-new product for creating flowers and foliage.
  2. WHAT IS ITS MAIN USE?It was created specifically for the production of flowers and other decorative elements that require great subtlety
  3. IS IT GLUTEN FREE?Yes, it is. Just like all Saracino products.
  4. DOES IT DRY QUICKLY?It dries less quickly than our Modelling Paste and this characteristic allows the composition of the flowers when the individual elements are not yet completely dry.
  5. DOES IT HARDEN?Yes, it does. Once stiffened, the flowers remain resistant and compact. In the original packaging, the product is slightly soft.
  6. HOW CAN I START WORKING WITH PASTA BOUQUET?You just need to roll it with the help of a rolling pin.
  7. CAN I MODIFY THE FLOWER AFTER A FEW DAYS?No, you cannot. Once the flowers dry, they can no longer be modified.
  8. IS IT EASY TO MODEL?Modelling is very simple and just as easy as placing the product in moulds to obtain petals and leaves.
  9. HOW CAN I MODEL SARACINO BOUQUET PASTE?You can easily work it with your hands and roll it with a rolling pin to thicknesses less than a millimetre.
  10. DO I NEED TO TAKE SPECIAL PRECAUTIONS BEFORE USING IT?We recommend washing your hands and drying them perfectly. If necessary, we recommend using a little corn flour on the hands and on the workspace to prevent the paste from sticking.
  11. DOES SARACINO PASTA BOUQUET COME IN DIFFERENT COLORS?At present, it is only available in white, but we are planning to expand our colour range as soon as possible.
  12. IN WHAT TYPE OF PACKAGE IS IT AVAILABLE?Currently it is available in 1kg buckets and in 250g packages.
  13. IS PASTA BOUQUET EDIBLE? IF SO, WHAT IS ITS TASTE?Yes, it is. It has a light vanilla aroma and taste.
  14. HOW CAN I STORE THE PRODUCT AFTER OPENING THE PACKAGE?For the buckets it should be kept in its original packaging with the lid closed. For the 250g paste, you should wrap the paste tightly in cling film to avoid contact with the air.
  15. WHAT IS THE MAXIMUM WORKING TEMPERATURE?We recommend you not using it with temperatures above 30 °


CUTE BEE TUTORIAL

CUTE BEE TUTORIAL

Skill level: BEGINNERS

You will need:

  • Saracino modelling paste : yellow, black, white, brown
  • Saracino powder colours: green, black, white, pink
  • Saracino wafer paper 0.27 mm
  • 24 and 22 gauge flower wire
  • Dresden tool
  • Small ball tool
  • Skewers and toothpicks
  • Roller
  • Cake dummy
  • Water and clear alcohol

Step 1

Depending on the size of model you need take an amount of yellow modelling paste and divide in half. One half leave for the head. The other half divide in half. Keep half for the torso. Divide the remainder into four for the arms and legs. Roll into smooth balls.

Step 2

Take two of the balls prepared for the legs. Roll using your fingers to form two tapered sausage shapes.

Step 3

Using finger pressure roll gently to define the ankles and form the feet.

Step 4

Using your fingers shape the large end to create the foot shape on each

Step 5

Push wooden skewers through each leg.


Step 6

Place legs on the dummy and cut the skewers to length.

Step 7

Take the ball prepared for the torso and roll to form an egg shape.

Step 8

Place the torso onto the shortened skewers.

Step 9

Roll out your black paste thinly and cut out thin black strips.

Step 10

Stick black strips around the torso (using a tiny amount of water if required) 

Step 11

Now take the two balls prepared for the arms. Roll them out with your fingers to a tapered shape. 

Step 12

Using gentle finger pressure roll at the wrist to form hands.

Step 13

Flatten palm of the hand with your pointing finger

Step 14

Cut thumbs using a triangle shape and then roll into thumb shape.

Step 15

Cut the fingers and gently shape them.

Step 16

Stick one arm to the shoulder with the hand in the front of the figure and the other with the hand on the back

Step 17

Take the head part of the paste and roll to an egg shape. Using your small ball tool make eye sockets – one is to be smaller than the other.

Step 18

Take a small amount of the white paste. roll into a ball and then place it into the eye sockets. Using your Dresden tool form a line beneath the left eye to add character.

Step 19

Dilute green Saracino powder colour with clear alcohol. Using a fine paint brush paint the iris.

Step 20

Dilute Saracino black powder colour with clear alcohol. Using your fine brush paint the pupil, eyelashes and brows.

Step 21

Take a small amount of yellow paste and blend onto the face to form a small cute nose.

Step 22

Using the sharp end of the Dresden tool shape the mouth.

Step 23

Dilute white Saracino powder with clear alcohol. Using a fine brush paint the teeth.

Step 24

Using your Dresden tool (spoon part) define the lower lip.

Step 25

Using a very small ball tool make the corners of the mouth.

Step 26

Insert a toothpick into the torso and fix the head in the right position.

Step 27

Now for the hair take a small amount of the brown paste and roll to make three tear drop shapes.

Step 28

Glue the teardrop shapes on the head to make the hair. Cut short lengths of the 22 gauge flower wire. Roll out very small balls of the yellow paste and push to the top of the wire to make antennae’s. Place them on the head of the bee.

Step 29

Using pink Saracino powder colour and a soft brush lightly dust the cheeks.

Step 30

For the flower stalk cut a small length of 20 gauge flower wire. Roll a small ball of yellow paste and fix the the end of the wire. Use your Dresden tool to add a fine texture to the ball.

Step 31

Roll out fuchsia paste thinly and cut two small flowers using a flower cutter.

Step 32

Thread the flowers onto the flower wire.

Step 33

Make the bee look like it holding the flower by inserting the end of the wire into the hand.

Step 34

Cut two small wings from Saracino wafer paper.

Step 35

Glue the wings to the back of the figure using a small amount of water.

DECORATING EASTER COOKIES

DECORATING EASTER COOKIES

Skill level: BEGINNERS

Royal Icing Consistencies:

  • Stiff: for contour and volumes
  • Medium: to fill

You will need:

  • Saracino Royal Icing – Stiff: for outline and volumes
  • Saracino Royal Icing – Medium: For run-outs / filling.
  • Saracino Gel Colours: yellow, orange and green
  • Saracino Powder Colours: blue, black, yellow, orange, brown and green
  • Black edible pearls
  • Brushes: 20/0, 4 and 8
  • Needle tool
  • Piping nozzles: 1, 2, 3 and leaf
  • Piping bags
  • Pencil
  • Parchment paper
  • Clear alcohol
  • Round cookie

Step 1

Transfer your template to a piece of parchment paper using a pencil (lead free).

Step 2

Transfer the template to your cookie by placing the parchment paper over the cookie and outline the drawing with the pencil.

Step 3

Using the previously mixed stiff royal icing fill your piping bag and using a No. 2 piping nozzle outline the top eggshell and the eyes.

Step 4

Repeat the process on the bottom eggshell.

Step 5

Fill the inner of both eggshells using ‘let down’ royal giving a flowing consistency. Piping nozzle No. 3 should be used here.

Tip: To achieve the perfect run-out consistency the Royal icing should be ‘let down’ to give a flowing consistency. When you mix and lift your spatula the Royal should level and flow into itself in a count of 10 seconds. It can be let down with a small amount of water or pre-mixed diluted Albumen.

Step 6

Sometimes when we pipe air bubbles form. If this happens they can be popped using a needle tool. Allow to dry.

Tip: You can use a cocktail stick instead of the needle tool.

Step 7

Allow the shells to dry slightly and form a ‘crust’. Repeat the same process for both eyes and place one black pearl on each eye before the royal icing dries.

Step 8

Carefully, using piping nozzle No. 1 (or even the end of a cocktail stick) make one small dot of white royal icing on each black pearl.

Using the Yellow Gel, colour some of the White Royal Icing and put in a piping bag with nozzle No. 2. Outline the body  

Step 9

Pressure pipe the feathers for the wings using the ‘Stiff’ Royal mix. Apply even pressure when piping so you achieve a smooth finish. The feathers should have definition between each one. 

Step 10

Run-out the inner of the chick body using flowing consistency Royal Icing and piping nozzle No. 3.

Step 11

Pop any air bubbles using the needle tool and allow it to dry.

Step 12

Using the Orange Gel, colour some Royal Icing and let-down to give a run out consistency. Run-out the beak using piping nozzle No 3.

Step 13

Pressure pipe the carrot with orange royal icing (stiff consistency), using piping nozzle No. 2, apply even pressure and drag from top to bottom of the right wing to give the tapered carrot shape.

Step 14

Using the Green Gel, colour a small amount of the Royal Icing. Using piping nozzle No 1, pipe the leaves to the top of the carrot.

Step 15

Using the stiff green Royal Icing and a leaf piping nozzle, pipe a line of leaves under the bottom eggshell and allow them to dry.

Step 16

Make a second layer of leaves on top of the first layer. The second layer is to be staggered from the ones below. Allow the icing to dry completely before the next stage.

Step 17

Colour the top of the eyes using the Blue dust and a soft brush.

Step 18

Dust between the eyes and the bottom of the top eggshell with black.

Step 19

Dilute some of the black powder colour with clear alcohol. Using a fine paint brush outline the broken egg shells.

Tip: You can use any clear alcohol for this. 

Step 20

Using the black paint and the fine paintbrush paint lines of cracking and dots on both eggshells.

Step 21

Paint a smile on the beak with the black paint and the fine paintbrush.

Step 22

Paint some fine lines on the carrot.

Step 23

Using the Yellow Powder colour and a fine brush dust the top of the top egg shell.

Step 24

Using a flat soft brush shade the entire outline of the body and feathers with orange dust to add highlight and definition.

Step 25

Dust the corners of the beak with orange.

Step 26

Dust both shells with brown, from outside to the inside.

Step 27

Using the soft brush shade the outline of each leaf with green dust to add depth.

CUTE KITTEN’S & HEARTS

CUTE KITTEN’S & HEARTS

Skill level: BEGINNERS

You will need:

  • Saracino white Pasta Top
  • Saracino white Pasta Model: white, black and red
  • Green Gel Colour
  • Water brush
  • Rolling Pin
  • Modelling tools: Dresden, small and large ball tools, silicone tool, scriber, pointed silicone tool
  • Knife and scalpel
  • Cornflour
  • Small scissors

Step 1

Add some drops of green gel colour of your choice to white Pasta Top and knead it well. As your colour base is white, you will need to add more green colour to get a dark green.

Tip 1: You can add different kinds of green to get the green you like (garden green, lime, leaf green, etc).

Tip 2: You can add a few drops of yellow if you want a brighter green.

Tip 3: If you don’t have any green colour, just use yellow and blue.

Tip 4: You may want to use gloves so your hands don’t stay coloured.

Step 2

Add a small quantity of black Pasta Model to a good amount of white Pasta Model. Knead it well until you get an even grey colour.

Tip: You can add black or grey gel colour instead of mixing the pastes.

Step 3

Add a small quantity of red Pasta Model to a good amount of white Pasta Model. Knead it well until you get an even pink colour.

Tip: You can add red or pink gel colour instead of mixing the pastes.

Step 4

Cover a cake board or a cake with the green Pasta Top and leave it aside. Smooth the top and sides and trim the excess paste. 

Step 5

Take 4 small amounts of the same size grey pasta Model and roll into 4 egg shapes.

Step 6

One at a time, lay the eggs on its side and gently press and rock the side of your finger just past the halfway point and smooth out a dent.

Step 7

Lightly pinch out the lower legs from the wider end of the eggs. Gently roll the paste between your fingers and stretch away from the body. Repeat on the other end of the eggs to form the arms.

Step 8

Use the Dresden tool to mark in creases where the legs and arms join each body.

Step 9

Pick one of the bodies, use the scalpel to mark the paws and the fingers. Bend the left arm to lay down on his belly and bend the feet flatten gently with your fingers.

Step 10

For the tail, roll a small sausage and attach it on the back of the body leaving it wrapped around the side.

Step 11

Add the details to the underside of the paws with small balls of pink Pasta Model. Gently flatten with your fingers.

Step 12

Pick one of the bodies, lay the body leaving the rounder part facing up. Bend both legs to the front until they are leaning against the body and leave the arms out straight.

Shape the thighs with the silicone tool and use the scalpel to mark the fingers.

Step 13

For the tail, roll a small sausage. Push a small ball tool into the back of the body and insert the tail on, leaving it facing up and slightly bent.

Step 14

Pick another body, bend the legs into a sitting position. Use the scalpel to mark the feet and bend them as shown. Flatten gently with your fingers. Bend the right arm across the chest and bend the left arm to point forwards. Use the scalpel to mark the fingers and add the details to the underside of the paws with small balls of pink Pasta Model. Gently flatten with your fingers.

Step 15

Roll a small sausage for the tail. Push a small ball tool into the bottom of the body and insert the tail on, leaving it facing up and slightly bent.

Step 16

Pick the last body, lay it on its side and bend all the paws forward. Shape the thighs with a silicone tool. Use the scalpel to mark the fingers. Add the details to the underside of the paws with small balls of pink Pasta Model. Gently flatten with your fingers.

Step 17

Roll a small sausage for the tail. Push a small ball tool into the bottom of the body and insert the tail on, leaving it along the back and curled.

Step 18

Take 4 small equal pieces of the grey pasta Model and roll into 4 balls. Keep 2 of the balls in a round shape and shape the other 2 in a doubly tapered shape as shown.

Step 19

Shape triangular shapes to form the noses by pinching small balls of pink Pasta Model with your fingers.

Step 20

Pick the 2 round heads, attach the noses in the centre of each face and mark the nostrils with the pointed end of a silicone tool.

Step 21

Using your large ball tool press to form an eye socket either side of the nose.

Step 22

Use the pointed silicone tool to mark a wide smile on each face. Choose one face to have an open mouth by pushing the wide end of the Dresden tool into the centre of the smile and lightly push down and towards the chin. Finish both mouths by lightly pushing a small ball tool into either end of the smile.

Step 23

Pick one of the tapered heads, make a pointy snout by pinching the centre of the face with your fingers.

Step 24

Using the last head, make each side thinner by pinching the paste slightly with your fingers.

Step 25

Attach the noses in the centre of each face and form the nostrils with a pointed silicone tool. Using the head with the pointy snout, form eye sockets either side of the nose with your large ball tool.

Step 26

Using the three heads you have formed eye sockets. Fill the eye sockets of all three faces with a small ball of white Pasta Model and flatten all the eye balls with your finger. Add a small ball of black Pasta Model on to each eye, press down lightly and finish them with a smaller ball of white.

Step 27

Roll 3 small tapered sausages of black Pasta Model and glue over the eyes. Use the scalpel to cut to size.

Step 28

Our fourth head will have it’s eye’s shut. Roll a small tapered sausage of black Pasta Model and fix as shown to form two eye brows.

Step 29

Use the pointed silicone tool to mark a wide smile on the final two faces. Using the face with open eyes, open the mouth by pushing the wide end of the Dresden tool into the centre of the smile and lightly push down and towards the chin. Finish both mouths by lightly pushing a small ball tool into either end of the smile.

Step 30

To make the ears, take 4 small balls of grey Pasta model and push a large ball tool into the centre of each ball. Add a smaller ball of pink Pasta Model in the centre of each “squashed” ball and push in with the ball tool to create the inner ear.

Step 31

Use the scalpel to cut each ball in half. You now have eight ears. Pinch the tip of each ear into a point.

Step 32

Glue the ears to the heads and use the Dresden tool to push and form the inside of the ear to give the required shape.

Step 33

Give the appearance of depth to the open mouths by inserting a small amount of black Pasta Model. Finish by adding small pieces of pink Pasta Model. Use the pointed silicone tool to mark a central line into the tongue

Step 34

Attach the heads to each of the bodies using wooden toothpicks:

  • Kitten lying down: face with closed eyes
  • Kitten facing down: round head with open mouth
  • Sitting Kitten: face with pointy snout
  • Kitten lying on its side: round head with closed mouth

They are now ready to be placed on the board or on your cake.

Step 35

Make different sizes of hearts from red Pasta Model. Make different sizes and as many as you would like. Use the pointed silicone tool to shape the upper groove in the hearts.

Step 36

For Cupid’s bow roll a red 2cm long tapered sausage and curl both tips in towards the centre. Bend the piece into a curve and glue a thin sausage of white end to end.

Step 37

For the arrow, use a small heart from the previous ones made. Roll a thin sausage of white and trim it to the same width as the hole of Cupid’s bow. Cut out a small rectangle of red paste and cut a V shape from each end as shown. Use the scalpel to mark two diagonal lines on each side. Apply glue to this shape on one side and to the little heart on the other side of the white sausage shape.

Step 38

For Cupid’s wings roll two pea sized balls of white into teardrop shapes. Gently flatten with your fingers.

Step 39

Use the pointed silicone tool to mark a scalloped edge and the lines onto the wings.

Step 40

Shape a heart from a hazelnut sized ball and gently flatten it with your fingers. Run the Dresden tool around the sides to create the effect of a lid. Roll out a thin strip of white paste and glue around the heart, trimming away any excess length. Create a small bow with two tiny triangle shapes of paste and a tiny ball of white. Use your pointed silicone tool to help shape and detail it.

Step 41

For the letter cut a small rectangle of white paste. Use the scalpel to mark lines starting from two corners from the widest part to the centre. Use a little heart to make the closer.

Step 42

Using the sitting kitten, make two cuts on either side of the head using small scissors to give detail to the hair. Gentle glue the bow and arrow to him.

Tip: You may need to support it for a little while until it dries, a piece of foam is excellent for this job.

Step 43

Attach the accessories to the other kittens:

  • Kitten lying down: hearts
  • Kitten facing down: love letter
  • Kitten lying on its side: chocolate box

Step 44

Glue the cupid wings onto the sitting kitten’s back.

Step 45

Roll a few tapered sausages of green Pasta Top and glue them together in groups of two or three, to form small patches of grass.

Step 46

Distribute the grass through the free space and some to come out under the kittens to compose the scenery.

Baby Butterfly

Baby Butterfly

Author: Mary Presicci

Skill level: BEGINNERS 

You will need:

  • Skin tone Saracino modelling paste
  • White Saracino modelling paste
  • Black Saracino modelling paste
  • Skin tone Saracino dust powder
  • Red Saracino airbrush colour
  • Blue Saracino airbrush colour
  • Brushes
  • Modelling tools including wire cutters / pliers
  • 0.50 Saracino wafer paper
  • White flower wire different thickness
  • Wooden cocktail stick
  • Water

Step 1

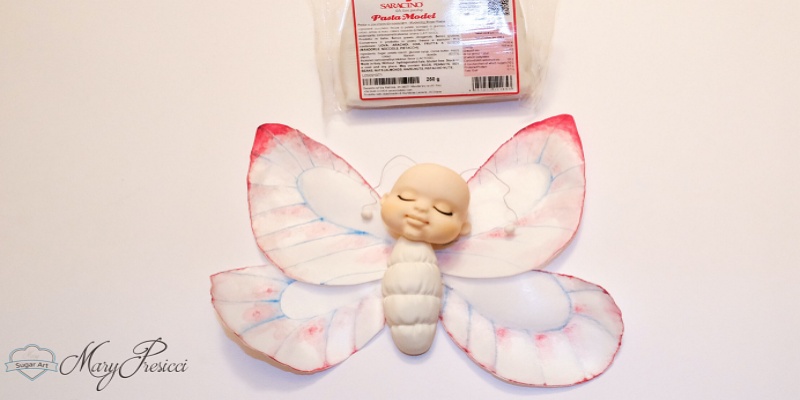
This is everything you will need to create this baby butterfly

Step 2

Cut out the wings to your preferred shape using the wafer paper

Step 3

Paint the edges of the wings with the hot pink airbrush dye and the internal parts with the blue

Step 4

Prepare the four wings in the same way

Step 5

Prepare the head using the skin coloured modelling paste. Roll an oval shape and form a groove in the centre

Step 6

Using finger pressure make an indent for the mouth area. Pushing some paste gently up to help form a nose

Step 7

With your Dresden tool mark the sides of the nose and continue the lines down to the chin

Step 8

Form the nose using a silicone tipped tool 

Step 9

Using finger pressure give the cheeks a rounded look.

Step 10

With a ball tool define the eye area

Step 11

With your silicone tool or a Dresden tool create grooves as shown

Step 12

Using your Dresden tool define the eyelids

Step 13

With a small ball tool define the nostrils

Step 14

Mark the ends of the mouth using a ball tool

Step 15

Using your silicone tool press to form two small indents

Step 16

Using your Dresden tool join the two ends of the mouth and form the upper lip

Step 17

Using your silicone tool form the lower lip


Step 18

Using your fingers form the neck and push the chin forward

Step 19

Use two small balls of modelling paste to create the ears

Step 20

The face is ready to be coloured

Step 21

Using a soft brush and the skin coloured Saracino dust lightly brush the cheeks

Step 22

Roll a small piece of black modelling paste very thinly to make the eyelashes

Step 23

Cut off a small piece and attach to the eyelid

Step 24

Using the white modelling paste roll a ball shape

Step 25

Roll the ball in your hands to form an elongated egg shape

Step 26

Using your Dresden tool form markings on the body as shown

Step 27

Using a little water attach your flower wire to the wafer paper wings

Step 28

Repeat this for all four wings


Step 29

Roll two small balls of white modelling paste. Cut two small lengths of thin flower wire and feed each into the small balls.

Step 30

Using your cocktail stick attach the head to the body. Feed the end of the wing flower wire into the body.


Step 31

Repeat this for all four wings. Attach each antenna to the head. Your cute baby butterfly is now ready!