




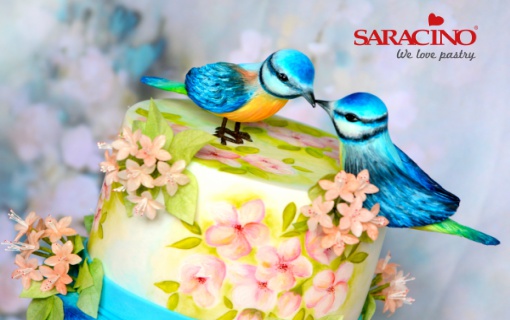
BIRDS IN LOVE – WEDDING CAKE


You will need:
-
White Saracino modelling paste
-
Dark Blue Saracino modelling paste
-
Yellow Saracino modelling paste
-
Black Saracino modelling paste
- Saracino wafer paper 0.27
- Micro stamens
- 24 gauge wire
- Green tape
- 10”, 8” and 6” round cake dummy with 4” height
- Saracino cake covering/white
- Cake drum/board 12” round and some covering
- Edible paint- hot pink, white, green,red,blue and yellow
- Round brushes various sizes from thin to thick, say number 0,2,4 and 8 or any equivalent (roughly 4 brushes)
- Colour palette
- Vodka (just a table spoon each) or any evaporator
- Wipes
- Rolling pin
- Cake smoother
- Contrast ribbon to cover the cake and drum and some glue or double sided tape
- Knife, scissors
- Some cornstarch required while rolling the cake covering
- Any small bowl for washing brushes
- Dresden tool
- Ball tool
- Shell tool

Step 1
Draw a bird shape using a ball tool on a flat rolled sheet of Saracino sugar paste.

Step 2
Cut the drawn outline with a knife tool.

Step 3
Cut all the edges well and smoothen if any rough or raw edges left.

Step 4
Roll thin strips in black and curl them to form the beak shape and eyes.

Step 5
Using the blue and light blue Saracino sugar paste form small droplets and start gluing on the bird base following a pattern and continue using some yellow, white and orange droplets.

Step 6
Make the branches with brown paste that is tapered from one end,Glue on the bird over the branches.

Step 7
Make one more bird facing the 1st bird in the same way.

Step 8
Again make some more branches in brown.

Step 9
Using a leaf tool blend them well.

Step 10
Mix some edible gel colours (blue and dark blue) with evaporators/vodka and start painting on the cake, using a flat brush dab and blend the two shades well, then add a bit of pink, red and orange and blend all the colours well.

Step 11
Make tiny wafer paper flowers

Step 12
Add few more highlights in dark blue.

Step 13
Cut a thin ribbon like strip in light blue sugar paste, approximately 2cm wide

Step 14
Brush with Saracino glue on one side.

Step 15
Glue it around the bottom of the cake.

Step 16
Trim the rest and blend the joints well.

Step 17
Using the edible marker draw some flowers and leaves on the second tier of the cake, mix some pink and orange edible paint and highlight the edges of the flowers.

Step 18
Blend the colours using white edible paint.

Step 19
Paint tiny dots in red and black in the center of the flower and blend some green around the flowers.

Step 20
Now with a pointy round brush draw the leaves in green.

Step 21
Blend using some light green and yellow/this can be achieved by mixing white or yellow in dark green.

Step 22
Brush some light blue in the empty spaces left between the flowers and leaves.

Step 23
Making the small birds is easy, start with an elongated ball of white modelling paste and taper from one end for the tail white a rounded end on other side for the head, make the eyes with a ball tool and add tiny eye balls.

Step 24
Add two tiny eyelids around the eyes.

Step 25
Blend the eyelids well.

Step 26
Make some feather texture on the tail with the knife tool or any pointy tool.

Step 27
With the shell tool texture the body.

Step 28
Roll a ball and shape it into a drop shape and flatten it to make the wings.

Step 29
Texture the edges of the wings with the knife tool.

Step 30
Texture the rest using the leaf tool.

Step 31
Join it to the body and blend with the ball tool

Step 32
Start painting the body starting with the lightest shade of blue

Step 33
Add a darker shade of blue on the top

Step 34
Using a thin brush paint standing strokes around the eyes forming a ring

Step 35
Paint a black ring just below the blue one

Step 36
Now paint the the eyes

Step 37
Paint the lower body with a light yellow edible paint

Step 38
Add some dark yellow and orange edible paint in the center of the lower body and blend well

Step 39
This is how it will look, make sure you keep the light yellow on both ends of the lower body

Step 40
Paint the tail in blue.

Step 41
Blend with the yellow and the blending will show some green on the tail too, make sure you have a bit of blue on the end of the tail and don’t carry the shading right till the end as it will result in a green tail

Step 42
Start painting the wings in shades of blue and then some black strokes

Step 43
Push a posy pick or a straw in places where you want the flowers

Step 44
Immerse the flower bunch into the straw/posy pick

Step 45
Create more wafer paper leaves around the branches and the flowers. Vein them, dust with green dust and use some Saracino wafer paper glue to glue them on.

Step 46
Make the birds legs with a wire and then tape it with brown tape, immerse it when the bird is completely dry. Place both the birds on top of the top tier of the cake

Step 47
Your bird theme cake is now ready

Sugar Pirates

In 2017 a group of sugarcrafters came together under the leadership of Captain Vicky Teather of the Yellow Bee Cake Co to form the Sugar Pirates. Vicky is one of the UK ambassadors for Saracino.

We have created a display of cakes, cookies and cupcakes using Saracino products. We’re super proud to announce that we won the best group table at Cake International.
Many of the artists chose to use Saracino for their pieces, so I’ve put together a gallery of some of the favourites from the show to share.
One of the most popular was Nicola Gerrans take on Captain Jack Sparrow and Anna Taylor Dillon’s skeleton pirate
Vicky created the Sugar team to include all skill levels, so if you would like to take part in next years theme please contact our facebook page, SUGAR COLLABORATION and check out our marvellous booty of fine work.
Enjoy <3

Hi, I’m Anna Taylor Dillon, based in Glasgow, Scotland. I own and run a full time catering business and also operate a part time cake business called Dillons Cakes,
I am self taught cake decorator/artist and baker and this was my third year at Cake International. I used a mixture of Saracino paste and modelling chocolate for the outer details and modeling paste for the main body to create Soulless Black Bob.

I’m Charlotte, an Ambassador for Saracino and I dropped my first piece!???????
I whipped this one up using Saracino modelling paste and covering paste.

My name is Debbie and I used Saracino modelling paste for my mermaid who is drowning the poor pirate, my waves and the seaweed.

Hi, I’m Donna from Valentinoscakery I started my cake decorating business in 2014 in Bournemouth, Dorset. I love using chocolate as an art medium and
I created my pirate using Saracino modelling paste.

I am Eva Cockrell and I have been decorating cakes for nearly 6 years, my business Euthymia Cakes is based in Hanslope, Milton Keynes.
I am a self-taught home baker turned pastry chef and I mainly create wedding cakes and sugar flowers. I used Saracino modelling paste except for feathers made of rice paper.

Hi I’m Fee Kakes from SCrumbtious Kakes in South London.
I’ve been competing at CI for 4 years now obtaining 3 Merits, 4 Bronze and 2 Silver Awards. Hoping that Gold is on the horizon.

Jen Lofthouse of Darrowby Cakes based on Thirsk North Yorkshire . Like so many of us I am self taught and have ran my home based business for nearly 6 years.
I have been competing at cake international for 4 years and have racked up plenty of awards including 5 golds and a 3 rd place of which I am extremely proud.

I’m Julie Rogerson from Julie”s Cake In A Box and I am based in Beverley, East Yorkshire.
I started decorating cakes around 6 years ago as a hobby, and now run a full time business. I have won Bronze, Silver and Gold awards at Cake International and have had tutorials published in various cake decorating magazines.
I used Saracino modelling paste and Saracino modelling chocolate for my pirate mermaid.

I’m Kate Jordin and I run The Bake Well Tart in Hinckley, Leicestershire. I have come a long way since the first cakes I made my family 10 years ago…
I started The Bake Well Tart two years ago and my passion is for creating unique and exciting cakes. I love working with other cake artists in collaborations
like this, because they are an opportunity to challenge myself whilst having some fun!

Hi, I’m Lesley Marshall, based in Taunton, Somerset. I operate a part time cake business called Lesley Marshall – cake art.
I am self taught cake decorator/artist and baker and this was my third year at Cake International. For “Jasmin” I used a mainly Saracino paste and a little flower paste.

Here’s my HMS Unsinkable pirate, struggling to stay afloat away from monsters lurking below! My piece is made with both Saracino modelling chocolate and modelling paste.
I’ve been doing cakes now for 6.5 years and its my passion. I write for magazines and share my tutorials as my main time focus and take part in colabs along side.I absolutely love making models that wow people

Hi, my name is Lorraine Mcgarry and I’ve been in business for about 5 years making predominantly wedding cake so I love when I get to push my boundaries with different
styles of cake, since discovering Saracino products my modelling has improved no end as itís such a forgiving product to use.
I used both Saracino modelling chocolate and modelling paste.

Hi, I’m Nicola Gerrans Sugar Art from Cornwall.
Sculpted cake designer and self-confessed sugar collaboration/competition addict. Jack Sparrow sculpted with Saracino.

Rob is the face behind Mr Bakerís Cakes – an award-winning hobby and passion project that keeps him sane alongside a very demanding full-time career as a primary school teacher.
Rob also runs the hugely successful Mr Bakerís Blog – one of the UKís top-rated baking and caking blogs and the home of his weekly online magazine, Something Sweet. His blend of topical articles and posts, recipes, tutorials and interviews with some of the most recognisable faces in cake have made Robís blog an essential resource for any caker and he is passionate about sharing and celebrating the incredible talents out there in the world of cake.

I am Sarah, I own Sarahís Cakes based in Horley, Surrey.
I have been making cakes for 5 years and really enjoy making animal characters.
My parrot was built around a frame with rice Krispy treats and I used Saracino model paste for his finer detailing as i find it gives a beautiful finish.

I’m Sarah Lou and I’m a Saracino Ambassador. I run my cake business and cake school Sensational Sugar Art In Cheddleton In Staffordshire.
My piece is made using Saracino top paste and modelling paste.

Saracino all the way for me 🙂 Suzanne from Cakin’ Faerie – Cake Design and Decoration based on the Bucks’Berks border in the village of Burnham.
My business was born in 2011 after I started to get more and more requests for cakes outside of my Family & Friends circle. I competed at Cake International for the first time
in 2014 and was delighted to receive a Gold Award. I love collaborations as they allow me to push my comfort zone and this was certainly the case with my piece
for Sugar Pirates.

I’m Vicky Teather form The Yellow Bee Cake Company. This piece was created with using Saracino products.

I’m Helenmarie Looker and I own Helenmarie’s Cake Boutique, based in Cottenham, Cambridge. I started out making cakes in 2011 for friends and family, but it soon grew
into the sucessful business it is today. I have been very fortunate to win Bronze and Silver awards at Cake International in the Decorative Exhibit category and hope
to add to them in the future.
I am expanding my skills and my business by becoming a trainee demonstrator for the the British Sugarcraft Guild and hosting sugarcraft classes in the surrounding villages where I live.


Hi, I’m Lesley Marshall, based in Taunton, Somerset. I operate a part time cake business called Lesley Marshall – cake art. I am self taught cake decorator/artist and baker and this was my third year at Cake International.
For “Jasmin” I used a mainly Saracino paste and a little flower paste.

Hi! I’m Jojo from Jojo’s Cupcake Madness, i started making cakes as a hobby in 2012 turning it into a small business in 2013.
Since then I’ve entered several competitions which resulted in winning Gold, Silver and Bronze awards. I am continuing to grow my skills each year and looking into teaching beginners sugarcraft

Hi, my name is Sarah and I own Daisy Cakes in Wokingham, Berks. I specialise in cupcakes and in particular miniatures, and have been teaching for the last two years.
I used Saracino modelling paste for my piece.

Hi I’m Nik from Sweet Creation LTD. I’m a multi award winning artist based in Portsmouth.
I was really excited to create my piece, so ended up finishing the skull months in advance. I used Saracino products, as they really help me to create great cakes.

I’m Susan Angell-Salter and the Owner of Vintage Couture Cakes based in the Vale of Evesham. I am fairly new to collaborations and modelling figures as I mainly do wedding cakes and sugar flowers.
I have given myself a challenge to create more complex models during the next twelve months.
Congratulations On Your Amazing Creations!
Join Our Newsletter
We’d love to send you the latest news, discounts & exclusive offers via email! By signing up below you are confirming you are happy for Saracino to send you marketing emails. We will always treat your personal details with the upmost respect & will never sell your details to other companies for marketing purposes.
• All the latest industry news • FREE video tutorials • Exclusive product offers


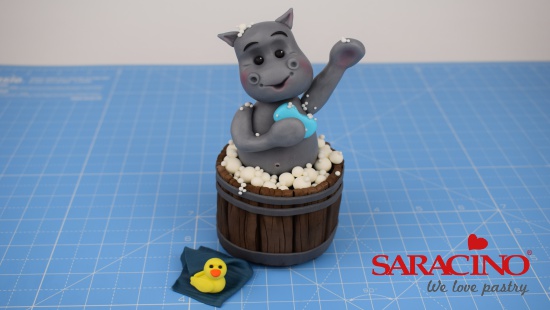
CUTE HIPPO TAKING BATH
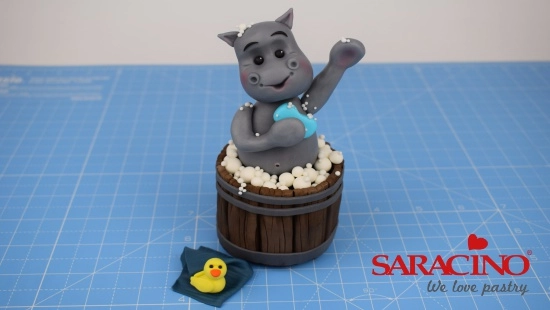
Author: Lynsey Wilton-Eddleston

FB: SUGARWHIZZ
Skill level: BEGINNERS
FROM LYNSEY:
Here Sugarwhizz shows you how to model this cute hippo taking a bath! Little hippo and his adorable duck would be perfect for that special baby shower cake or little one’s birthday!
You will need:
- 2 x 28g Rice crispy treat bar
- Grease Proof paper / Parchment paper and scissors
- Dresden tool
- Large and small balling tools
- Small Rolling Pin
- Sharp knife
- Small Paintbrush (for gluing together)
- Small soft paintbrush (for dusting details).
- Cool boiled water
- Cocktail sticks
- Food safe skewer
- For this tutorial I used the following Cerart tools Cerart Large balling tool (K500) Cerart Small balling tool K501 & K502
- 30g Black Saracino modelling paste
- 50g Brown Saracino modelling paste
- 7g Grey Saracino modelling paste – Add a small amount of Saracino black gel to white paste.
- 88g of grey Saracino modelling chocolate
- 10g White Saracino modelling paste
- 3g Light blue modelling paste
- 1g Black Saracino modelling paste
- 5g Navy Saracino modelling paste (add a small amount of blue colour with a tiny amount of black to the paste to create navy)
- 3g Yellow Saracino modelling paste
- 1g Black Saracino modelling paste
- 1g Orange modelling pastE
- Saracino gel Black, Light Blue, Yellow, Orange, Brown
- Saracino Powder lake – Pink and brown
- Cool boiled water for gluing
Step 1
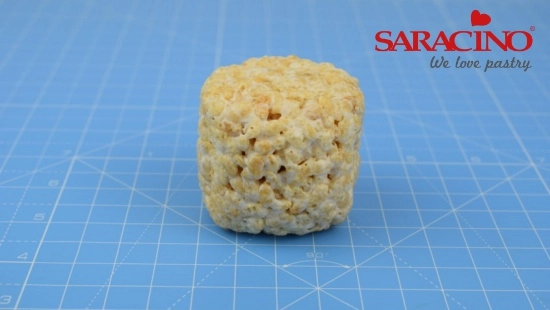
Take two 28g bars of RKT and roll into a short fat cylinder shape, gently pressing and squeezing the RKT together as you go. Flatten the top and bottom.
Step 2
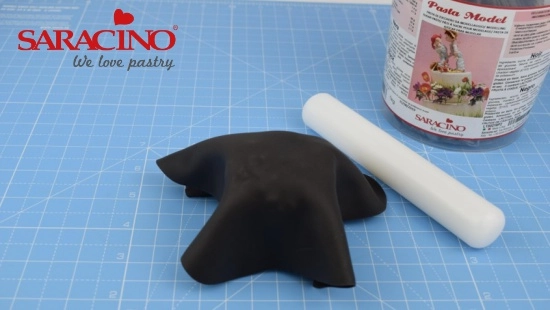
Take 30g of black modelling paste, knead and soften to warm up. Using a small rolling pin roll out the paste to a thickness of around 1-2mm, the paste should be big enough that when you drape it over the RKT the whole barrel is covered.
Step 3
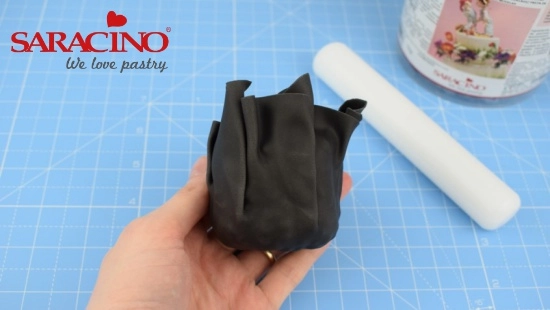
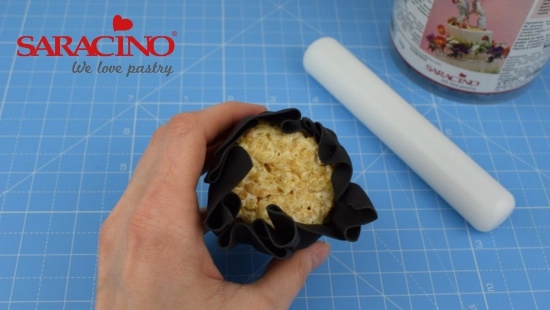
Smooth the paste across the top of the barrel, then using your fingertips gently smooth the paste down around the sides. Don’t worry if there are creases it doesn’t have to be perfect. Turn the barrel upside down and gently but firmly squeeze the paste around the sides to ensure the paste is stuck to the RKT. There should be no need for water the RKT should be sticky enough to hold the paste.
Step 4
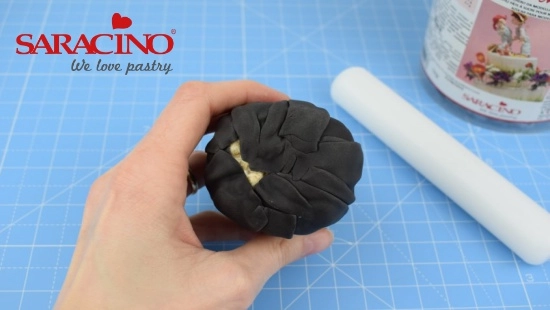
Gather the excess paste around the bottom of the barrel.
Step 5
Fold the excess paste down onto the bottom of the barrel. Gently but firmly push and smooth the paste together to completely cover the bottom of the barrel.
Step 6
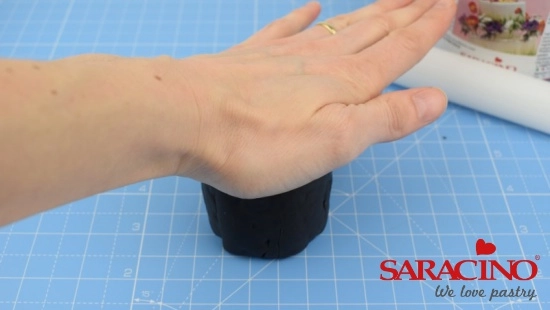
Turn the barrel the right way up and place on the work surface. Gently press down on the top with the palm of your hand to ensure the paste is well stuck to the RKT.
Step 7
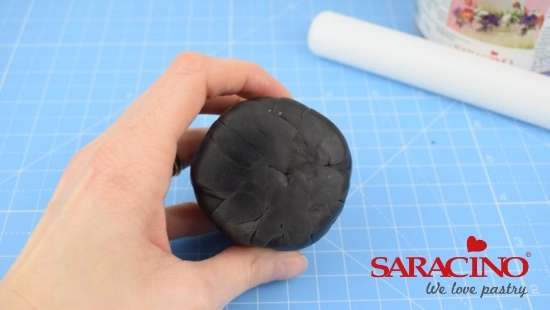
Rub the paste on the bottom with your fingertips in small circular motions to blend and smooth together.
Step 8
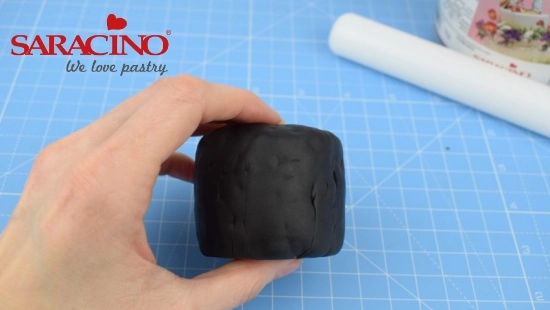
Smooth any prominent lumps and bumps around the sides again by rubbing the paste in small circular motions with your fingertips.
Step 9
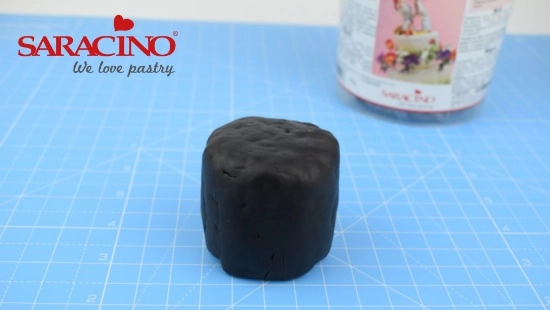
Finish off by smoothing the top of the barrel and ensuring its relatively level.
Step 10
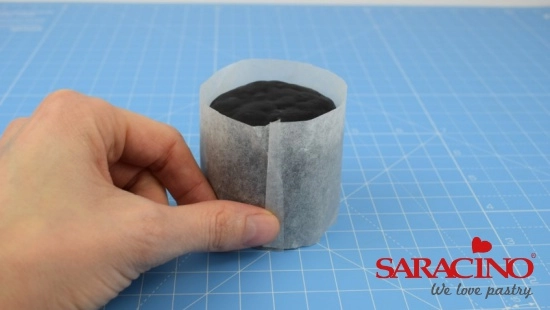
Cut a piece of greaseproof paper so that it’s slightly longer than the circumference of the barrel and approximately 5mm taller than the top of the barrel.
Step 11
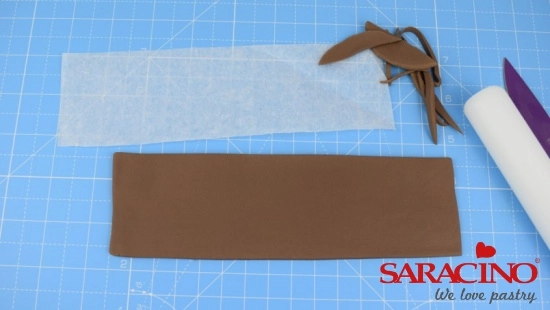
Take 50g of brown modelling paste, knead and soften to warm up then roll out to a thickness approx. 3-4mm. Lay the paper template you made in the previous step on top of the paste and using a sharp knife trim the paste to size.
Step 12
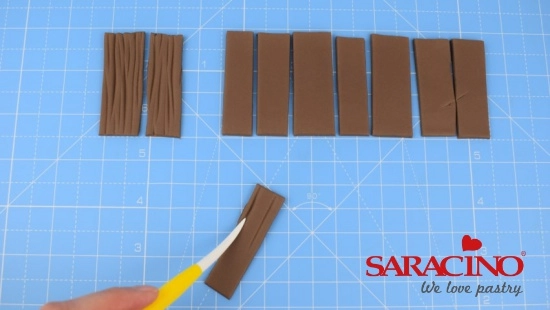
Use the sharp knife to cut the paste into 10 strips. They don’t have to be precise or even the same width. Use the veining end of the Dresden tool to score lines and grooves from top to bottom on each plank.
Step 13
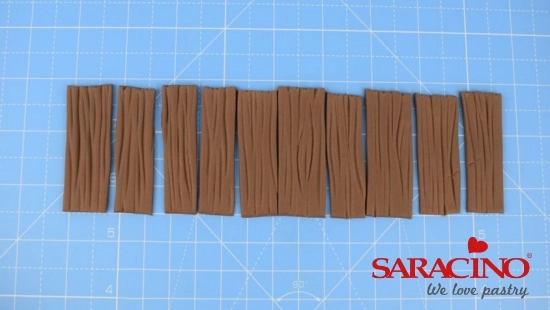
Continue until all the planks are textured. Try to keep the planks in order, to ensure they fit together when you stick them to the barrel.
Step 14
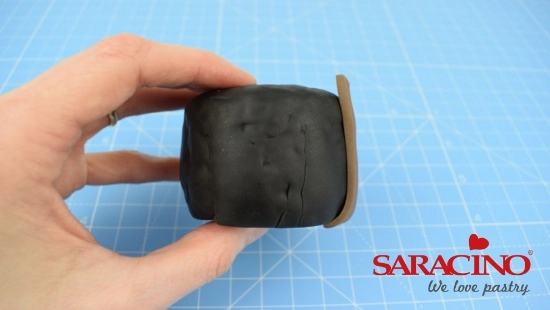
Apply a small amount of water to the back of the first plank and stick into place. Leave approximately 5mm of the plank sticking up above the barrel. Ensure that the plank is straight and stick down bending the end of the plank underneath as shown.
Step 15
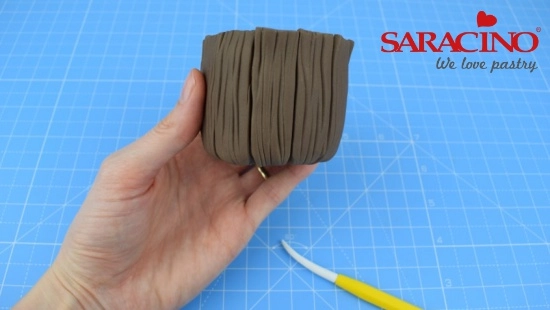
Continue around until all the planks are stuck into place. It may be necessary to trim the last plank with a sharp knife to fit. Don’t worry if you have small gaps. That’s why we covered the barrel with black paste first!
Step 16
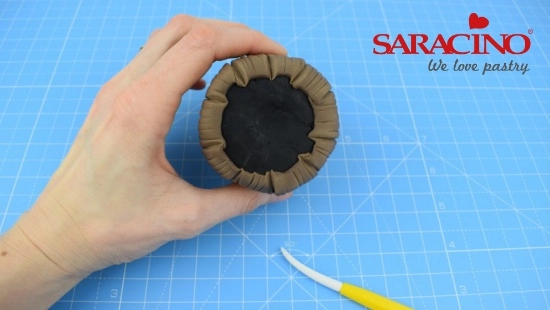
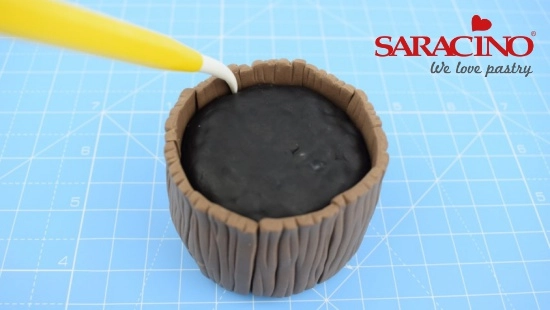
Use the veining end of the Dresden tool to gently redefine the edges of the planks. Start at the top and run the tool gently down and around onto the base of the barrel.
Step 17
Mark the inside of each plank with the veining end of the Dresden tool to add texture.
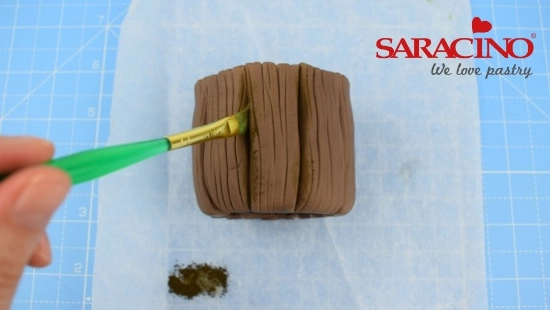
Step 18
Using a small dry paintbrush apply a small amount of the brown edible tint down the edges of each plank to shade and add contrast.
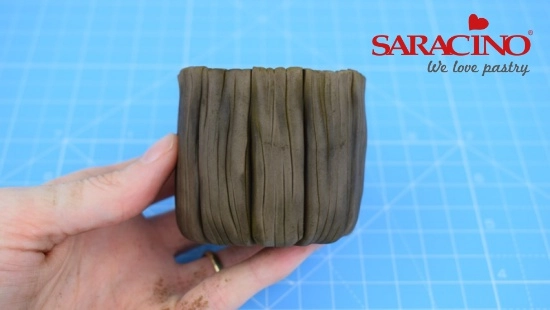
Step 19
Dust the top inside edges of the planks. Continue to add a small amount of shading randomly to the planks around the outside as shown.
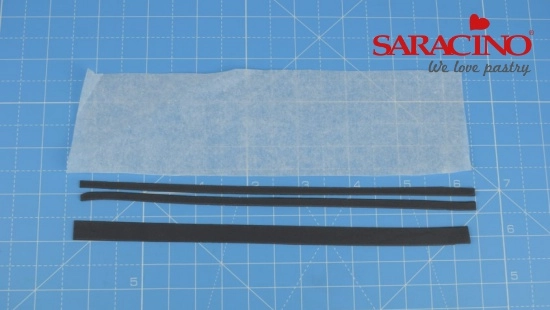
Step 20
Take 7g of grey modelling paste, knead and soften to warm up. Roll out to a thickness of around 1-2mm. Use the paper template as a guide and cut 2 strips of paste approximately 1cm wide. Carefully cut one of the strips lengthways in half so that you have 2 thinner strips and one thicker strip of paste as shown.
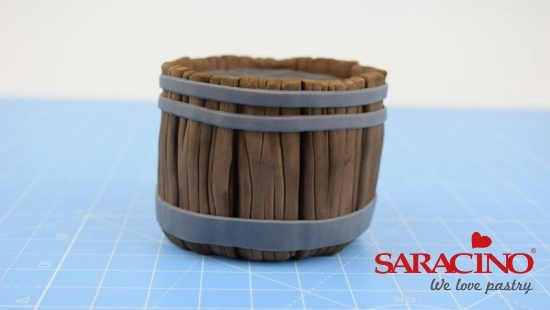
Step 21
Add a small amount of water to the back of each strip. Attach the top strip first. Start at the back of the barrel, attach one end of the strip and wrap the paste gently around the barrel whilst sticking it in place. Trim off any excess paste. Repeat for the second strip and finish with the widest strip at the bottom.
Step 22
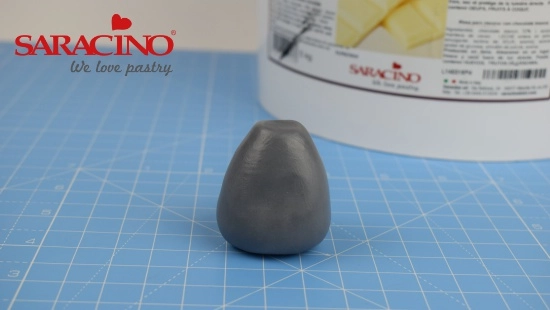
Take 45g of grey modelling chocolate, roll into a tear drop shape. Sit on the work surface and gently flatten the top with your finger tip.
Step 23
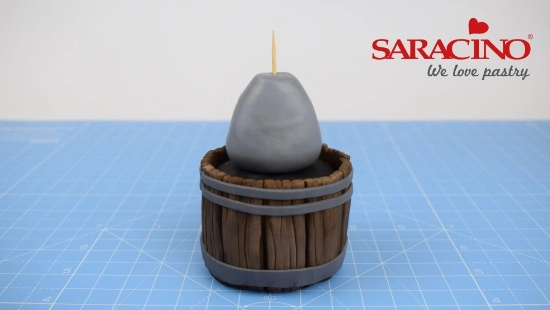
Apply a small amount of water to the base of the body and stick into place on the top of the barrel. Gently push a food safe skewer down through the middle of the body and into the barrel, leaving a small amount of skewer protruding from the top ready for the head later.
Step 24
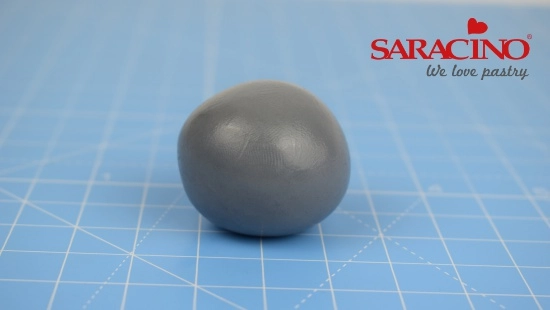
Take 30g of grey modelling chocolate knead and soften to warm up and roll into a ball.
Step 25
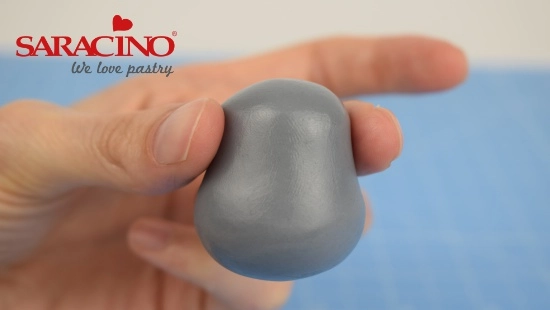
Roll the top of the ball between your thumb and forefinger to narrow the head slightly as shown.
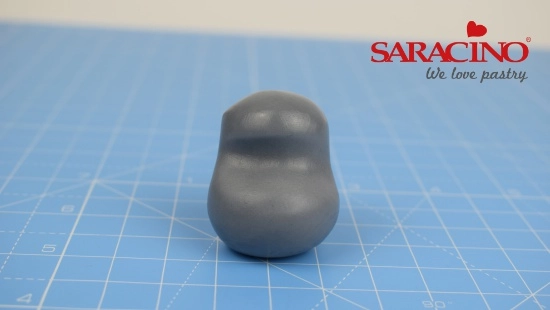
Step 26
Gently press your finger across the face to create a shallow indent.
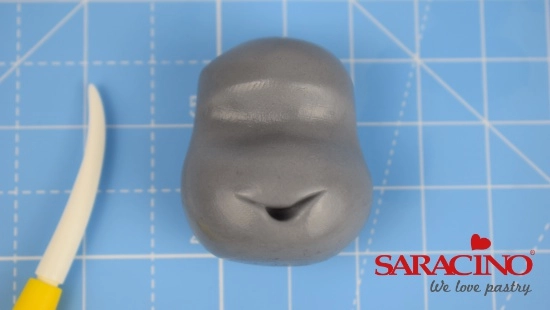
Step 27
To make the mouth first take the smoothing end of the Dresden tool and push in gently to open the mouth. Use the veining end of the Dresden tool to mark each side of the mouth.
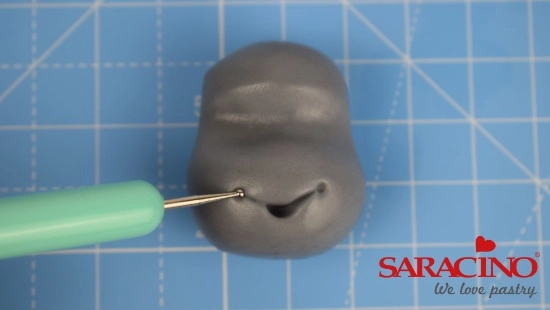
Step 28
Use the small end of the small balling tool to gently indent each corner of the mouth as shown.
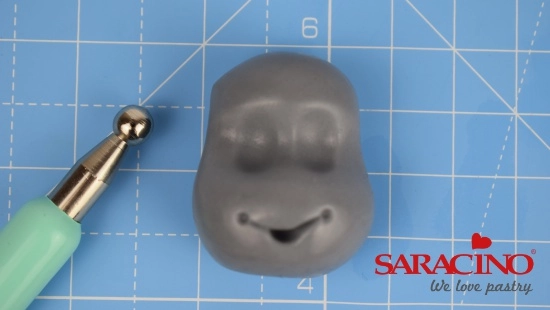
Step 29
Use the large end of the balling tool to indent two eye sockets as shown.
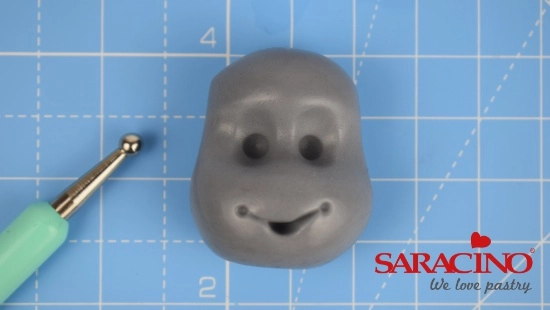
Step 30
Use the small end of the balling tool gently press in to make two small eye sockets as shown.
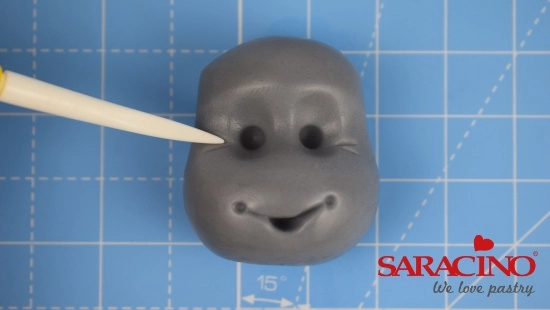
Step 31
Use the veining end of the Dresden tool to mark two small creases at the base of each eye socket as shown.
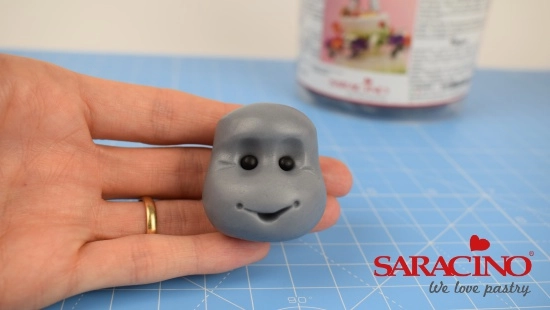
Step 32
Take 2g of black modelling paste, divide equally into two and roll each piece into a small ball. Apply a small amount of water into each eye socket and stick the paste into place.
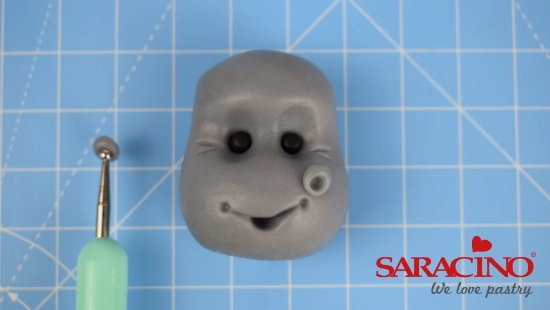
Step 33
Take 1g of grey modelling chocolate and roll two small balls. Stick them into place as shown. Use the small balling tool to gently create the nostrils.
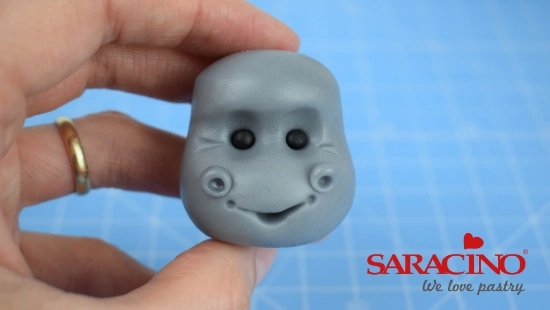
Step 34
The nostrils should be positioned just above each side of the mouth as shown.
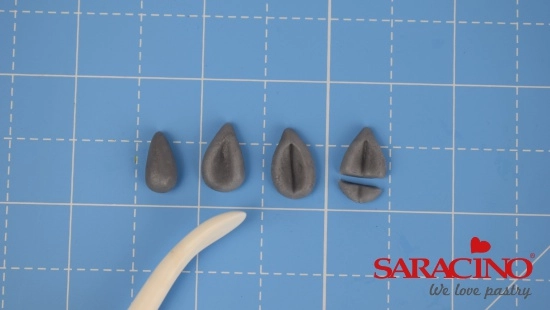
Step 35
Take two tiny balls of grey modelling chocolate, roll each one into a teardrop and flatten with your fingertip. Use the smoothing end of the Dresden tool to indent the centre of each ear. Use the tip of the veining end of the Dresden tool to mark a line in the centre of each ear as shown. Cut the bottom of each ear off with a sharp knife as shown.
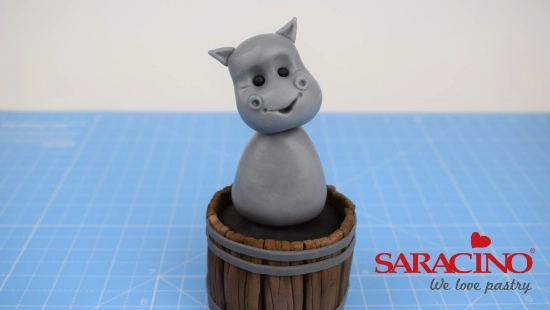
Step 36
Apply a small amount of water to the top of the body, gently slide the head down the skewer until it comes to rest on the body. Stick the ears into place on the top of the head.
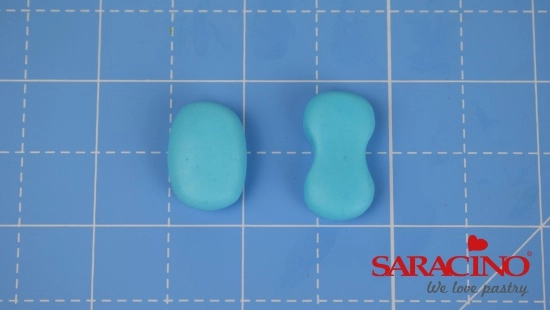
Step 37
Take 3g of light blue modelling chocolate roll into a short fat cylinder. Flatten the paste slightly with your fingertips and gently squeeze the middle to indent the paste as shown.
Step 38
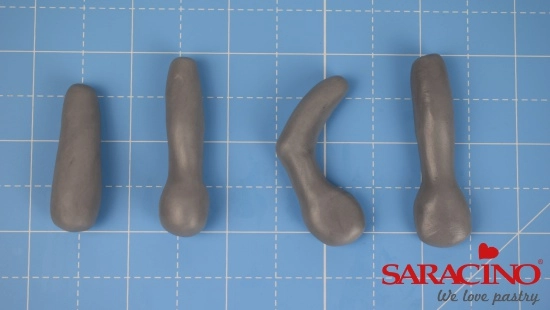
Take 10g of grey modelling chocolate and divide equally into two. Roll each piece into a short teardrop. Narrow slightly at one end by rolling the paste between your thumb and finger to create the hand. Gently flatten and smooth the hand with your fingertips. Again, roll the paste between your thumb and finger to narrow the wrist and lengthen the arm as shown. Bend the right arm in the middle and gently pinch out the elbow. Leave the left arm straight.
Step 39
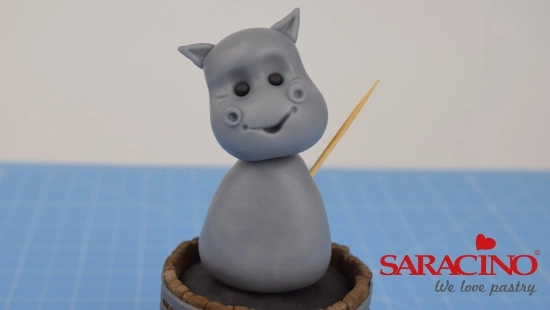
Gently press a food safe skewer into the paste as shown.
Step 40
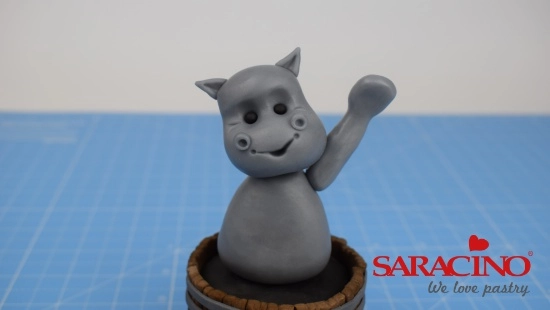
Carefully slide the arm down the skewer and stick into place with a small amount of water.
Step 41
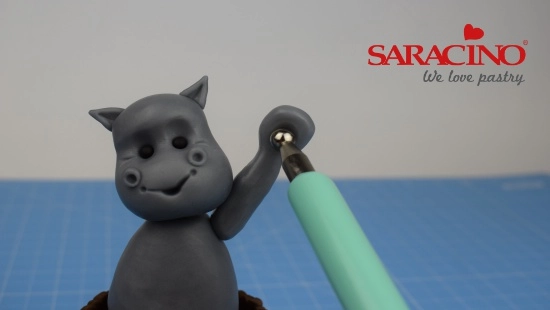
Use the large end of the balling tool to gently indent the palm of the hand.
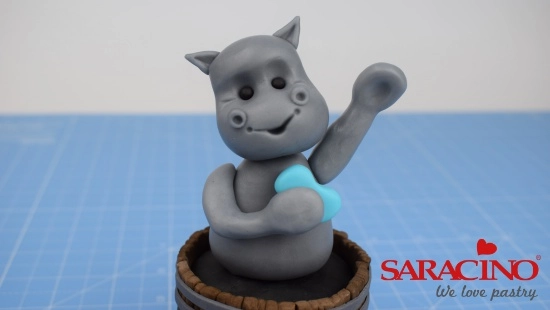
Step 42
Stick the sponge into place at the bottom of the left arm. Stick the right arm into place resting the hand on the sponge.
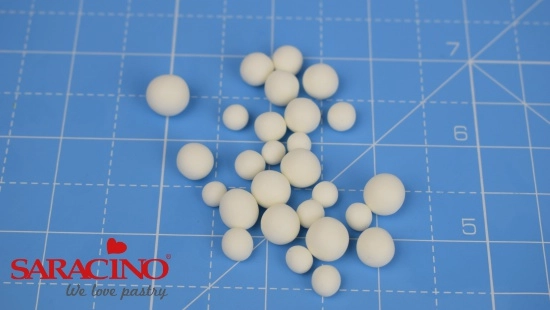
Step 43
Take 7g of white modelling paste and roll multiple balls of varying sizes.
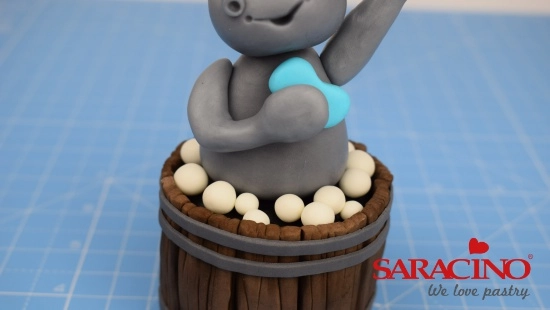
Step 44
Take 2g of white modelling paste and roll lots of tiny balls of various sizes. Stick them randomly into place around the top of the barrel.
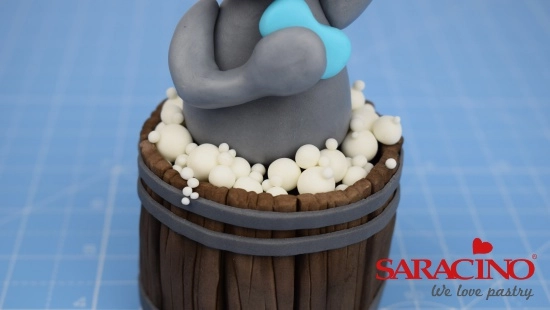
Step 45
Take 2g of white modelling paste and roll lots of tiny balls of various sizes. Stick them randomly into place around the top of the barrel.
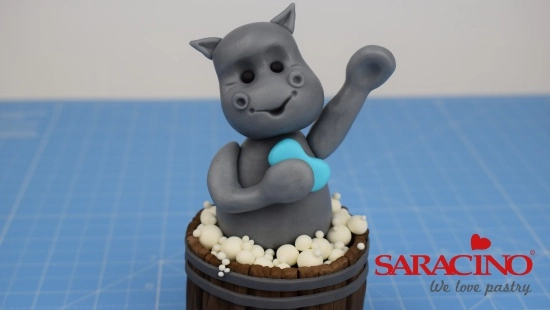
Step 46
Position some of the tiny balls so that they are ‘spilling’ down the side of the barrel.
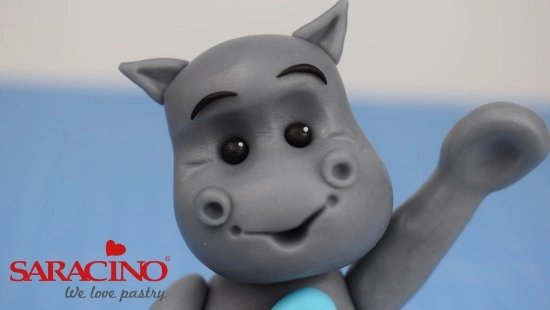
Step 47
Roll two tiny white balls and stick them into place on each eye as shown.
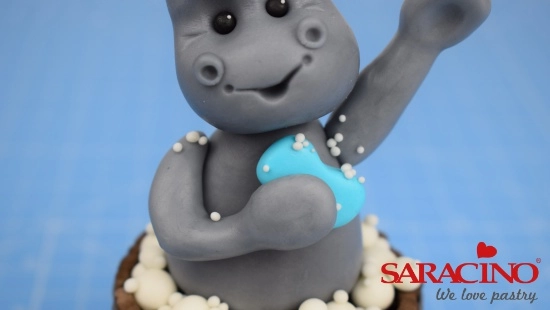
Step 48
Stick some tiny balls around the base of the left arm and across the sponge. Add a few to the top of the right shoulder.
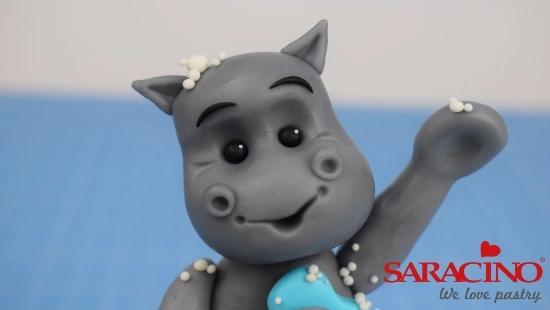
Step 49
Add a few tiny white balls to the top of the head and left hand.
Step 50
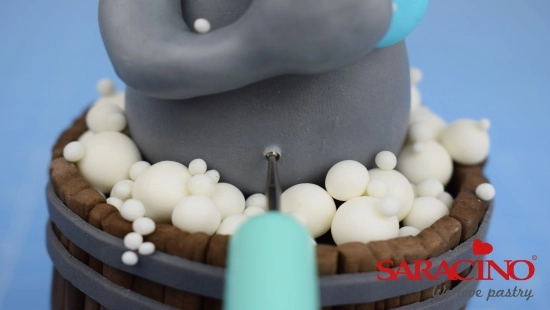
Use the small end of the balling tool to gently indent a belly button.
Step 51
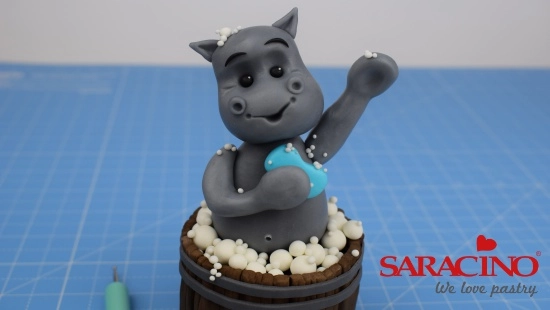
Place the hippo to one side to dry a little.
Step 52
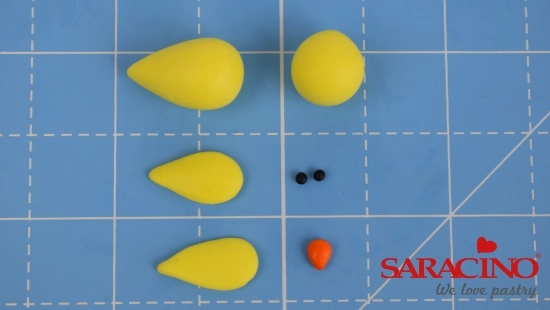
Take 3g of yellow modelling paste. Roll 1g into a teardrop shape, 1g into a small ball and divide the last 1g into two, roll each piece into a teardrop shape and flatten gently with your fingertip. Roll two tiny balls of black modelling paste, and finally roll a tiny ball of orange modelling paste into a teardrop shape.
Step 53
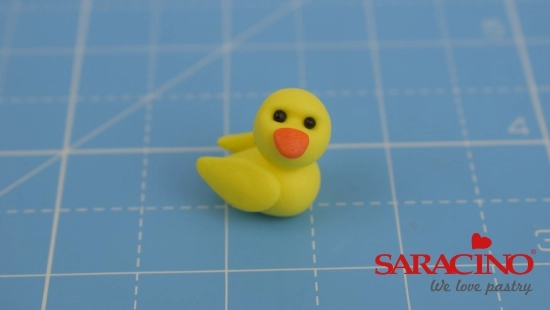
Stick the two wings either side of the body. Use the small balling tool to indent two holes and stick the eyes into place. Stick the head onto the body ad finally add the beak.
Step 54
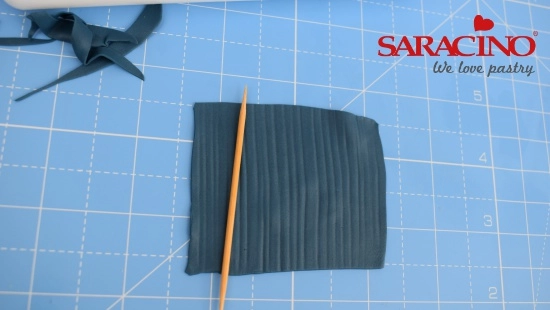
Thinly roll 4g of navy modelling paste, and using a sharp knife trim the edges to make a rough rectangle shape. Gently roll and press a cocktail stick along the paste to texture.
Step 55
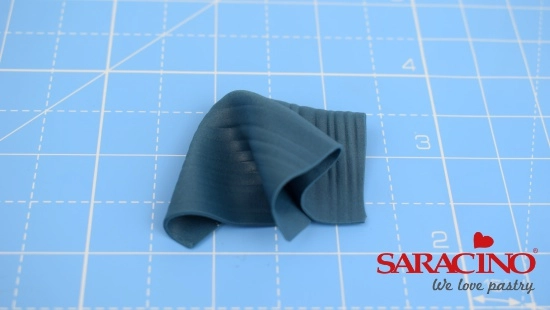
Fold the paste together to look like a crumpled towel.
Step 56
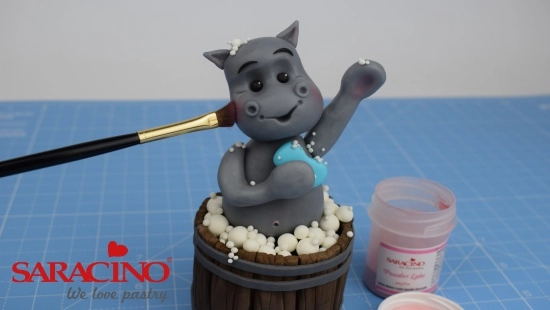
To finish use a soft paintbrush to apply a small amount of Saracino pink dust to the cheeks and palm of the hippo.
Step 57
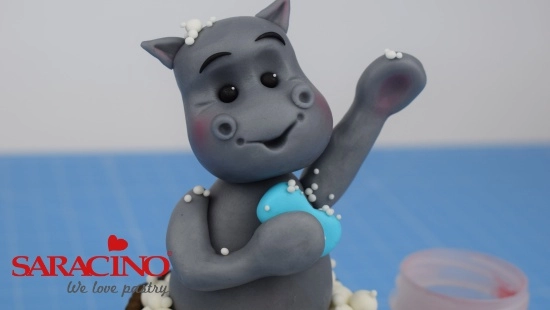
Add a small amount of dust to the inside of the ears.

THE GREATEST SHOWPIECE
Introducing one little boy with a big imagination.
When little Jacob designed his own fifth birthday cake, he was inspired by his favourite film, with the design including all of his favourite characters, larger than life animals, music, movement and a lot more besides!
His godfather, cake blogger Rob Baker-Gall of Mr Baker’s Cakes and Mr Baker’s Blog knew that this wasn’t something he could do on his own, so he reached out to his friends – some of the most talented cake decorators and artists in the UK – to achieve the impossible and bring Jacob’s dreams to life.
We Are Featuring the work of 17 fantastically talented and amazingly generous cake artists from across the UK who all came together to help bring to life the dreams of a very special little boy on his fifth birthday.
The finished cake was on a 0.92m board and was over 1.6m tall – with the majority of the characters modelled out of Saracino Modelling Paste.
Enjoy <3


Congratulations On Your Amazing Creations!
Join Our Newsletter
We’d love to send you the latest news, discounts & exclusive offers via email! By signing up below you are confirming you are happy for Saracino to send you marketing emails. We will always treat your personal details with the upmost respect & will never sell your details to other companies for marketing purposes.