KAWAII HALLOWEEN CUPCAKE TOPPERS

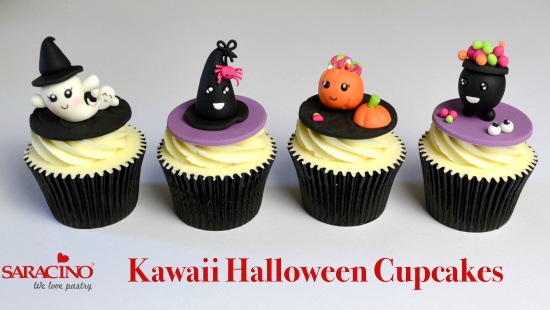
KAWAII HALLOWEEN CUPCAKE TOPPERS

Author: SARAH BRAY

Skill level: BEGINNERS

You will need:

  • Black sugarpaste with tylose powder
  • Purple sugarpaste with tylose powder (I coloured white paste with Saracino violet gel colour)
  • Saracino modelling paste purple
  • Saracino modelling paste orange
  • Saracino modelling paste fuschia
  • Saracino modelling paste light green
  • Saracino modelling paste white
  • Sugar glue
  • Fine tipped edible black pen
  • Pale pink edible dust
  • 58mm round cutter
  • Cobble impression mat
  • Foam drying mat
  • Rolling pin
  • 29mm circle cutter
  • Paintbrush
  • Craft knife
  • Small ball tool
  • 2.5cm circle cutter
  • 6mm round plunger cutter
  • Small soft brush
  • Silicon shaping tool

GHOSTS

Step 1

Roll out black paste and use a cobble impression mat to make a pattern. Cut out two 58mm circles. Cut out two 58mm purple circles. Leave to dry on a foam mat.

Step 2

To make the larger ghost roll a cherry tomato sized piece of white paste into a ball and angle your hands to make a teardrop shape. Bend the tail of the ghost slightly. 

Step 3

Cut out a 29mm circle of black paste for the brim of the hat and glue to the ghosts head. Roll a marble sized piece of black paste into a teardrop shape using the sides of your hands. Cut off the rounded end and stick onto the brim of the hat bending the tip over.

Step 4

To make the ghosts arms roll two small teardrop shapes from white paste. Make a little dent on each side of the ghost with the end of a paintbrush and glue the arms inside (pointed end first)

Step 5

Make two small indents for the eyes and add small balls of black paste. Add tiny white pieces of paste for the highlights.

Step 6

For the baby ghost make a small teardrop shape as before and bend the end up. Roll a small sausage shape of white paste and cut in half to make the baby ghosts arms and stick on with glue.

Step 7

Glue both ghosts to the black cobbled topper and leave to dry (supporting with kitchen roll if necessary)

WITCHES HAT

Step 1

Roll a cherry tomato sized piece of black paste into a ball and angle your hands to make a teardrop shape and cut of the rounded end to make the witches hat.

Step 2

Cut out a 29mm circle of black paste. Add a small spot of glue to the centre of the circle and attach to a purple discs. Use the end of a paintbrush to lift the brim in three places slightly. Glue on the cone of the hat and bend tip slightly.

Step 3

To make the spider roll a small oval ball of fuschia paste in the palm of your hand.

Step 4

Roll another piece of fuschia paste into a long thin length. Place the body on top of the length of paste and cut the first pair of legs

Step 5

Repeat this three times to create the spiders 8 legs and use a craft knife to separate and shorten the legs.

Step 6a

Roll out a long thin length of black paste and bend the top section over to make the first loop (in the shape of an ‘e’)

Step 6b

Repeat to make a second loop and cut off excess.

Step 6c

Glue the spider to the bottom of this length and attach this to the witches hat with sugar glue.

Step 7

Use a small ball tool to make two indents for eyes and fill with small balls of black paste. Add highlights as before.

Step 8

Using a 6mm round plunger cutter, cut out a thin circle of white paste. Cut in half and attach one half for the mouth of the hat.

PUMPKIN

Step 1

Roll a cherry tomato sized piece of orange paste into a ball and cut off a quarter with a craft knife and set aside.

Step 2

Push the ball into the workboard leaning it back slightly and use a silicon shaping tool to create grooves for the pumpkin and repeat on the lid. 

Step 3

Roll a small piece of light green paste into a teardrop shape and cut off the rounded end. Make a small indent with a small ball tool in the lid and glue in the stalk.

Step 4

To make the lollies roll out two long thin lengths of green and fuchsia paste. Pinch together and the top and twist into a rope.

Step 5

Curl these round to make a lolly and repeat to make a smaller one. Flatten slightly with your finger

Step 6

To make the candies roll three thin lengths of fuchsia, orange and white paste and push together.

Step 7

Cut diagonally one way and the other to cut 6 little candies. Use your thumb and fingers to push and shape them together.

Step 8

Use a small ball tool to make two indents for eyes and fill with small balls of black paste. Add white highlights as before. 

Step 9

Fill the pumpkin with the sweets and candies. Attach pumpkin, lid and additional sweet onto the black topper.

CAULDRON

Step 1

Roll a cherry tomato sized piece of black paste into a ball. Cut off a quarter with a knife.

Step 2

Roll 3 pea sized pieces of black paste into balls and set aside to dry.

Step 3

For the rim of the cauldron roll out a piece of paste 3mm thick and cut out a 2.5cm circle and attach to the flat side of the cauldron with sugar glue.

Step 4

Roll a collection of little balls of varying sizes using green, fuchsia and orange paste and arrange these on the top of the cauldron securing with sugar glue.

Step 5

Use a small ball tool to make two indents for eyes and fill with small balls of black paste. Add white highlights as before. 

Step 6

When the cauldron legs feel firmer arrange them in a small triangle on the purple disc and gently stick the cauldron on top.

Step 7

Using a 6mm round plunger cutter, cut out a thin circle of white paste. Cut in half and attach one half for the mouth of the cauldron. Add a few bubbles to the side of the cauldron.

Step 8

Roll 2 small white balls of paste and use a small ball tool to make an indent. Stick in 2 small balls of black paste and add highlights as before. Stick these onto the topper.
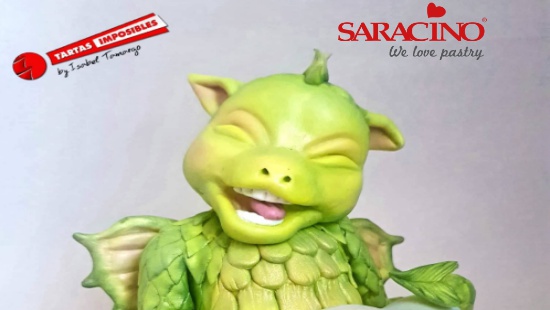
BABY DRAGON SWEET VALENTIN

BABY DRAGON SWEET VALENTIN

Skill level: BEGINNERS

You will need:

  • Approx 250g of Saracino modelling paste for the figurine
  • Approx 200g of Saracino sugar paste for the board
  • Modelling tools (small size)
  • Diamond shape cutters (at least two small sizes)
  • Scalpel
  • Rolling pin
  • 18cm rounded cake drum
  • A piece of aluminium foil
  • A pair of toothpicks
  • RKT for the interior
  • Colours: apple green, milk chocolate, green, metallic green, pink, metallic grey

Step 1

Make the shape for the body and head. You can cover a small amount of RKT if it is to be edible or cover a rolled up foil ball if you just want to make the figurine for display purposes. We will cover both elements with the modelling paste, already coloured with apple green colour.

Step 2

Start the face by using a ball shape. Press with the dresden tool in both sides to mark the cheeks. Make the lines of the eyebrows and eyes like in the pictures to have smily eyes. Finally mark a little more the cheeks, forming them rounder.

Step 3

Make both nose and mouth really easy, using two small pieces of Saracino modelling paste. You can wet both pieces to fix them to the rest of the face. Make them rounded and smooth with your fingers and make two holes to form the nose. The mouth has to be open so just add the second part (jawline and chin) and fix it just as you did with the sides. You can mark the smile in the corners of the mouth with the dresden tool as you see in the pictures

Step 4

Finish the head with ears and some hair and fix them to the head with water. You can also decorate the head with some texture, making squares with your tool up to the forehead and back of the head

Step 5

Let’s make some more details! Take a pinch of white modelling paste to create the teeth. Just fix them in the upper and inner part of the mouth and make some straight lines. We can also take a pinch of paste, dye it with pink and make the tongue coming out to have a funny expression.

Step 6

Let’s prepare the board! Knead and roll the sugar paste and cover the cake drum with a thick layer. Don’t forget to dampen the board first to have the paste stick to it. Make textures, like a stone floor with our modelling tool, I recommend the dresden tool to form the holes rounded. You can make the pattern of the stones to the size required. Take small pieces of paste and make the stones to cover the side of your drum. Dust it to add extra contrast.

Step 7

Now it’s time to make the body. We need to stick the shape we made already with the RKT to the board. Once we have the body stable, we can start forming the legs, using the dresden tool as you see in the pictures. Then stick them to the body with water and bend them like in the picture.

Step 8

Now the arms, also with our tool, bending them a little in the middle and making some details on the hands like wrinkles and nails as you see in the pictures. You don’t have to work too much on the arms because we will cover them after with scales

Step 9

We can make the heart to let it set. It’s really easy to make the shape, just decorate it with your choice of words (“love”) written with a rounded tool and make some textures using a piece of foil.

Step 10

Now it’s time to decorate the body with the scales. You can shape them directly to the body after you cover the RKT but in this tutorial we will make them with cutters. For the body you can use large ones, we don’t need a cutter for that. Just try to use different sizes, make it smaller in the upper part and getting larger towards the tummy. Make small diamonds for the rest of the body and fix them with water starting always at the bottom and working up, overlapping the rows until we get to the top. Make a tail with a piece of paste, covering it with scales and put a textured heart at the top. Shape a pair of wings and allow to dry. Fix them to the back of the dragon with toothpicks and water or edible glue.

Step 11

After covering all with the scales we can fix all the elements together. The arms have to hold the heart but all are glued to the body so it will be easy to build. Put the tail on the heart, curvy. Stick the head in the body with another toothpick and you have your dragon ready to paint!

It’s easier to paint your figurines if you work with pre-coloured paste so now you just have to apply shade and colour as you wish. Use the darker colours for the inners parts, depressions and holes and metallics for the rest, applying carefully with a brush. Also with the board, you need the cream colour for the centre of the stones and a darker brown for the holes to create the texture effect.

And it’s done!

CUTE BALLERINA MOUSE CAKE TOPPER

CUTE BALLERINA MOUSE CAKE TOPPER

Author: Patricia Alonso

Skill level: BEGINNERS

You will need:

  • White SARACINO modelling sugar paste
  • Black  SARACINO modelling sugar paste
  • Tiffany  SARACINO modelling sugar paste
  • Plastic  knife Cerart
  • Sharp cutting knife
  • Paint brushes for painting, dusting and gluing
  • Glue
  • Pink dust for brushing
  • Black pen edible paint
  • Small ball tool Cerart
  • Big  ball tool Cerart
  • Small rolling pin
  • Round cutters of different sizes
  • Foam
  • Flower wires number 22
  • Cocktail stick
  • Black edible ink pen

Step 1

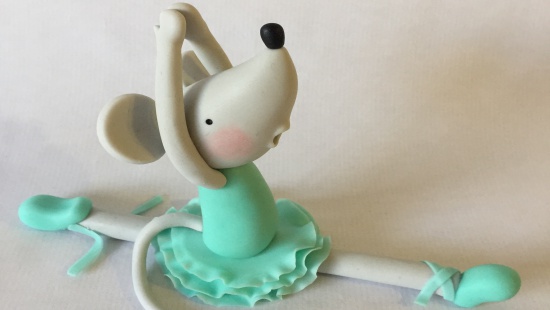
Mix some white SARACINO modelling sugar paste and a bit of black SARACINO modelling sugar paste to have a light grey paste.

Step 2

Make a ball and roll it into a sausage. Cut the tIps of them to have legs as long as you need.

Step 3

Make two balls with some Tiffany SARACINO modelling sugar paste and, then, roll it  into a pear shape for the ballet slippers.

Step 4

Glue the ballet slippers in the tips of the sausage.

Step 5

Roll some Tiffany SARACINO modelling sugar paste into a pear shape. Cut the base of the pear with a sharp cutting knife.

Step 6

Stretch thin with the rolling pin some Tiffany SARACINO modelling sugar paste and cut 3 different size rounds.

Step 7

On a foam, press each round on the edge with a big ball tool Cerart and let dry a few minutes before assembling.

Step 8

Stretch thin with the rolling pin some Tiffany SARACINO modelling sugar paste and cut four narrow strips. Then, roll some light grey paste into a teardrop shape and press with a small ball tool Cerart to build the mouth.

Step 9

Assembly the pieces with edible glue.  To secure the head on the top of the body, insert a cocktail stick and push it down securing the head with a little edible glue. 

Step 10

1. Stretch thin with the rolling pin some light grey paste and cut two rounds of the same size for the ears. 

2. With the same cutter, cut a small part of each ear  to support it better on the head.

3. Use some light grey paste and roll it into a sausage with a pointed end and cut as long as you need.

4. Roll a bit of black SARACINO modelling sugar paste into an oval shape.

Step 11

Assembly the pieces with edible glue.

Step 12

Paint the eyes with a black edible ink pen.

Step 13

Roll some light grey modelling paste  into a sausage with a little ball in one of the tIps. Cut the other tIp and insert a wire inside of them. Press lightly the tip and cut a small triangle to form the thumb.

Step 14

Brush the cheeks with pink dust.

Step 15

AND…. YOUR BALLERINE RAT IS FINISHED!

MODELLING A LIFE SIZE EAR

MODELLING A LIFE SIZE EAR

Author: Carla Puig

Skill level: BEGINNERS

You will need:

  • Saracino White Modelling Chocolate
  • Saracino Skin Tone Food Colour
  • Dresden Cerart 301 Tool

Step 1

We only need Saracino Modelling chocolate and a dresden tool

Step 2

Colour a small piece of chocolate with flesh tone and do a ball

Step 3

Give ‘drop shape’ to the ball

Step 4

Flatten the ball

Step 5

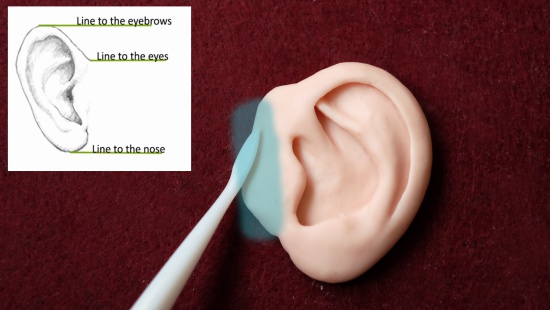
Using an ear picture as a reference, lightly draw the shape in our ‘flattened drop’

Step 6

Remove all the chocolate showed in the ‘green zone’

Step 7

Smooth the edges with the back of the tool

Step 8

Remove a little bit of the chocolate in the ‘red zone’

Step 9

Smooth the edges with the tool

Step 10

Once all the edges are smooth, stick it to the face and blend the ‘blue zone’ with the cheek following the position showed in the image.

CAKE OF THE MONTH AUGUST 2018

CAKE OF THE MONTH AUGUST 2018

Congratulations to MILENE HABIB


who wins our top spot for


SARACINO CAKE OF THE MONTH – AUGUST 2018


Exclusive for Saracino, Milene answered few questions. Have a look below!


Q: What cake tool can’t you live without?

A: Brushes, I do not use just to paint, but also for modelling

Q: What inspired you?

A:  Everyone and everyhing, I see cake every where. But specially cartoons and fantasy art. Jessie was created for a deviant sugar art collab. I love toy story, that was my inspiration among a few fanarts I found online, and I really had to give a sassy look to her hehehehe

Q: What’s your favourite Saracino product?

A: Modelling Paste

Q: What movie title best describes your life?

A: Dificult question!! Probably “Alice in wonderland”, “We’re all mad here.” “I’m not crazy, my reality is just different than yours.”

Q: What’s your best advice in 5 words or less?

A: Live, laugh, love and bake!


AND A FEW QUICK FIRE QUESTIONS:


1. Flavour – Chocolate or vanilla? – VANILLA  

2. Plan properly or wing it? – PLAN PROPERLY

3. Whilst working – Listen to music or watch tv? – LISTEN TO MUSIC

4. Favourite product – Saracino pasta model or Saracino modelling chocolate? – PASTA MODEL 

5. Delivery – Down a long bumpy road or during a rain storm? – RAIN STORM

6. Buttercream or ganache? – GANACHE

7. Do you prefer – Baking the cake or decorating the cake? – DECORATING 

8. Mould or handmade? – HANDMADE 

9. Airbrush or paint by hand? – PAINT BY HAND

10. Apron or chef whites? – APRON

11. Straight edge or round? ROUND EDGE

12. Customer design or free reign? – FREE REIGN  

13. Stay up all night to finish or get up early to finish? – GET UP EARLY TO FINISH 

14. Fruit cake – Yay or Nay? – YAY

15. Your own birthday cake – Make it yourself or have the week off? – DAY OFF


To see more of Milene’s work visit her page


Saracino Team