CREATE A WAFER PAPER FEATHER

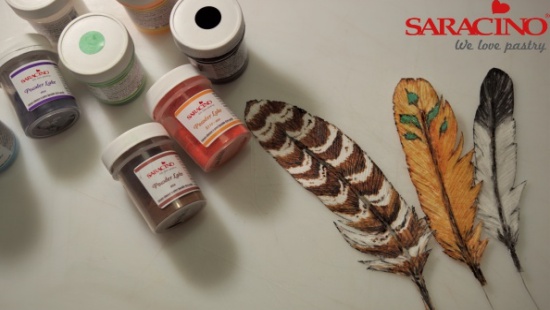
CREATE A WAFER PAPER FEATHER

Author: Gisi Prekau

Skill level: BEGINNERS

You will need:

  • Wafer Paper from Saracino – 0.27 thickens
  • Saracino cocoa butter
  • Powder dust – black, brown, green, blue, yellow, orange from Saracino
  • Flower wire 24 gauge
  • Piping gel from Saracino 
  • Small scissors
  • Pencil
  • Dresden tool
  • Painters palette
  • Brush big wide
  • Fine brushes

Step 1

Choose a feather template and cut it out with scissors.

Step 2

Fold the waferpaper so that the rough side is inside. Transfer the template to the outside of the paper using a pencil.

Step 3

Prepare floral wire to a length suitable to fit the centre of the feathers and bend them slightly to give them gentle curvature.

Step 4

Coat the edible paper on the inside with piping gel using a large brush, then place the floral wire and fold. Give good pressure to glue the waferpaper well.

Step 5

Using a dresden tool push the wafer paper over the wire to form the centre of the feather. Let it dry for several hours.

Step 6

Cut out the feathers carefully with small scissors. Add texture to the feather using a Dresden tool.

Step 7

Now you are ready to paint your feathers as required.

Step 8

Melt the cocoa butter and mix with powder colours.

Step 9

Using a thicker mixture paint the darker parts of the feather. To achieve more transparent colour for the lighter sections use a thinner mix.

Step 10

I always start with a general base colour (thinner blend) and work with the details gradually. The following details are usually marked in colour and applied with a finer brush.

Step 11

The colour scheme can be made as you wish – add a fine marking outer line around the edge of the feather.

CAKE OF THE MONTH NOVEMBER 2018

CAKE OF THE MONTH NOVEMBER 2018

Congratulations to WIOLETTA ADAMSKA


who wins our top spot for


SARACINO CAKE OF THE MONTH – NOVEMBER 2018


Exclusive for Saracino, Milene answered few questions. Have a look below!


Q: What cake tool can’t you live without?

A: CERART tools, Mary Presicci set 

Q: What inspired you?

A:  Inspirations are all around us, just keep your eyes wide open

Q: What’s your favourite Saracino product?

A: Modelling Paste and Raspberry food flavouring 

Q: What movie title best describes your life?

A: I have no idea… 😉 

Q: What’s your best advice for cake makers?

A: If you don’t know how the cake looks like, take a picture and you will see what has gone wrong 


AND A FEW QUICK FIRE QUESTIONS:


1. Flavour – Chocolate or vanilla? – VANILLA  

2. Plan properly or wing it? – WING IT

3. Whilst working – Listen to music or watch tv? – SOMETIMES MUSIC

4. Favourite product – Saracino pasta model or Saracino modelling chocolate? – PASTA MODEL 

5. Delivery – Down a long bumpy road or during a rain storm? – RAIN STORM

6. Buttercream or ganache? – GANACHE

7. Do you prefer – Baking the cake or decorating the cake? – OF COURSE DECORATING 

8. Mould or handmade? – HANDMADE 

9. Airbrush or paint by hand? – BOTH

10. Apron or chef whites? – APRON JUST FOR NOW

11. Straight edge or round? STRAIGHT

12. Customer design or free reign? – FREE REIGN  

13. Stay up all night to finish or get up early to finish? – ALL NIGHT 

14. Fruit cake – Yay or Nay? – NEVER TRIED..ops

15. Your own birthday cake – Make it yourself or have the week off? – DAY OFF


To see more of Wioletta’s work visit her page


Saracino Team 

CREATE A BEAUTIFUL ROSE

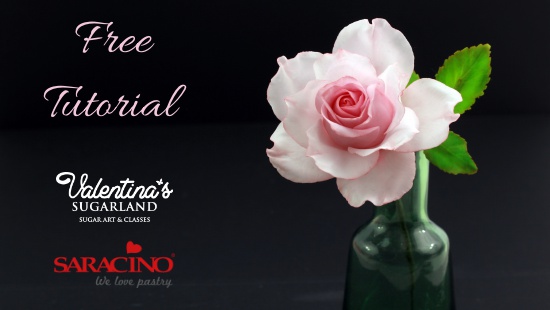
CREATE A BEAUTIFUL ROSE

Skill level: BEGINNERS

You will need:

  • 50-70g Saracino Pasta Bouquet Gum Paste
  • Saracino Cake Gel or glue
  • Gel colours green and pink
  • Dust colours – pink, green, white, yellow, red
  • Floral wire green 20G and 28G
  • Floral wire white 28G
  • Styrofoam rose center 3.5cm 
  • Floral tape, green
  • Teardrop cutter 4.5cm and 5cm
  • Rose leave cutter 4cm and 3cm 
  • Veiner rose petal, large
  • Veiner rose leave
  • Calyx cutter 3.5cm
  • Cell-board with grooves
  • Foam pad
  • Ball tool, big
  • Craft knife
  • Hot Glue
  • Pliers
  • Plastic spoons

Step 1

Use a styrofoam rose center glued on the 20G green wire or make one out of 15g white Gum Paste. If you are using a gum paste center make it ahead of time and leave it to dry well.

Step 2

Colour your paste in three different shade of pink using gel colour and one shade of green. You will probably need to colour about 10-20g for each colour. 

Step 3

For the rose petals roll out the paste with the darkest colour very thin. Before rolling out apply some vegetable fat on your board, that will allow you to roll out thin. Cut out 5 petals with the 4.5cm teardrop cutter. 

Step 4

Place the petals on the foam pad and thin the edges using a large ball tool. Applying pressure roll the ball tool half on the paste and half on the pad. If needed use some cornstarch to make sure the paste will not stick to the pad or to the ball tool. 

Step 5

Place every petal in the veiner and firmly press to texture with the petal structure. Before first use of the veiner dust it with little cornstarch and dab off. Open the veiner and carefully lift the petal and place on a tablespoon to dry a bit.

Step 6

Use two petals to  cover the centre completely. Apply glue to the center and attach the first petal so it covers half of the cone. Keep one side open and slide the second petal underneath the open edge. Stick to the cone tightly.

Step 7

Apply glue to the edges of the pointed tip of the three remaining petals – like a “V”

Step 8

Add the first petal of the second row overlapping the joint of the petals of the first row. Keep the left side open. Add the second and third petal clockwise. Slide the left edge of the third petal under the open edge of the first. The petals are tight around the cone, only the upper edges are slightly open. 

Step 9

Roll out the middle colour and cut out 6 petals of 4.5cm. Thin the edges and press between the veiner as shown before. For the third row place three petals around the cone as shown in step 8. Leave the upper edges a bit more open than in row 2. 

Step 10

For the fourth row place the remaining three petal in the same way as for row 3. Curve the upper and the side edges with your finger tips. 

Step 11

Roll out very thin the lightest colour of your Pasta Bouquet and cut out 5 petals with the 5cm long teardrop cutter. Thin the edges and impress with the veiner. Place to dry on the tablespoons. Curve the upper edge with your finger tip and leave a bit longer to dry. The petals are ready to be placed on the rose when they can hold their shape and have a leathery feel.

Step 12

In the meantime prepare your last row of petals. To have more movement on those petals, you have to support them with wire and let them dry longer. Use a non stick board with grooves. Apply vegetable fat over one groove, place small amount gum paste of the brightest colour and roll out thin.

Step 13

Cut out a petal with the teardrop cutter with 5cm length.

Step 14

Cut one 28G wire in three and use one piece per petal. Place the petal with the back side up on the foam pad. Place one finger over the thicker center and insert the wire carefully with the other hand. It may help if you slightly twist the wire. Apply glue on the wire end before inserting. Now turn the petal with the right side up and using the ball tool thin the edges.

Step 15

Place the wired petal onto the veiner and press with one finger in order for the wire to bend to the curves of the veiner. Impress the petal structure as usual.  

Step 16

Carefully lift the petal out of the veiner and place it on a tablespoon.

Step 17

Curve the edges and leave at lease for 1 hour to dry. 

Step 18

If the fifth row petals are dry enough, you can assemble them around the rose. Apply “V”-like glue on the petal and place them clockwise around the cone, every one slightly under the previous one. 

Step 19

This petal row is more open and only glued to the base of the cone. Leave it for at least 30min to dry assembled like this. 


Step 20

Dust the rose centre and the edges of the petals with edible dust colours. I am using here Saracino Dust colour in pink and white, mixing the intensity depending on that which part I am dusting – darker in the center, lighter on the outer petals.

Step 21

Dust the wired petals too. Apply the dust on the edges and on the base of the petal inside and outside.


Step 22

Using flower tape put together the wired petals clockwise and always slightly one underneath the other. 

Step 23

Roll out thick green gum paste and cut out one calyx. 


Step 24

Using the ball tool go over each petal of the calyx and stretch it.

Step 25

Cut with a craft knife the top of each petal in two or three sections. Apply glue on the petals leaving the tips glue-free. 


Step 26

Attach the calyx to the rose and make sure it is sticking to the rose petals. Place small amount green gum paste behind the calyx and shape it as a half-ball.

Step 27

For the leaves roll out small amount green gum paste over the rill board and cut out one 4cm leaf. Insert a piece of 28G wire inside and thin the edges.  


Step 28

Impress with petal structure using a veiner. Make another two leaves each 3cm long and leave all three of them to dry. 

Step 29

Mix green and and yellow dust colour to achieve different shades of green. You will also need a bit of red dust. 


Step 30

Dust the rose leaves with darker and lighter green. Dust the edges with red. Dust also the calyx with these colours.

Step 31

Bind the three leaves with florist tape, the biggest leaf is in the middle, the smaller ones lower and on the sides. Bind rose and leaf branch together. 


CHRISTMAS CACTUS CUPCAKE TOPPERS

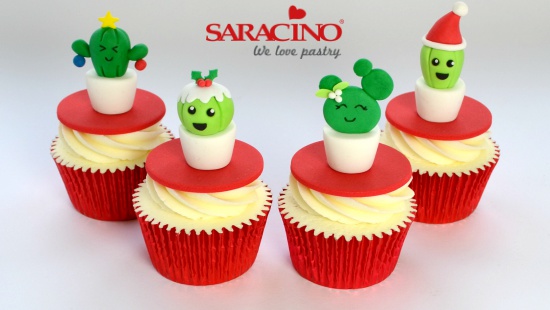
CHRISTMAS CACTUS CUPCAKE TOPPERS

Author: SARAH BRAY

Skill level: BEGINNERS

You will need:

  • Red sugarpaste treated with tylose powder
  • Saracino modelling paste white
  • Saracino modelling paste green
  • Saracino modelling paste light green
  • Saracino modelling paste red
  • Saracino modelling paste black
  • Small piece of yellow modelling paste (I coloured saracino white with melon yellow food colouring)
  • Small piece of blue modelling paste (I coloured saracino white with baby blue food colouring)
  • Sugar glue
  • Non edibles
  • Workboard
  • 58mm round cutter
  • Foam drying mat
  • Rolling pin
  • Paintbrush
  • Small ball tool/Large ball tool
  • Smoother
  • Sharp knife
  • Craft knife
  • PME blade tool
  • 29mm circle cutter
  • 10mm diamond plunger cutter
  • 6mm circle cutter
  • 11mm star plunger cutter
  • Fine tipped edible black pen

Step 1

Roll out the red sugarpaste and cut out four 58mm circles. Leave to dry on a foam mat

Step 2

Take a piece of white paste about the size of a large cherry tomato. Holding a smoother at an angle, roll back and forth to create a large teardrop shape.

Step 3

Using a sharp knife, cut the excess off at either end to make the pot. Repeat this three times to make four pots and set aside.

Step 4

Roll a cherry tomato sized piece of light green paste into a ball in the palms of your hands.

Step 5

Using a blade tool mark four deep creases into the cactus.

Step 6

Using some sugar glue attach the cactus to one of the pots.

Step 7

In one of the spaces use a small ball tool to make dents for the eyes.

Step 8

Cut out a 29mm circle of thin white paste and leave it to harden for a minute. Use a craft knife to cut a wiggly line all the way round to make the cream for the top of the cactus Christmas pudding.

Step 9

With your fingers, press this onto the top of the pudding using a spot of edible glue if necessary.

Step 10

To make the holly cut out two diamonds using the 1cm plunger diamond cutter and use a straw to remove the corners off two of the opposite sides

Step 11

Roll three tiny balls of red paste and attach the leaves and berries to the top of the pudding with sugar glue.

Step 12

For the eyes roll two small balls of black paste and secure with sugar glue. Add tiny white balls of paste as highlights. Roll a piece of black paste thinly and cut out a 6mm circle. Cut in half with a craft knife and attach one half for the mouth. Attach this pot to one of the red toppers with sugar glue.

Step 13

Roll a cherry tomato sized piece of light green paste into a ball and angle your hands to roll into a teardrop shape.

Step 14

Roll a cherry tomato sized piece of light green paste into a ball and angle your hands to roll into a teardrop shape.

Step 15

Mark 5 lines on the cactus with a blade tool as before and attach the cactus to the pot with sugar glue. Mark in two dents for the eyes with a small ball tool as before.

Step 16

To make the Santa hat roll a large marble sized piece of red paste into a ball. Angle your hands and roll into a teardrop shape

Step 17

Cut off the rounded end with a sharp knife to make the hat and stick onto the cactus’ head using sugar glue if needed. Bend the tip over slightly

Step 18

Roll a long sausage of white paste (about 3mm thick) and flatten slightly. Wrap around the base of the hat and trim off excess at the back with craft knife. Use a spot of sugar glue to secure if needed. Roll a small pea sized piece of white paste into a ball and attach to the top of the hat with sugar glue

Step 19

To finish off add two small balls of black paste for the eyes and add white accents as before. For his mouth roll a piece of black paste thinly and cut out a 6mm circle. Cut in half and attach one half. Glue the cactus pot to a red topper.

Step 20

Roll a cherry tomato sized piece of green paste into a ball. Angle you hands and roll into a tear drop shape. Cut off the pointed end with a sharp knife.

Step 21

Place on board and in a rocking motion from bottom to top mark on three lines using a blade tool. These will be the back of the cactus

Step 22

For the front mark only a quarter of the way up from the bottom and repeat. Do this from the top a quarter of the way down and repeat. This will then leave a space for his face to drawn on later. Use sugar glue to attach the cactus to the pot.

Step 23

Use a small ball tool to mark a dent half way down on either side (this is where his arms will attach into)

Step 24

Roll 2 pea-sized pieces of green paste into balls. Roll into teardrops with the side of your finger.

Step 25

Bend slightly and use sugar glue to stick these into the dent on either side. You may need to support these for a few seconds whilst they are drying. Set aside.

Step 26

To make the decorations cut out a star (10mm star plunger cutter) from yellow paste. Attach to the top of the cactus. Roll a small petit pois sized piece of blue and red paste for the baubles. Attach one bauble to each arm using a spot of sugar glue if necessary. Set aside to dry.

Step 27

Take a large marble sized piece of green paste and roll into a ball. Use your fingers and thumbs to flatten into a thick circle.

Step 28

Attach to one of the pots with sugar glue.

Step 29

Roll another piece of green paste into a pea sized ball and flatten in the same way. Attach to the top right hand side of the circle. Roll two more petit pois sized balls of green paste, flatten and stick one on the previous circle and the other on the left hand side

Step 30

For the mistletoe make two tiny balls of light green paste and roll into teardrops using the side of your finger.

Step 31

Roll out from the rounded end first using a rolling pin to make two small leaves. Attach these two the left hand side of the cactus.

Step 32

Roll three tiny balls of white paste and secure these next to the leaves with sugar glue. Attach cactus pot to a red topper and leave to dry

Step 33

When toppers are completely dry draw faces on to both dark green cacti using the fine end of an edible black pen. Stick on last cactus pot to remaining red topper.

Cake International 2018 Show Saracino Stand

Cake International 2018 Show Saracino Stand

When you’re the biggest cake show in the world celebrating your 25th birthday, what’s the most important thing you need? Why cake of course! But not just any cake, THE biggest, most beautiful, out of this world cake ever seen! A cake so big you need a ladder to reach the top! Sometimes though even a cake of this magnitude isn’t enough on its own to celebrate such an important birthday, so what do you do? Well if you’re team Saracino you decide that the only thing perfect enough to accompany such an incredible cake is an equally incredible life-sized replica of the fabulous Melanie Underwood!

How did all this magic happen? Let me tell you… Way back in January Sylwia Anna Jozwiak dreamt up the idea for the birthday cake to top all birthday cakes, now as amazing as she is this was a task she could not do alone, after months of planning she rallied her team of super talented sugarcraft artists and told them of her master plan. She enlisted the expert help of the CakeDummies.com team to create the larger lower tiers of the cake. The bottom tier was an amazing 1000mm diameter and 300mm deep. Preparation of the structure and dummies for the cake even involved weekend visits to Llandudno for the amazing Rhianydd Webb and Sylwia Sobiegraj! 30 Saracino Ambassadors from around the world jumped on the birthday train and set about making magic. For months they worked away using only the finest Saracino ingredients to complete their creations in preparation for the big day…

The day of the build! As the sun was rising team Saracino were already up and raring to go, ambassadors with their precious cargo were travelling from all over the country and flying in from all over the world to create the mother of all birthday cakes.

So many jobs, so much work and everything had to be done on site in the oh so cold NEC hall! Cakes were being covered, piping was taking place. Flowers and leaves were being wired together in preparation for their adornment on the cake. Beautiful paintings carefully unpackaged and lined up ready to be hung. Over in the figure zone, there were so many magnificent figures being unboxed and prepared. Ambassadors were fixing heads to ambassadors, creating hairstyles and adding those finishing touches. All around were people working, husbands were roped in for the arduous task of kneading and boy, knead they did! Saracino Pasta Model, Pasta top and modelling chocolate all in preparation for the unbelievable creation that was taking place in the middle of the build! The phenomenal life-sized Melanie Underwood! Who at the start of Thursday morning was nothing more than a head and pair of hands but who throughout the day was brought to life under the watchful eyes and expert guidance of Rhianydd Webb and Isabel Tamargo! Every inch of her carved smoothed and coloured to perfection!

Breaths were held all around as the cakes were stacked and lifted into place on the table. The home stretch was now in sight, the flower team descended on the cake twiddling and twirling and attaching their masterpieces. The figures were secured into position, on the cake, under the cake and all around the cake! Paintings were hung delicately on the walls, and Melanie was finally guided into place, graphics and posters prepared by João Pimentel (including a fun selfie frame) were set up, all miraculously before the 8pm deadline! When finished the overall height of the cake was measured at a staggering 2200mm tall.

As if all this wasn’t enough magic for one stand to have, throughout the weekend the team Saracino offered multiple astounding free demonstrations from its proud ambassadors. There were modelling demonstrations for animals and people, demonstrations in how to paint with cocoa butter, and an array of flower making demonstrations to name a few. For those who wished for a more hands on approach team Saracino provided a marvellous opportunity to take some spectacular classes on site with several of their incredibly talented ambassadors.

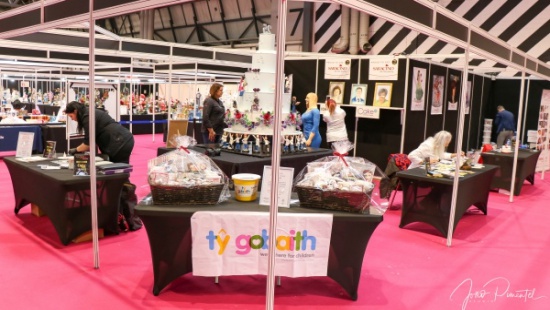
So, they had the best cake ever and the astounding demo’s and the spectacular classes, but Saracino had a rather special and very important mission they were also working on all weekend. Raising money for Hope House Ty Gobaith! A beautiful and vitally important hospice for children who are affected by conditions so serious they aren’t expected to live longer than early adulthood. With the generous donations from Cake international, Silvia Mancini Cake art & co, Cerart, Valentina’s sugarland and Sweet Revolutions by Domy. Saracino put together two phenomenal hampers full of goodies and sold raffles tickets throughout the weekend of the show.

How do you top all of that? By inviting the real-life Melanie Underwood to come and cut the cake of course! At 3pm the cake was ceremoniously cut and served to the hoards of visitors desperate to get a delicious slice! The raffle was drawn, and the winners announced. Now you may think that this would conclude our story but no! Not content with just a raffle for Hope House, team Saracino then set about auctioning off everything that adorned the cake! People were buying flowers and leaves. Husbands were selling off wives, wives were selling off husbands…Of the sugar variety! Ambassadors and judges were buying their own figures, well who wouldn’t be ecstatic at having a mini version of themselves in sugar? Money poured in from everyone happy to help such a worthwhile cause. I’m delighted to tell you the generosity of everyone who contributed that weekend raised a whopping £1820.65 and was gratefully received by Hope House shortly afterwards.

This is how you have the most memorable, fantastical worthwhile weekend! A birthday celebration full of laughter and love and incredible sugar art! Roll on Cake international 2019 you won’t believe what we have planned!

Enjoy the photo slide below. Click on the picture to see more.


Text by Lynsey Wilton – Eddleston