VALENTINE’S COOKIE

VALENTINE’S COOKIE

FB: PLANETA CIAST

Skill level: ADVANCED

You will need:

  • Saracino Royal Icing
  • Sharp scissors
  • Water
  • Skewer
  • Thin precise brush
  • Small soft brush
  • Icing bags
  • Saracino gel colours: skin, red, brown, black
  • Saracino powder colours: white, skin, pink, light blue, blue, brown, black
  • Ready baked gingerbread

Step 1

Measure 250 grams of Saracino Royal icing, add 50 grams of water, mix intensively with a spoon or in a food mixer. The icing you are creating will be perfect for filling backgrounds on your gingerbread.

Step 2

Put a small amount of icing into a bowl and add Saracino blue powder coloring. Add smaller amount first and add gradually to achieve the perfect shade.

Step 3

Mix the icing until the coloring completly desolves. Well-mixed frosting with a dye should be smooth and without lumps. Advice: Put leftover icing in a sealed container or put a wet cloth on top of the bowl.

Step 4

Put one of your gingerbread on a board and fill a piping bag with the coloured royal icing.

Step 5

Cut out a small hole on the sharp end of the icing bag. Pipe a line around the edge of the gingerbread.

Step 6

Run out between the piped line with coloured royal icing.

Step 7

The background will need about 2h to dry. Alternatively you can put it in the oven on 50 degrees celcius for around 10 minutes. The icing on the top will dry out, but will still be soft under the surface. While moving the gingerbread, DON’T touch the icing!

Step 8

After the icing dries out you can put other layers. You can easily draw a shape using a skewer.

Step 9

Put some white royal icing into a bowl and add one or two drops of Saracino skin tone gel colour.

Step 10

Fill an icing bag, cut out a little hole in the sharp end of the bag.  Mark on the gingerbread face, hand and the leg of the character. Important: You can add other elements when the previous dries out.

Step 11

Mark the head of the second character and pipe the outline.

Step 12

Run out the head shape with icing after the first head has dried out slightly.

Step 13

Pipe the neck and an ear.

Step 14

Put some white royal icing in a bowl and add a drop of Saracino red gel coloring. Mix with a spoon. Put half of the prepared icing in an icing bag. Add another one or two drops of the red gel coloring into the bowl, mix it and put it in another icing bag. This way you will achieve two different shades of pink.

Step 15

Repeat steps from the 14th point, but with Saracino brown gel coloring.

Step 16

Repeat steps from the 14th point, but with Saracino black gel coloring. Add more drops to the icing as we want a strong black colour.

Step 17

Draw a shirt with the pink icing, a t-shirt with dark brown and the pants with light brown. Leave it to dry.

Step 18

Draw the first trouser leg with light pink icing, hands and legs with nude color icing.

Step 19

Draw the second trouser leg with light pink icing, hands and legs with the nude color icing.

Step 20

With the nude color icing, pipe the leg and the belly.

Step 21

Pipe the hair outline with the black icing.

Step 21

Run out the hair with black royal icing.

Step 22

Pipe the hairline of the second character.

Step 23

Run out the hair with black royal icing.

Step 24

Put the light blue icing into a bowl and add a little more Saracino blue powder to achieve stronger colour. Mix it, put into the icing bag and pipe the pillows. Advice: You can also use the gel colour to colour your icing.

Step 25

Put the remaining pink icing into a bowl and add more red gel colour to get a deep red. Mix it well and put it into an icing bag and pipe hearts.

Step 26

Measure 125g of Saracino Royal icing and add 18 g of water. Mix it well. You’ll get icing perfect to make edge bead. Put it into an icing bag and pipe the beads around the gingerbread.

Step 27

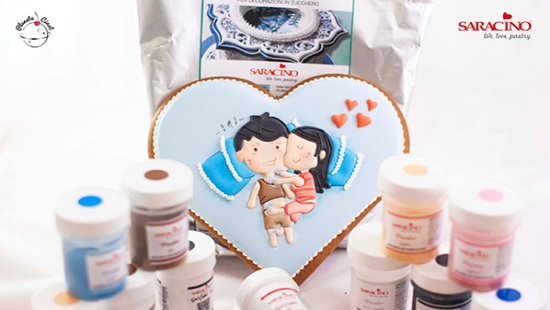
The gingerbread should look like this with the decorative bead around the edge.

Step 28

Take blue powder colour and dust the hands of the characters with a brush to achieve effect of cold hands and feet. Important: Don’t put the colour direct onto the icing without  dabbing it on a paper towel first.

Step 29

Repeat step 28 with pink powder colour, dust the hoodie, the trousers and the cheeks of the characters.

Step 30

Use the brown powder colour to add shadows on the hoodie and the trousers. Important: If you have only one brush, wash it and dry it after every usage.

Step 31

Mix the brown powder colour with water or clear alcohol using a small brush. Draw around the hoodie and the trousers.

Step 32

Use the diluted brown colour to paint eyes, and use the nude color to draw around hands and the legs.

Step 33

Add one more pillow next to both sides of characters. Use the diluted white powder colour to draw lines around the characters as shown on the photograph.

Step 34

Dilute the black powder colour and draw symbols above the characters. Use the white thick icing (one you have used to pipe decorative beads around the edges of the gingerbread) to pipe a patern around the pillows.

Step 35

With pink diluted powder colour paint around the trousers, shirt and add stripes on the shirt.

Step 38

Put the rest of the white icing into a bowl and add a tiny bit of black icing, mix it and put into another bag. Pipe around the hair. Dust some shadows with blue powder colour.

Step 37

Da Da your gingerbread is ready to give to a loved one.
VALENTINE’S CUPCAKE TOPPERS

VALENTINE’S CUPCAKE TOPPERS

Author: SARAH BRAY

Skill level: BEGINNERS

You will need:

  • Red sugarpaste treated with tylose powder
  • Saracino modelling paste white
  • Saracino modelling paste rose
  • Saracino modelling paste fuchsia
  • Small piece of brown modelling paste 
  • Small piece of black modelling paste 
  • Sugar glue
  • Work-board
  • 58mm round cutter
  • Foam drying mat
  • Rolling pin
  • Paintbrush
  • Edible glue
  • Small dotting tool or small ball tool
  • Sharp knife
  • Craft knife
  • Blade tool
  • Stitching tool
  • Large heart cutter (approx. 35mm in diameter)
  • 10mm diamond plunger cutter
  • 13mm diamond plunger cutter
  • Heart plunger cutters (small 6mm, medium 10mm and large 13mm)
  • RulerCling film
  • Fine tipped edible black pen
  • Pink edible dust and brush

Toppers

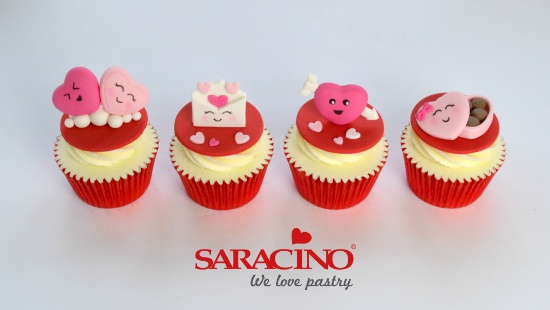
Roll out red sugarpaste (pretreated with tylose powder) and cut 4 x 58mm circles. Set aside to dry completely on foam mat.

Step 1 Hearts on a cloud

Roll out fuchsia pink paste to approx. 6mm in thickness and place a piece of cling film on top. Smooth over with fingers so there are no creases and push heart cutter down on top. Carefully remove cling film (making sure the cutter hasn’t left any on the top of the paste) and set aside to dry. Repeat with the rose paste.

Step 2

Use a stitching tool to add detail around the edge of the rose heart and leave to dry.

Step 3

To make the cloud roll out a number of white paste balls in the palm of your hand. Try to have a variety of different sizes.

Step 4

Stick the balls onto the topper with the larger balls in the centre and getting smaller towards the two sides.

Step 5

Using sugar glue, stick the rose pink heart onto the right hand side of the cloud at an angle.
Step 6

If necessary turn the topper around and support the back with another small ball of white paste.

Step 7

Glue the second fuchsia pink heart onto the left hand side of the cloud, also add a spot of glue to join the two hearts together in the middle. Push together gently onto the cloud. Again, if necessary, add a white paste ball to the back to support the heart.

Step 8

You may now want to add in a small white paste ball or two just to finish off the cloud. Leave to dry completely.

Step 1 Arrow through heart

Roll out a piece of fuchsia paste about 6mm in thickness. Cover with cling film and smooth the top. Cut out a heart shape as before.

Step 2

Use a small dotting tool to make two dents for eyes and set aside to dry.

Step 3

Roll out a piece of white paste approx. 3mm in thickness. Use a knife and ruler to cut a strip approx. 16mm long and 6mm wide. Cut this into two lengths, one 10mm and the other 6mm.

Step 4

Using a piece of paste of the same thickness cut out 2 small diamonds using your diamond plunger cutter (1cm) Cut another diamond with a 13mm diamond plunger cutter.

Step 5

Cut the larger diamond into two triangles.

Step 6

Using sugar glue attach the small rectangle to the heart approximately half way down on the right hand side.

Step 7

Glue one of the triangles to the end of this rectangle

Step 8

Attach the other larger rectangle to the left hand side of the heart opposite the previous piece.

Step 9

Use sugar glue to add the two small diamonds either side to complete the arrow. Set aside to dry completely

Step 10

Roll two small balls of black paste and glue into dents for eyes. Add small pieces of white paste for accents.

Step 11

Using a small amount of sugar glue attach the large heart (with arrow) to the middle of one of the toppers and support from behind whilst drying.

Step 12

Using a small heart plunger cutter, cut out one small rose pink heart. Cut two hearts using a medium plunger cutter (one rose pink and one white)

Step 13

Use sugar glue to attach these hearts to the front of the topper 

Step 1 Love letter

Roll out the white paste to approximately 3mm in thickness. Cut out a rectangle approximately 35mm by 28mm with a knife.

Step 2

Remove a triangle from one of the long sides of the rectangle with a knife.

Step 3

Roll out another piece of white paste thinner to approximately 2mm in thickness. Lay the cut shape on top and using a knife cut around the three straight sides.

Step 4

Now cut the top of the envelope to make it look open 

Step 5

You will have two shapes like this.

Step 6

Roll out the fuchsia paste and rose paste fairly thinly. Using the large and medium heart plunger cutters, cut out one large fuchsia heart and two medium rose pink hearts.

Step 7

Attach the larger fuchsia heart to the envelope just slightly above the middle checking that when the other piece is overlaid it is poking out. Apply glue at the bottom of the letter and fix to the cupcake topper

Step 8

Use sugar glue to attach the other piece of the envelope on top.

Step 9

Add the two medium sized rose pink hearts to the top of the envelope with sugar glue.

Step 1 Chocolate box

Roll out the rose pink paste to approximately 2mm in thickness and cut out a large heart.

Step 2

Roll a strip of rose pink paste and set aside for a minute to slightly harden (as this makes the next step easier) using a long bladed knife in a rocking motion cut a strip approximately 1cm in width.

Step 3

Brush a small amount of sugar glue around the side of the heart.

Step 4

From the middle of the left hand side, start to wrap the strip around the edge of the heart to create the side of the chocolate box

Step 5

Use the blade tool to push the paste into the shape of the heart.

Step 6

With a craft knife cut off the excess paste and use a small amount of sugar glue to stick the two ends together.

Step 7

Using small balls of brown paste make chocolates for the inside of the box. Mark the tops of the chocolates with a small dotting tool, shell tool etc. Secure inside the box with sugar glue. Don’t worry if there is a gap on the left hand side as the box lid will cover this.

Step 8

To make the lid roll a piece of rose pink paste approximately 4mm in thickness. Cover with cling film as before and cut out a heart.

Step 9

Take a small piece of fuchsia paste and use a small mould to make a bow. Glue this to the top left of the heart with sugar glue.

Step 10

Stick the chocolate box to the right hand side of the topper with sugar glue.

Step 11

Add the lid at an angle securing with sugar glue. Set this to dry.

When completely dry use an edible black pen to mark on the faces and eyes of the hearts, envelope and chocolate box. Be very careful here as they are still quite fragile. Use some soft pink edible dust to add pink cheeks to the pale pink heart on the cloud, the pale pink chocolate box lid, and the envelope.

CREATING VARIOUS COLOURS with SUGARWHIZZ

CREATING VARIOUS COLOURS with SUGARWHIZZ

Skill level: BEGINNERS

FROM LYNSEY:

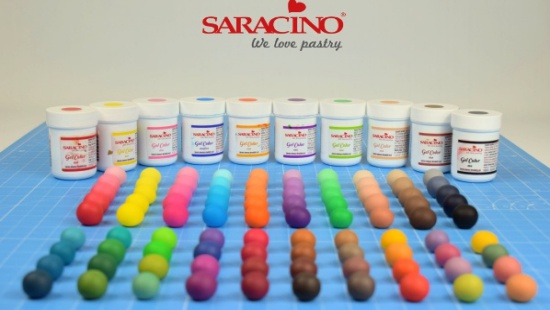
Never underestimate the power of colour! It’s such an important factor in making your creations beautiful, bold and unique to you. With Saracino gel colours its incredibly easy to create a never-ending range of colours, tints and shades, guaranteed to make your masterpiece stand out from the crowd. There’s a strange phenomenon in cake land that leads you to believe you need to own hundreds of pots of colour in all, shapes, sizes and colours. When the truth is you don’t. You only really need a few basic colours and a little knowledge to set you on your way. 

For this tutorial we’re going to concentrate on Saracino gel colours, however the same principles apply to the dust colours too. I’m going to show you a few basic steps and introduce you to a few colours to start you on your way. 


You will need:

  • Saracino Gel Colours:
  • White
  • Yellow
  • Pink
  • Red
  • Violet
  • Orange
  • Green
  • Blue
  • Brown
  • Black
  • Skin Tone

Take the amount of paste you need, knead and soften the paste until it is smooth. Using a clean cocktail stick, apply a small amount of gel colour to the centre of the paste. Fold the paste over so the colour is contained and begin to knead the paste gently. Keep kneading until the colour is unified and streak free. Add more gel colour a little at a time and repeat the kneading process until you reach your desired colour. The more gel colour you add the darker the shade will be.  If the paste becomes too warm during colouring it will appear soft and sticky. Don’t worry this isn’t permanent and can be solved easily by placing the paste in a clean food bag and leaving to cool down for a while. Once cool the paste will firm up again and will be easy to handle. For dark shades it is often best to colour your paste 12 – 24 hours before and leave to settle, the colour will develop more and the paste will be easier to work. For lighter shades you can colour and use immediately.

First up this may seem obvious but the simplest way to gain a variety of tints and shades is by adding different quantities of gel colour to white paste.

It’s impossible to give you the exact quantities needed to achieve each shade as it depends on how much paste you want to colour. Therefore, the easiest way is to experiment, start with a small amount of gel colour to create the lightest shade, increase the amount of gel colour a little at a time to create darker shades until you reach the colour you desire. The more practise you have colouring paste the quicker you learn to judge how much gel colour you need. 

I’ve given you examples of five different shades for each colour obviously there are many more shades depending on the quantity of gel colour you add.

Hard to believe but this cake was made and coloured using only Saracino Gels and dusts.


Saracino Gel Colour – RED

Saracino Gel Colour – Yellow

Saracino Gel Colour – Orange

Saracino Gel Colour – Blue

Saracino Gel Colour – Green

Saracino Gel Colour – Pink

Saracino Gel Colour – Violet

Saracino Gel Colour – Flesh

Saracino Gel Colour – Brown

Saracino Gel Colour – Black

For the tutorial I only needed small amounts to demonstrate so used around 2g for A however A can be any quantity, it doesn’t matter how much you have of A the scale is still the same.

B is roughly ½ the quantity of A. 

C is roughly ¼ the quantity of A.

D is roughly 1/8 the quantity of A.

For example, if A was 100g, B would be 50g, C would be 25g and D would be 12.5g .We’ve used these amounts as examples in the mixing guide that follows.

This should help you in scaling up and down for colouring whatever quantity of paste you need.

TOP TIP – When creating a new shade or colour, start small. Mix the colour you need with just a few grams of paste, keep a note of your combination and quantities. Then when you have the colour you desire, scale up the amounts. This way you wont waste huge amounts of paste if you create the wrong colour. 

Let the mixing begin…

Left to right, top to bottom.

  1. Grey 100g + Blue 25g 
  2. Blue 100g + Black 12.5g 
  3. Blue 100g + Black 12.5g + Violet 12.5g
  4. Blue 100g + Black 50g + Violet 50g

Left to right, top to bottom.

  1. Blue 100g + Green 50g 
  2. Green 100g + Black 50g 
  3. Green 100g + Yellow 12.5g + Violet 12.5g
  4. Flesh 100g + Green 50g + Black 12.5g

Left to right, top to bottom.

  1. Yellow 100g + Blue 12.5g 
  2. Yellow 100g + Blue 50g
  3. Yellow 100g + Green 12.5g + Violet 12.5g
  4. Grey 100g + Green 25g 

Left to right, top to bottom.

  1. Pink 100g + Blue 25g 
  2. Violet 100g + Blue 50g 
  3. Pink 100g + Violet 25g
  4. Violet 100g + Red 50g

Left to right, top to bottom.

  1. Red 100g + Pink 100g 
  2. Red 100g + Violet 12.5g 
  3. Red 100g + Brown 50g 
  4. Red 100g + Black 12.5g 

Left to right, top to bottom.

  1. Orange 100g + Brown 12.5g 
  2. Orange 100g + Blue 50g 
  3. Brown 100g + Red 25g 
  4. Brown 100g + Black 50g 

Left to right, top to bottom.

  1. Grey 100g + Orange 50g
  2. Grey 100g + Brown 25g 
  3. Flesh 100g + Red 12.5g + Black 12.5g
  4. Grey 100g + Brown 50g + Green 12.5g + Red 12.5g + Black 12.5g

Left to right, top to bottom.

  1. Yellow 100g + Orange 12.5g 
  2. Flesh 100g + Yellow 50g + Red 12.5g 
  3. Orange 100g + Red 25g 
  4. Orange 100g + Red 100g

Left to right, top to bottom.

  1. Grey 100g + Violet 25g 
  2. Grey 100g + Red 25g 
  3. Grey 100g + Pink 25g 
  4. Grey 100g + Yellow 50g 

Left to right, top to bottom.

  1. Yellow. 100g + Flesh 12.5g 
  2. Flesh 100g + Yellow 12.5g 
  3. Flesh 100g + Pink 12.5g 
  4. Flesh 100g + Blue 12.5g + Brown 12.5g

Now you’ve got a whole palette of colours to play with it’s a good time to point out that just like the original gels these new colours can by multiplied into many different, tints, shades and tones.

Tint – A tint is created by adding more white paste to your colour making it lighter.

Shade – A shade is created by adding more black paste to your colour making it darker

Tone – A tone is created by adding grey, or both black and white to your colour.

Last but not least is this little beauty… Saracino White gel colour. Which can be used for lightening colours. However, I usually just use white paste and I save this for magical things, like mixing it with a small amount of clear alcohol (or cool boiled water) and painting details such as the whites of eyes, highlighting and shading my creations, or simply painting patterns onto sugar work! The only limit on this one is your imagination.

Of course, this also applies to the full range of Saracino gel and dust colours. You can mix them individually with a small amount of clear alcohol or water or combine the gel and dust colours together to create endless new colours. All of which can then be used to paint and shade your creations, here are some of my favourite examples…

The most important thing to remember is to be brave, experiment and have fun! 

RALPH THE PUPPY

RALPH THE PUPPY

Author: VICKY TEATHER


FB Page : https://www.facebook.com/YellowBeeCakeCompany/

Skill Level:

Beginner

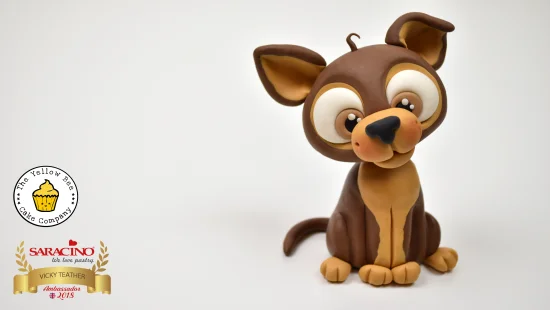
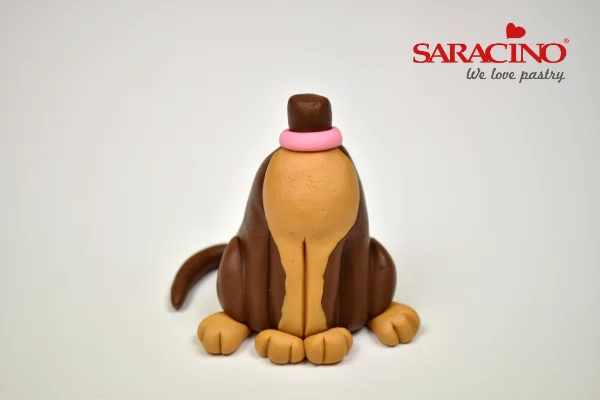
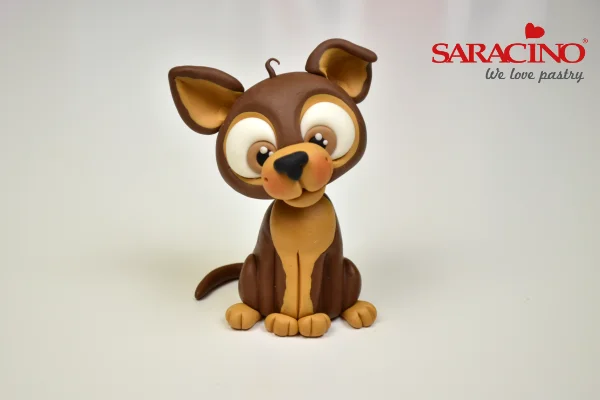
In this tutorial Vicky Teather from The Yellow Bee Cake Co shows you how to create Ralph, the super cute puppy.  This tutorial is perfect for the dog lover in your life. 

You will need:
  • 80g Saracino Pasta Model: Brown
  • 20g Saracino Pasta Model: White
  • 4g Saracino Pasta Model: Pink
  • 2g Saracino Pasta Model: Black
  • Saracino Dust Colour: Red
  • Gel Colour: Caramel
  • Modelling Tools: Dresden, Bulbous Cone
  • Large and Mini Ball Tools
  • Craft Knife
  • Edible Glue
  • Paintbrush
  • Dusting Brush
  • Cocktail Stick

Step 1

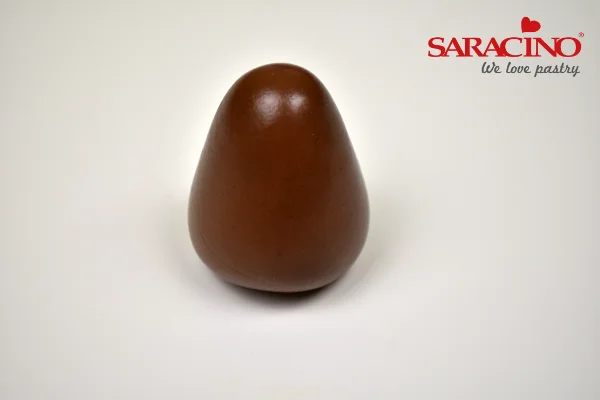
For the body, shape 35g of Brown modelling paste into an egg. 

Step 2

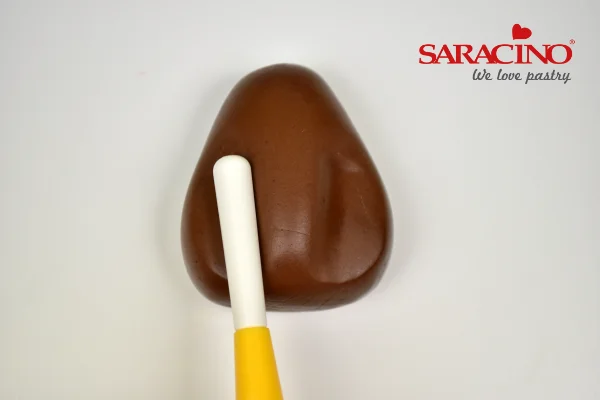
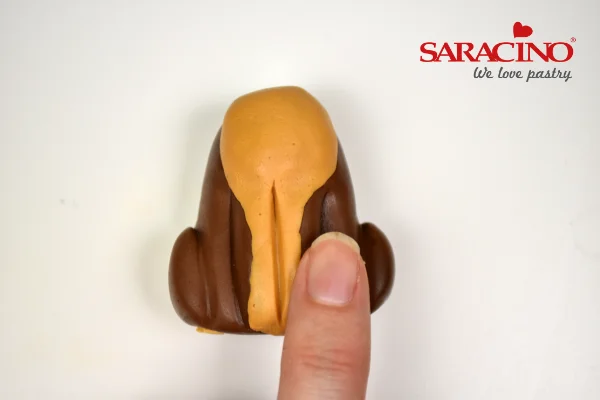
Use the other end of the Bulbous Cone tool to press the paste away from the centre of the shape.

Step 3

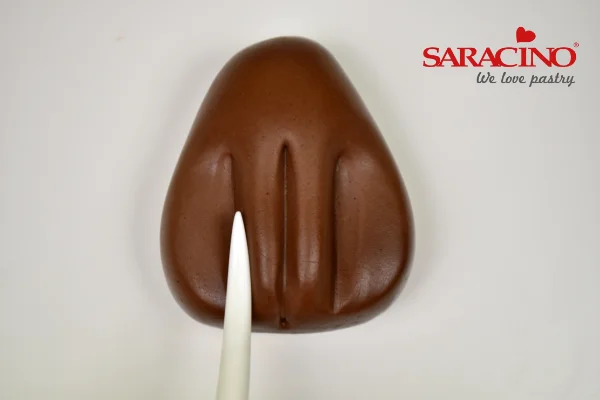
Smooth the paste with your fingers around the front legs to enhance and then use the Dresden tool to indent either side of the legs and a further line down the centre. Use your fingers to shape the paste to round off any harsh edges left by the tools.

Step 4

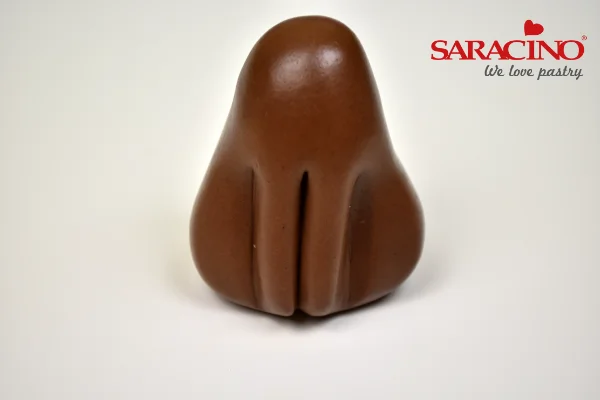
Sit the body back up on its end. Use your fingers to thin out the top of the body.

Step 5

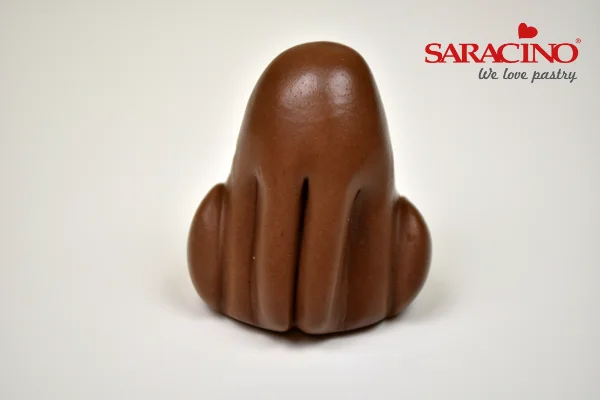
Press the side of your finger into the body to create the haunches. Then use the Dresden tool to mark a distinct line around the haunch. Smooth the haunches with your fingers to round the shape and continue to mark with the Dresden until a crease has formed.

Step 6

Colour 15g of the White modelling chocolate with the Caramel gel colour. Take 5g of the Caramel paste and shape into a long teardrop. Place the wide end over the chest of the body and begin to smooth and blend the paste into the body using your fingers. Re mark the front legs with the Dresden.

Step 7

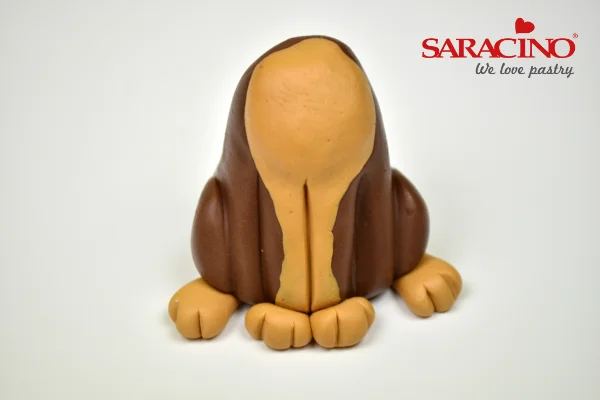
For the feet, take two small balls of Caramel paste and shape into hemispheres. Press the Dresden tool into the rounded edge of the paste twice and repeat with the craft knife to enhance the mark. For the back legs, take two larger balls and roll into cones. Repeat the above to mark in the toes. 

Step 8

Glue the small feet to the front legs and the cone shaped feet underneath the haunches.

Step 9

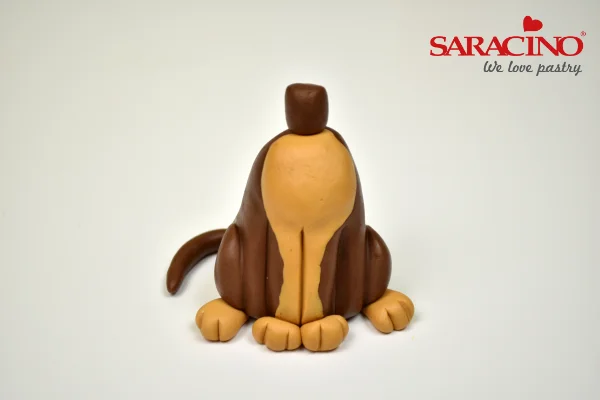
Roll a pea sized ball of Brown paste into a cylinder and attach to the top of the body. Roll 4g of Brown paste into a long sausage with a tapered end. Trim the paste to a 5cm length and glue in place. 

Step 10

Roll the Pink modelling paste into a sausage and attach around the base of the neck. Push a cocktail stick into the neck and down through the body.

Step 11

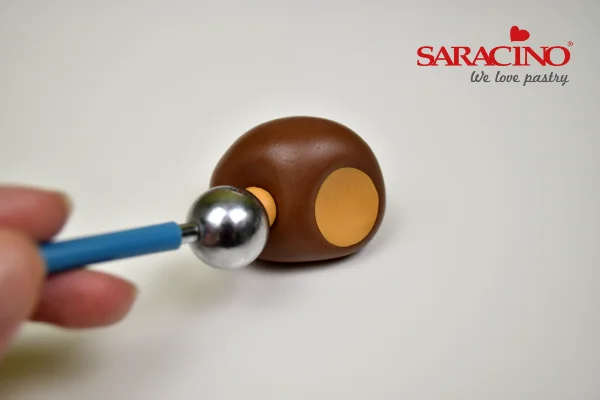
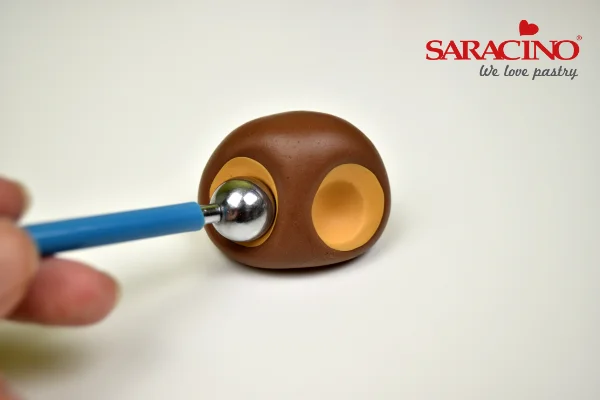
For the head, shape 35g of Brown modelling paste into a rounded dome. Press a large ball tool into the lower edge to create two wells. Fill the wells with a pea sized ball of Caramel paste and then use the ball tool to blend the paste into the head.


Step 12

Press a smaller ball tool into the inner corner of the eyes. Fill with a large ball of White modelling paste. The paste should bulge out of the holes. Use your fingers to gently flatten the front of the ball.

Step 13

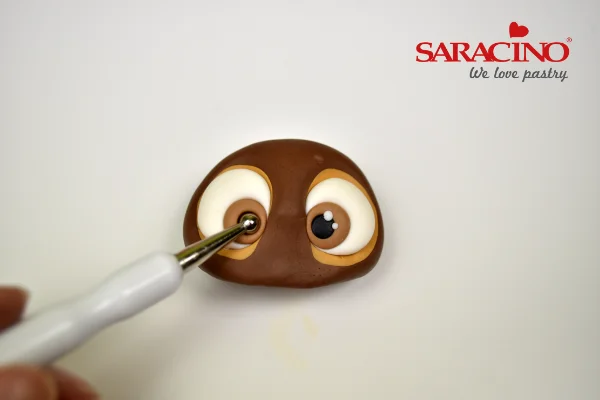
Press a smaller ball tool into the inner corners of the eye. Fill with a 50/50 mix of Brown and White modelling paste. Repeat with an even smaller ball tool, to which you should fill with a small ball of Black modelling paste. Add two small balls of White modelling paste to each eye for a highlight.


Step 14

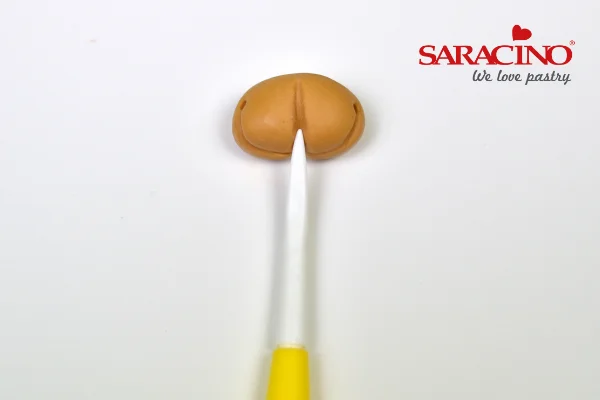
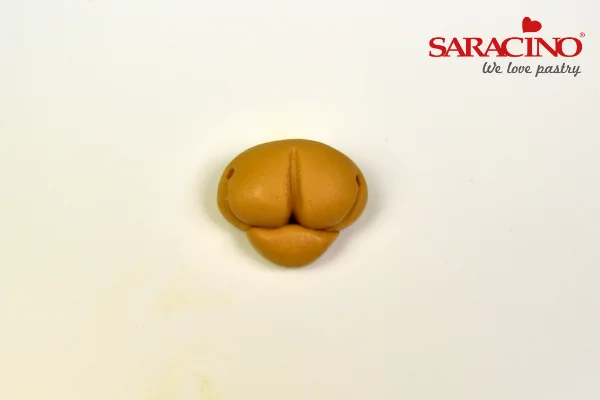
Shape 3g of Caramel modelling paste into an ovoid. Use the Dresden tool to mark a deep line down the centre of the shape. Draw in a mouth along the lower edge and use a mini ball tool to add dimples at either end of the smile.

Step 15

Add a small ball of Caramel paste to the lower edge of the mouth. 


Step 16

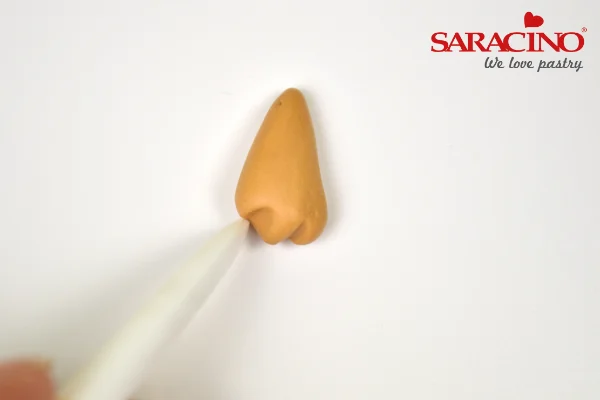
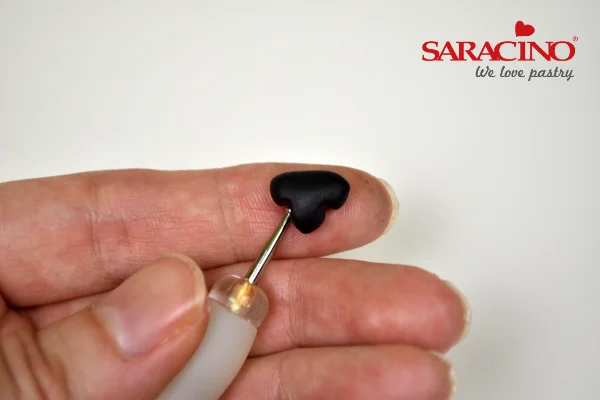
For the nose, take a small ball of Black modelling paste and shape into a triangle. Press a small ball tool into the nose on either side of the point to create the nostrils. Glue the nose to the top of the muzzle and then glue the muzzle in place on the lower edge of the face.

Step 17

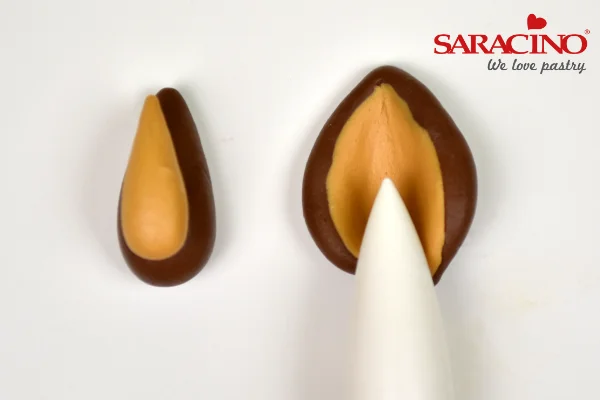
For the ears take two 2g balls of Brown modelling paste and shape into cones. Take two smaller balls of Caramel paste and shape into cones. Place the Caramel cone on top of the Brown cone and gently press the two together with your fingers. Then press the Bulbous Cone tool into the paste to thin the inner ear. Pinch the bottom edge of the ear together and then trim away the point to create a flat base. Glue in place on either side of the head. Bend one ear over slightly.


Step 18

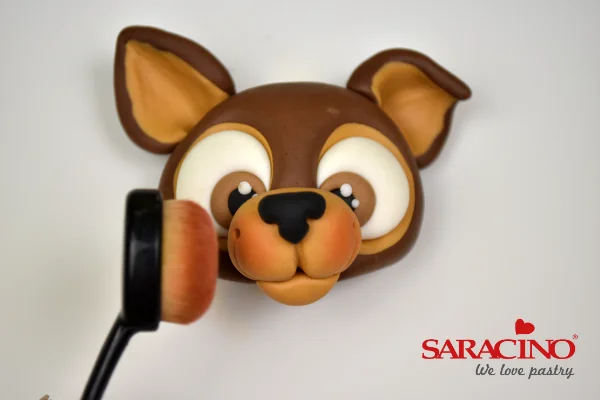
Lightly dust the cheeks with the Red dust colour. 

Step 19

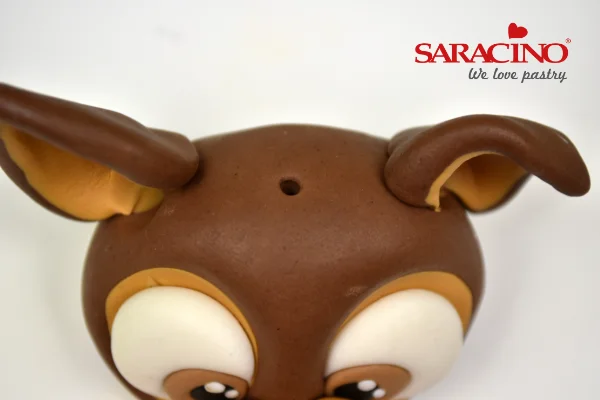
Press a mini ball tool into the centre of the head.


Step 20

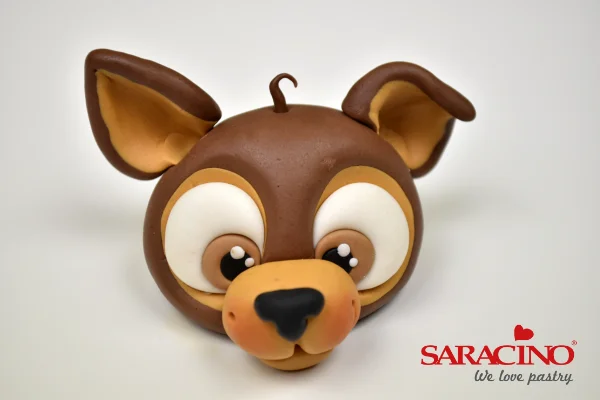
Roll a very fine sausage of paste and glue into the hole on top of the head. Bend the top into a curl.

Step 21

Glue the head at an angle on top of the body. Ta-dah Ralph is finished! 


CREATE A WAFER PAPER FEATHER

CREATE A WAFER PAPER FEATHER

Author: Gisi Prekau

Skill level: BEGINNERS

You will need:

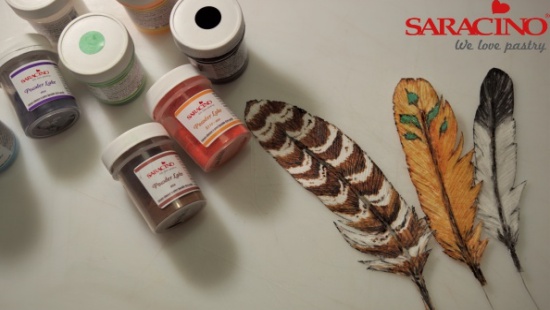
  • Wafer Paper from Saracino – 0.27 thickens
  • Saracino cocoa butter
  • Powder dust – black, brown, green, blue, yellow, orange from Saracino
  • Flower wire 24 gauge
  • Piping gel from Saracino 
  • Small scissors
  • Pencil
  • Dresden tool
  • Painters palette
  • Brush big wide
  • Fine brushes

Step 1

Choose a feather template and cut it out with scissors.

Step 2

Fold the waferpaper so that the rough side is inside. Transfer the template to the outside of the paper using a pencil.

Step 3

Prepare floral wire to a length suitable to fit the centre of the feathers and bend them slightly to give them gentle curvature.

Step 4

Coat the edible paper on the inside with piping gel using a large brush, then place the floral wire and fold. Give good pressure to glue the waferpaper well.

Step 5

Using a dresden tool push the wafer paper over the wire to form the centre of the feather. Let it dry for several hours.

Step 6

Cut out the feathers carefully with small scissors. Add texture to the feather using a Dresden tool.

Step 7

Now you are ready to paint your feathers as required.

Step 8

Melt the cocoa butter and mix with powder colours.

Step 9

Using a thicker mixture paint the darker parts of the feather. To achieve more transparent colour for the lighter sections use a thinner mix.

Step 10

I always start with a general base colour (thinner blend) and work with the details gradually. The following details are usually marked in colour and applied with a finer brush.

Step 11

The colour scheme can be made as you wish – add a fine marking outer line around the edge of the feather.