CAKE OF THE MONTH AUGUST 2018

CAKE OF THE MONTH AUGUST 2018

Congratulations to MILENE HABIB


who wins our top spot for


SARACINO CAKE OF THE MONTH – AUGUST 2018


Exclusive for Saracino, Milene answered few questions. Have a look below!


Q: What cake tool can’t you live without?

A: Brushes, I do not use just to paint, but also for modelling

Q: What inspired you?

A:  Everyone and everyhing, I see cake every where. But specially cartoons and fantasy art. Jessie was created for a deviant sugar art collab. I love toy story, that was my inspiration among a few fanarts I found online, and I really had to give a sassy look to her hehehehe

Q: What’s your favourite Saracino product?

A: Modelling Paste

Q: What movie title best describes your life?

A: Dificult question!! Probably “Alice in wonderland”, “We’re all mad here.” “I’m not crazy, my reality is just different than yours.”

Q: What’s your best advice in 5 words or less?

A: Live, laugh, love and bake!


AND A FEW QUICK FIRE QUESTIONS:


1. Flavour – Chocolate or vanilla? – VANILLA  

2. Plan properly or wing it? – PLAN PROPERLY

3. Whilst working – Listen to music or watch tv? – LISTEN TO MUSIC

4. Favourite product – Saracino pasta model or Saracino modelling chocolate? – PASTA MODEL 

5. Delivery – Down a long bumpy road or during a rain storm? – RAIN STORM

6. Buttercream or ganache? – GANACHE

7. Do you prefer – Baking the cake or decorating the cake? – DECORATING 

8. Mould or handmade? – HANDMADE 

9. Airbrush or paint by hand? – PAINT BY HAND

10. Apron or chef whites? – APRON

11. Straight edge or round? ROUND EDGE

12. Customer design or free reign? – FREE REIGN  

13. Stay up all night to finish or get up early to finish? – GET UP EARLY TO FINISH 

14. Fruit cake – Yay or Nay? – YAY

15. Your own birthday cake – Make it yourself or have the week off? – DAY OFF


To see more of Milene’s work visit her page


Saracino Team 

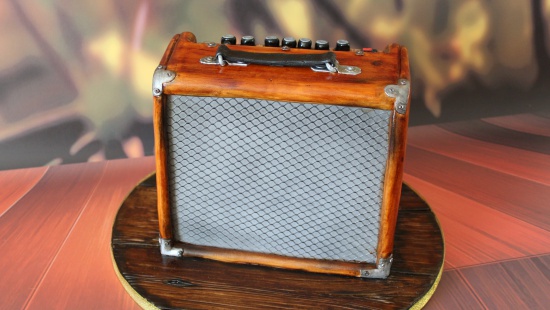
AMPLIFIER SCULPTED CAKE

AMPLIFIER SCULPTED CAKE

AMPLIFIER SCULPTED CAKE


You will need:
  • 18” x 12” (45cm x 30cm) single layer sponge cake (10 egg mix)
  • 750g buttercream
  • 1.2kg white chocolate ganache
  • 2kg pasta top white
  • 50g black pasta model
  • 100g pasta model white
  • Dust colours: yellow, orange, brown, green, black
  • Paste colours: black, red
  • Metallic colours: light silver; light gold; bronze
  • Saracino Liquid shiny
  • Nielssen Massey lemon Extract
  • Dinkydoodle Shell and shine
  • Greaseproof paper
  • PME Stitch wheel
  • Long serrated knife
  • Long and small rolling pins
  • Palette Knife
  • Scalpel
  • PME dresden
  • No.2 brush for glue
  • No.8 filbert brush
  • Large wide paintbrush
  • Large blusher paintbrush
  • 14” (35.5cm) round cake drum
  • 8” x 4” (21 x 10cm) cake card with one hole in centre for a dowel
  • 3 long cake dowels
  • Fishnet cake lace mat (Clare Bowman)
  • Circle cutters 1m, 1.5cM

Step 1

Cut the prepared sponge into layers 21.5cm by 11cm. Spread a little buttercream onto the cake drum and place on the first layer. Spread buttercream and add two more layers. Cut two of the dowels to size and dowel through the first three layers of cake, buttercream and fix the cake card on top.  Push a long dowel down through the hole, buttercream the cake card and continue to add layers. Trim the sides and top of the sponges straight.

Step 2

Cover the sponge with white chocolate ganache by spreading with a palette knife. Chill in between adding layers until approximately 4mm thick. Smooth down with a hot knife to neaten.

Step 3

Colour 300g of the pasta top grey by adding a little black paste colour. Pin out to 3mm thick and place onto the cake lace mat. Roll over with a rolling pin to emboss, then measure the cake and cut the grey to fit the front. (You can also choose to trim when it is in place).

Step 4

Brush the ganache with tepid boiled water. Use the cake lace mat to lift the paste into place.

Step 5

Pin out 300g of white paste top and cover the cake drum (moisten the drum first with water) by adding a strip first to the front, then the back of the drum. Finally add smaller sections either side. Emphasise these joins and add a couple more by pressing in a ruler to represent floor boards. Trim the edges.

Step 6

Mark knots and lines on the boards with the narrow end of the Dresden tool. 

Step 7

Use a sharp knife to cut a small recessed section from the back of the top of the amplifier as shown 18cm long and 4cm wide.  Add more ganache then cover this section with thin white pasta top.

Step 8

Pin out white pasta top 3mm thick and cut a panel to fit the back of the cake. Fix in place with tepid water as before. Trim to fit. 

Step 9

Pin out more white paste and next cover the top, curving the paste over the edge towards the front.  Next add a strip at the front to represent the base, then  cover the sides, curving the front edge as before. 

Step 10

Add the final side and then use a Dresden tool to emphasise the joins.

Step 11

Add the washers and sockets as in the image by pinning out pasta model white thinly and using a 1cm circle cutter. Fix into place with edible glue. Use the handle of the paint brush to make holes into the input sockets.

Step 12

Create brackets for the handles by cutting out strips of white pasta model 3cm x 1cm and cut off the corners. Place the shapes onto paintbrush handles to create the ridge. Leave to set.

Step 13

Cut the T-shapes as in the image to act as the corner protectors. Roll tiny balls of white pasta model and gently press into place for the screws. Mark a cross on the top of each by pushing a scalpel into the ball. 

Step 14

To make the handle, Cut out a strip of black pasta model 20cm long by 1.5cm. Use a stitch wheel to mark along the length. Turn face down. Place the two paint brushes onto the paste, each 5cm from the middle and fold the paste over so that they form a double layer. Turn back over and pressed crunched greaseproof paper on to create a leather effect.

Step 15

Mix brown, green and a little black dust colours together with Nielssen Massey lemon extract and use a large wide paint brush to paint colour into the deeper marks and the edges of the iced drum. Vary the colour so that the deeper shades are in the deeper gaps.

Step 16

Add more brown to the mixture and paint the drum with long strokes until covered. Next add yellow and a little orange into the mix and add stripes to the cake as in the image. Allow these to dry before adding the next layer of colour. 

Step 17

Paint the cake with long strokes of the same colour mixture slightly diluted down more until an even covering in achieved.

Step 18

Cover a plate with foil. (This protects the plate and means you can simply discard the foil when you have finished.) Mix light silver with a small amount of black dust colour and add liquid shiny and paint onto any screws or corner protectors. Next use a dry large blusher brush and dry dust the grey front in circular motions with black to add depth to the grey. Mix a little lemon extract in with the black and add shading into the screws and around the brackets using a small brush.

Step 19

Mix a little brown into black dust and lemon extract and use a large flat paint brush to add the depth as shown in the image into the gaps between floor boards and in the knots.  Add two small balls of grey  and place as in the image to represent nails and paint silver.

Step 20

Paint the recessed panel with bronze and brown mixed with liquid shiny. Create switches by cutting out 1cm long rectangles from black pasta model. Next roll a small sausage of the black slightly shorter than the rectangle and flatten one side. Make two more. 

Step 21

To create the dials, roll 1g balls of black pasta model into a sausage shape and press down onto the board to flatten one end. Pin out more black and cut 1.5cm circles for each of the dials. Use a little of the grey leftover paste, pin out thinly and cut 1cm circles to sit on top of the dials.

Step 22

Mix light silver with liquid shiny and paint the lines onto the dials section as in the image using a fine paintbrush. Create the red light but cutting a small rectangle of red paste, place this on top of rolled out black paste and cut a slightly larger rectangle around.  Fix the brackets for the handles on top of the cake and make washers and screws as in step 11. Roll a thin sausage of white pasta model and fit under the ridge in the brackets for the fixings. Cut each to 1cm longer than the bracket either side and pinch to a point. Paint silver and add a little black as before the age the silver. Fix the dials into place.

Step 23

Place the handle onto the brackets slightly pulled to one side. Gently press the points of the fixings into the hollows on the handle left by the paintbrush.  Spray the whole cake with Dinkydoodle shell and shine

Step 24

TA -DA

DISNEY DEVIANT SUGAR ART COLLABORATION

DISNEY DEVIANT SUGAR ART COLLABORATION

Disney Deviant Sugar Art was formed in 2016 by Cassandra Rice and Mayra Prado Estrada.

Our theme is inspired by everything Disney! An amazing group of talented worldwide artists select a Disney character and recreate them in a deviant manner… We had lots of fun in this collab! It’s almost like a box of Cracker Jack; you never know what kind of surprise the sugar artists will come up with!

Enjoy Watching


Congratulations On Your Amazing Creations!

Take Your Time And Visit Love Is… Facebook Page Disney Deviant Sugar Art Collaboration To View All The Amazing Creations!

Join Our Newsletter

We’d love to send you the latest news, discounts & exclusive offers via email! By signing up below you are confirming you are happy for Saracino to send you marketing emails. We will always treat your personal details with the upmost respect & will never sell your details to other companies for marketing purposes.

• All the latest industry news   • FREE video tutorials   • Exclusive product offers

Products         Tutorials          Ambassadors           Events           Blog           Showcase         Contact


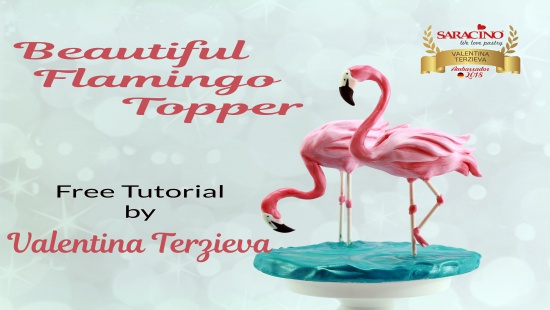
MODELLING FLAMINGO

MODELLING FLAMINGO

Skill level: BEGINNERS

You will need:

  • Round Cake Board 18cm 
  • Cake Dummy 
  • Template Flamingo 20cm
  • Modelling Tools and brushes
  • Knife
  • Hot Glue
  • Pliers
  • Saracino Cake Gel
  • Saracino Pasta top – 200g white
  • Gel Colours – turquoise, green metallic and blue metallic

For each flamingo:

  • Saracino Modelling Chocolate – 100g white
  • Saracino Modelling Paste – 5g white and 5g black
  • Styrofoam Egg 4.5cm long
  • 2x 15cm long Lollipop stick 20cm
  • Aluminium wire 2mm thick
  • White flower tape or paper tape
  • 2 x black small sugar balls for eyes
  • Gel Colour – pink
  • Dust Colours – pink, red, white, black
  • Lemon extract/ clear alcohol

Step 1

Assemble the inner structure using the template. If you use paper lollipop stick you will be able to bend the knee. Use hot glue to attach the legs, neck and tail to the egg/flamingo body. 

Step 2

Measure the leg length and draw a line with a pencil. Insert the flamingo structure in a dummy up to this line for easier working. Wrap the neck and the body with paper tape so it is not too smooth and the modelling chocolate can stick better to it. 

Step 3

Colour all your modelling chocolate with a pink gel colour to achieve light pink. Take 60g of paste and roll into a ball. Press the ball flat between your hands or use a rolling pin until it is about 8cm diameter.

Step 4

Wrap the modelling chocolate around the body and tail. Press firm to join the seams. Using gloves helps you to smooth the modelling chocolate without sticking to your hands. You can also use plastic or wooden tools to join and smooth. Keeping in mind the body shape from the template form the body in this shape. Smooth well once the shape is ready. 

Step 5

Using plastic modelling knife and your fingers cut and form the tail as in the picture. 

Step 6

Roll 15g pink Modelling Chocolate into a sausage. Cut in the middle as in the pictures. 

Step 7

Put it over the neck wire and press seams together. 

Step 8

Smooth and form with your fingers and modelling tools. 

Step 9

Using the template as reference make sure the neck and head are the right size.

Step 10

Using the template form the beak out of 2.5g white Modelling Paste Saracino. 

Step 11

Roll out small amount of black modelling paste and wrap it around the half of the beak.

Step 12

Cut the excess and add one small triangle each side as on the template. Put two black sugar balls for eyes and make a small hole for nostrils on each side of the beak.

Step 13

If needed cut a small part of the forehead away so the beak fits better.

Step 14

Make hole in the beak and join it with the head. Use Saracino glue or water to glue both parts together. 

Step 15

For each wing form 10g modelling chocolate into a tear shape. Press it flat and draw a few curved lines with a plastic knife. 

Step 16

Attach the wings on each side and smooth the joins with your fingers.

Step 17

For the foot form a small tear, press it flat and cut out two triangles. 

Step 18

Attach the foot on the bent leg. If your flamingo is going to stand on the sand, you will need a second claw. Wrap tiny amounts of modelling chocolate on the knees. 

Step 19

Make as many flamingos as you like using the same template and changing the position of the legs and the neck. If you want to put your flamingos directly into the cake skip Steps 20 and 21 and go directly to step 22 to paint your flamingos. 


Step 20

If you want to make a cake topper with it own stand, use a cake board, mark the spots where your flamingos legs will go into the board. Use a knife to make small holes as big as the legs are thick.

Step 21

Cut the legs 1cm after the pencil line that you drawn in step 2. Inject hot glue into each hole. Insert the leg into it and hold for a minute allowing the glue to cool down and hold the flamingo in place. 


Step 22

Use brush and pink powder to dust the leg.

Step 23

Dust the cheek with pink powder too. Dusting with powder colours gives you softer look than painting. 


Step 24

Mix different shades of pink using red and white powder. Use lemon extract or clear alcohol to make the powder into fluid. 

Step 25

Start painting the flamingos pink with a small brush. Don’t forget to apply black paint into the nostrils.


Step 26

The neck and the tails are darker pink, the wings are brighter except for a few lines, which gives you the illusion of depth. On this picture you can also see the difference that a little bit of painting makes. The finish of the painted flamingo is so much more realistic. 

Step 27

Colour the sugar paste with turquoise and roll it out about 3-5mm thick. Apply cake gel on the cake board so the paste will stick on the board. 


Step 28

Cover the board. Trim the paste around the legs. Press the seams together and smooth. Use a modelling tool to draw some circles around the legs. Cut out the excess on the edge of the cake board.

Step 29

Mix loosely green and blue metallic gel and using a wide brush apply on the cake board. Try to have different shades of the mixture on the board, so it looks realistic like a tropical sea. 


Step 30

Your cake topper is now ready to go on top of the cake.