CHRISTMAS NUTCRACKER

CHRISTMAS NUTCRACKER

Author: Zoe Smith

Skill level: BEGINNERS

You will need:

  • Tiffany modelling paste
  • White modelling paste
  • Skin modelling paste
  • Pink liquid colour
  • Black liquid colour
  • Craft knife
  • Small rolling pin
  • Flower tool
  • Snowflake plunge cutter
  • Edible glue
  • Work mat
  • Wooden skewer

Step 1

Roll 50g of skin modelling paste into a ball, flatten the base against your mat to make the head.

Step 2

Take a pea sized piece and pinch it into a triangle shape. Trim one side so it will sit flush against the head.

Step 3

Stick the nose to the centre of the face.

Step 4

Colour a tiny amount of paste pink and roll into to balls. Flatten and glue either side of the nose.

Step 5

Roll a pea sized amount into a ball and pinch to create a cone shape.

Step 6

Flatten and pull pointed end to make a finer tip. Curl around and wait a minute to firm.

Step 7

Glue under the nose and repeat on the other side.

Step 8

Take tiny bits of white modelling paste and roll into sausages and flatten slightly. Glue to the head as shown.

Step 9

Take 60g of Tiffany modelling paste and shape into a rectangle for the torso and pinch slightly at the base. Set aside to firm.

Step 10

With 16g of a Tiffany/white modelling paste mix make a similar shape as you made for the torso to create the legs. But make sure the top surface is nice and flat.

Step 11

With your flower tool draw a line down the center, repeat on the other side.

Step 12

To make the feet take approx 1g of the same mix and roll into an oblong shape then cut into two.

Step 13

Glue the feet to the legs.

Step 14

Roll 30g of Tiffany modelling paste to make the hat. Make one side flat. 

Step 15

Pinch the other side as shown.

Step 16

Push a wooden skewer through the legs, torso, head and hat leaving enough at the base to stick into your cake or dummy.

Step 17

For the arms roll out 7g of Tiffany and trim either end and cut into two.


Step 18

Glue to the sides of the torso as shown.

Step 19

Take small ball of Tiffany/white mix and cut into two.

Step 20

Glue to the tops of the arms. Add four tiny balls of white modelling paste flattened to create buttons.

Step 21

Colour a tiny bit of paste with a little Black to create a light grey. Roll into two shut eyes and glue above the cheeks.  

Step 22

Take 1g of white modelling paste for the beard, make an oblong shape, flatten and pinch at one end.

Step 23

Glue to the torso and push up the pinched end slightly.

Step 24

Separate 20g of white modelling paste into 8 balls. Make each ball into a teardrop shape that is flat at on end.

Step 25

Glue each of these pieces to the head ,the flat end under the hat and the pinched end to the neck.

Step 26

Roll out 2g of Tiffany /white mix into a strip long enough to wrap around the hat. With your craft knife cut out small triangles.

Step 27

Wrap around the hat and glue in place. Gently push the tips of the triangles away from the hat.

Step 28

Roll out a strip of Tiffany/white mix and glue around for a belt.


Step 29

With a small snowflake plunger cutter make a snowflake from white modelling paste. Then trim off the tips on each section.

Step 30

Glue to the hat.

Step 31

Make a teardrop from Tiffany/white mix and using the flower tool make a feather. Trim the rounded end.

Step 32

Glue to the hat and back of the snowflake. Ta da !
 

ComicStrip Cakers Collaboration

ComicStrip Cakers Collaboration

by Fee Kakes & Kathy Cooper

MARVELOUS CAKERS PRESENTS – COMICSTRIP CAKERS COLLABORATION

Collaboration Facebook Page – https://www.facebook.com/ComicStripCakers

The Comicstrip Cakers Collaboration came about as an idea for Marvel comic fans within the cake community to pay tribute in celebration of Marvel Comics 80th birthday this year.
It was put together by Fee Kakes (of sCrumbtious Kakes) and Kathy Cooper (of Kathy Cooper A Slice of Art) as part of The Cake Collective (a collective cake group set up by Vicki Du Plessis that encourages cake artists of at all levels to challenge themselves by participating in various collaborations).

The idea was to do our own interpretation of our own favourite Marvel comic characters and to have fun with it.

We were inspired to celebrate Marvel Comics 80th birthday because Fee and a number of other Cake Collective artists are HUGE Marvel comic fans and Kathy is a SUPER Deadpool fan and there was a huge response from the Cake Collective members to take part. It seemed feasible that we could create a brilliant tribute as we initially had 80 plus cake artists wanting to take part. It also followed on from our Cameod Stan Lee collaboration that featured at London’s Cake International on Tour Group competition achieving a Gold award earlier this year.

The Cake Collective already has a number of collaborations that they are currently working on and also developing ideas for future themes. The Cake Collective welcomes all cake artists of all skill levels and currently has 1.6K members from all over the world. If anyone wishes to join the Facebook group they can by going tohttps://www.facebook.com/groups/thecakecollective/

Sarah Carr

Paul Williams

Congratulations On Your Amazing Creations!

Take Your Time And Enjoy Looking At These Amazing Cakes And Creations.

To Watch Click HERE

Join Our Newsletter

We’d love to send you the latest news, discounts & exclusive offers via email! By signing up below you are confirming you are happy for Saracino to send you marketing emails. We will always treat your personal details with the upmost respect & will never sell your details to other companies for marketing purposes.

• All the latest industry news   • FREE video tutorials   • Exclusive product offers

Products         Tutorials          Ambassadors           Events           Blog           Showcase         Contact


Cute Christmas Penguin’s

Cute Christmas Penguin’s

Skill level: BEGINNERS

TIPS:

Tip 1: You can make a snow man and his family using the same tutorial with a few little tweaks like instead of flippers and feet add some twigs made with wires and modelling chocolate

Tip 2: If you have some left over white Saracino that wasn’t used for a while and is a bit hard then how about crushing it in food processor and using it as snow?

You will need:
  • Saracino Fuschia sugar paste mixed with white to form light pink
  • Saracino Azure modelling paste
  • Saracino Light Blue modelling paste
  • Saracino Green modelling paste
  • Saracino Yellow modelling paste
  • Saracino Red modelling paste
  • Saracino Black modelling paste
  • Saracino White modelling paste
  • Rolling pin
  • Cutting wheel
  • Heart shape cutter
  • Dresden tool
  • Scallop tool
  • Shell tool 
  • Knit impression mat

Step 1

Roll pink Saracino modelling paste into a round ball, roughly 2 inches in diameter.

Step 2

Roll a small amount of white modelling paste into a thin sheet

Step 3

Using a metal heart shape cutter cut a heart shape on the bottom of the sheet to have a flat base instead of a pointy one

Step 4

Now give a deeper “V” cut to the heart using the cutter as shown in the picture

Step 5

It should look like the photo above

Step 6

Place this heart on the pink ball

Step 7

Gently roll and blend the edges of the heart well with the pink ball

Step 8

Using a ball tool mark the position of the eyes

Step 9

Make a lovely smile with the PME scallop tool

Step 10

Add tiny black eye balls made with Saracino black modelling paste

Step 11

To make lashes roll a very small amount of black modelling paste and taper it from one end

Step 12

Gently place two lashes on each eye using the pointy end of the dresden tool

Step 13

Add some blush on the cheeks using Saracino pink dust

Step 14

For the beak roll a tiny ball of orange modelling paste

Step 15

Flatten it and pinch from one end to form a beak and then glue it in position like shown in the picture

Step 16

Gently blend it onto the head

Step 17

For the body roll an oval shape ball out of pink modelling paste

Step 18

Roll out some white sugar paste and cut a small circle (roughly 4cm in diameter)

Step 19

Place it on the upper part of the body (oval shape)

Step 20

Blend it well by gently rolling

Step 21

Secure the head onto the body, use a tooth pick if required and some edible glue

Step 22

For the flippers, roll a small pink ball

Step 23

Taper this ball to form a drop shape and flatten

Step 24

Glue the flippers in position as in the picture

Step 25

Position the flippers at this stage before they dry

Step 26

To make penguins feet, take a small bit of orange modelling paste and form a drop shape

Step 27

Flatten the drop shape

Step 28

Using the pointy end of Dresden tool mark the toes on the feet

Step 29

Glue the body onto the feet

Step 30

Repeat the same for the male penguin. Use a slightly darker colour if you would like them to look different.

Step 31

Make tiny eyebrows for both the penguins using black modelling paste

Step 32

Fix the head of the male penguin and glue both of them together in a cuddling position

Step 33

For the scarf – roll light blue modelling paste and use the knit impression mat to get the knitted texture

Step 34

With a cutting wheel cut a long strip

Step 35

At both the ends of the strip make some fringe

Step 36

Wrap the scarf around both the penguins neck

Step 37

With a dresden tool hold it in the centre and gently press

Step 38

To make the hat for our girl penguin roll some yellow modelling paste and texture with the knit mat and start cutting

Step 39

Cut a triangular shape out of it

Step 40

Make a cone and seal the ends using edible glue

Step 41

Roll some white modelling paste with a rolling pin and cut a thin strip for the rim of the hat

Step 42

Texture with the shell tool

Step 43

Glue the rim on the base of the hat

Step 44

Make a tiny pom pom ball out of white modelling paste and glue on top of the hat

Step 45

Glue the hat on the female penguin

Step 46

To make the hat for our male penguin cut a small light green disk

Step 47

Roll a small ball in light green and glue on top of this disk

Step 48

Glue the hat on the male penguin

Step 49

Roll a small thin black string for the string lights

Step 50

Make tiny bulbs as shown in the picture in different colours of sugar paste

Step 51

Glue the bulbs onto the string

Step 52

Let the bulbs dry for some time on the string before you lift them

Step 53

Glue one end of the string on the female penguins hand and the other on the male penguins hand

Step 54

Your cute penguin couple is now ready to chill out on your cake

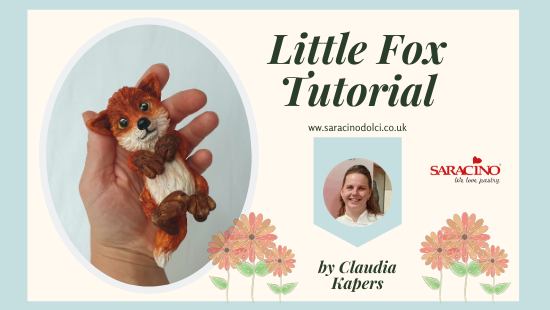
LITTLE FOX TUTORIAL

LITTLE FOX TUTORIAL

Skill level: BEGINNERS

You will need:

  • Saracino Model Paste white
  • Saracino Pasta Scultura
  • Saracino powder colors Brown, Yellow, Orange, White and Black
  • Saracino Liquid Shiny
  • Ball tool
  • Dresden tool
  • Modelling tool
  • Paintbrush
  • Exacto knife
  • Clear alcohol
  • Cocktail sticks or spaghetti

Step 1

Take a ball of Pasta Scultura  and form into the shape of the body

Step 2

Make a hair texture to the body with the Dresden tool. Work from the neck down to the bottom

Step 3

Roll a piece of Pasta Scultura into a length of 4 cm

Step 4

With your finger form a narrower section to the front leg.

Step 5

Make two notches on the foot with the Dresden tool.

Step 6

Using the Dresden tool form the hair texture on the leg.

Step 7

Attach the legs to the body

Step 8

Form a hind leg from a ball of Pasta Scultura

Step 9

Shape the hind leg with the finger and make a heel

Step 10

Make the notches for the toes with the dresden tool

Step 11

Use your Dresden tool to form a fur texture to the rear legs.

Step 12

Attach the hind legs to the body

Step 13

Form a roll of Pasta Scultura 5cm long and 1.5cm thick. This is for the tail.

Step 14

Model the roll into an elongated drop

Step 15

Apply fur texture to the tail using your Dresden tool.

Step 16

Attach the tail to the body

Step 17

Shape a ball of Pasta Scultura for the head.

Step 18

Using your finger press the ball slightly flatter on both sides and form a small snout.

Step 19

Using your ball tool form two holes for the eyes.

Step 20

Shape the mouth with the Dresden tool

Step 21

Make the nostrils with the tip of the dresden tool

Step 22

Make a border around the nose

Step 23

Using Pasta Model make two small balls of about 8mm diameter. These are for the eyes

Step 24

Fix the eyes into the eye sockets and apply fur texture to the face.

Step 25

Attach the head to the body

Step 26

Cut a ball of pasta scultura in half for the ears

Step 27

Form two triangles for the ears.

Step 28

Shape a rim to the ear and form fur structure to the ear with the Dresden tool. Attach the ears to the head.

Step 29

Mix yellow Saracino powder with alcohol and paint the eye very light yellow. Mix brown saracino powder with alcohol and make a brown edge around the eyes. Finally make the pupil with black Saracino powder

Step 30

Mix orange and brown Saracino powder with alcohol and paint the body. Avoid the belly, ends of the legs and the chin.

Step 31

Mix brown and black Saracino powder with alcohol and paint the ends of the legs dark brown

Step 32

Mix white Saracino powder with alcohol and paint the belly and the end of the tail white.

Tip: Let the edges of the colors merge slightly


Step 33

Using a small piece of Pasta Model place a white dot on both eyes

Step 34

Finish the eyes and nose with Saracino Liquid Shiny to give a glazed effect.

Tip: For extra strength in the attachment of the head, legs and tail, you can use cocktail sticks or spaghetti.

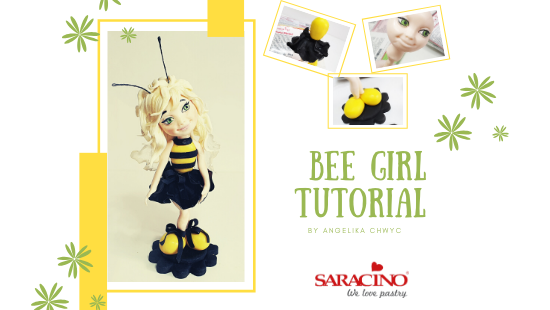
BEE GIRL TUTORIAL

BEE GIRL TUTORIAL

Skill level: INTERMEDIATE

TIP:

If you prefer to model using Saracino pasta model only use ready mixed colours. If you want to mix your own coloured pastes (Pasta model and Chocolate) use Saracino colours – I present this in the tutorial.

You will need:

  • Saracino white modelling paste
  • Saracino white modelling chocolate
  • Saracino black modelling paste
  • Saracino yellow modelling paste or yellow gel colour
  • Saracino light green modelling paste or light green gel colour
  • Saracino skin tone powder colour
  • Saracino light gold powder colour
  • Saracino purple gel colour
  • Craft knife or scalpel
  • Rolling pin
  • Large brush
  • Small brush
  • Cocktail sticks and wooden skewer
  • Florist wire
  • Tool with a sharp point

Step 1

Mix white modelling paste with modelling chocolate. Mix in a ratio of 1:1 and divide into three (the colour will be slightly beige). Then colour each piece/ Two of the balls with skin colour, one ball with yellow and a small green ball.

Step 2

Form an oval shape and with your finger form a dent across the centre

Step 3

Attach the head to the wooden stick. Using a small amount of paste, fix a piece of paste around the top of the stick to stop the head sliding down (this is not a neck and will be removed later)

To create a chin, find the centre of the bottom of the face. Press gently on both sides and try to raise the cheeks a bit. The bottom of the face should be nicely rounded

Step 4

Form the eye sockets with the ball tool.

Step 5

Then gently mark the sides of the nose.

Step 6

Form the end of the nose.

Step 7

Add two lines on the cheeks that make up the smile line

Step 8

With a slightly rounded tool, start forming lips.

Then use cocktail sticks to make holes in the mouth corners. Form holes in the nose and shape the outer edges of the nose.

Step 9

Stick pieces of white pasta model (almond shaped) to the eye sockets and then gently push them in to form and shape them.

Step 10

Add green round balls to the eyes as shown. This will give our Bee Girl the look of glancing sideways.

Step 11

Make eyelids from the skin color.

Step 12

Make a skin-colored line for the bottom eye lid. Using the black Pasta Model, add pupils and a thin line on the green part of both eyes.

Step 13

Use black paste and make thin lines around the eyes. The top line should be longer to form the last eyelash.

Step 14

Repeat on the other eye

Step 15

Add a few eyelashes on each eyelid and form the eyebrows with a small line of black paste. Use a small amount of white paste to add white dots.

Step 16

Dust using skin powder dust to give definition and highlighting to the face.

Step 17

Add a bit of red powder colour to contour the cheeks. Mix Red powder and white gel and paint the lips using your small brush.

Step 18

Remove the head from the stick and put it aside in a safe place ready for later use.

Step 19

Now we will make the stand for our Bee. Cut two shapes out of black paste – the smaller is to be a circle shape and the larger cut using a flower cutter to an overall height of 5mm each.

Step 20

Fix the smaller circle to the larger flower and stick with a small amount of water. Now form the big yellow oval shoes.

Step 21

Model two legs, narrowing downwards. Roll the leg at the knee to make even narrower.

Step 22

Gently insert a wooden stick through one leg.

Step 23

Insert the leg with the stick into one shoe. Fix the other leg to the shoe bend at the knee.

Step 24

Now make several ‘petals’ of different sizes with black paste. Roll out thinly.

Step 25

Use the ball tool to give form and shape to the edges. You can do this on a flower modelling mat.

Step 26

Attach the petals randomly to form the skirt.

Step 27

Keep a wavy edge to the hem of the skirt.

Step 28

Form the body so narrower at the waste and wider at the shoulders.

Step 29

Roll out the black paste and cut out thin strips for the black stripes.

Step 30

Fix the horizontal lines onto your body. Make bows and fix onto the skirt and shoes. We now need to add a neck. Insert a wooden stick a few centimetres into the body and form the neck around the stick.

Step 31

Fix the head onto the stick

Step 32

To make the arms roll skin colour so that it narrows slightly at the wrist. Then narrow further at the elbow and the wrist.


Step 33

Form the thumb on the hands.

Step 34

Then mark all fingers on the hand without cutting them.

Step 35

Stick them on your torso with your hands resting on the skirt.

Step 36

Now for the hair. Make strands of different sizes from the beige paste (a combination of modelling paste and chocolate). Give form and texture using a wooden stick.

Step 37

Apply light gold powder and cut the edges so that the ends are sharp

Step 38

Next apply strands of hair starting from the back of the head up. Remember to glue each element with water.

Step 39

To finish your hairstyle, add a larger element to the front and then add a few smaller ones.

Step 40

Use florists wire to make bee antenna. Colour them black and fix them into the head.

Step 41

Make your isomalt in accordance with the instructions on the packet. Pour out small circular shapes from the isomalt and then rub one edge with a wooden stick. The shape of the wings should be uneven.

Step 42

Colour the tips of the wings using dust colours and fix them to the back using a mix of paste with water.