


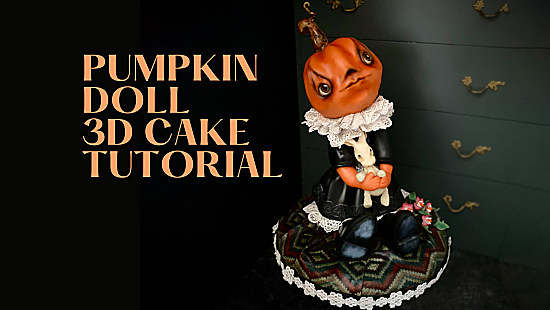
VALENTINE’S GIFT CAKE TUTORIAL

EQUIPMENT:

For the base cushion add marshmallow and the butter to a heatproof bowl and melt in a microwave or over a bain marie. Once melted combine with the rice. I try to use a spatula as long as I can. This mixture is extremely sticky so once you put your hand in there is no going back!
TIP: When you put your hand in it, put some vegetable oil on your hand first, it will help against stickiness.

Place your rice krispie mixture on the cake board and spread all over. Try to flatten and smooth. The rice on the board should be thick enough to look like a cushion. Make a chocolate ganashe and smooth the surface of the cushion. I used a dark chocolate with a ratio of 2:1 chocolate to cream. Simply chop the chocolate, heat the cream and pour over the chocolate. Wait a minute or two and stir well.

Smooth using a spatula or anything similar you like to work with.

Now to cover the ganache. Prepare everything you will need as because when your mixture of glycerine and gelatine is ready you will have to work fast.

Cut the gelatine sheets into small pieces and add to a heatproof bowl. Cover with water. Leave to soak for 5 minutes then turn the leaves over and soak for a further 5 minutes. Make sure all the pieces are soft, otherwise soak for a few more minutes. Microwave in 10 or 15 second bursts stirring after each time until completely dissolved. Repeat 2 – 4 times depending on the power of your microwave. Do not let it boil. Stir in the glycerine and mix well. Microwave again for 10 – 15 seconds. It should be liquid and hot.It is now ready to use but will start to turn to jelly as it cools. If that happens you can microwave it again in 10 or 15 second bursts to keep it fluid.
When your mixture is ready it’s time to put this on your paper. Put your paper on the working mat, take a wide brush and add your gelatine mixture all over trying to make light and smooth strokes. Immediately and carefully flip over your paper and repeat covering with the gelatine mixture. Leave to dry at least 20-30 minutes.

Once dried it will be a little sticky so I use a big brush and cornflour to dust the paper. You can trim it to your size as it is ready to use. Don’t worry to fold it as it will not break. You can stretch it like real fabric.

Add some cake gel to the ganached cushion. Starting on the side, stick the fabric to the ganache folding it into the center of the board. Use scissors if you have to cut any excess. Remember, we want a fabric look so it does not have to be perfect and equal on every side.

Prepare some more Rice Krispie mix just like before.

Insert the cake dowel where you want the dolls bottom to be. Oil your hands and press the rice mix around the dowel. Form it to a cone shape and try to squeeze it hard to make it more stable.

Cover the Krispie mix with ganache.

Use the Krispie mix to model two boots. Roll black Pasta Top thick. We do not want it too thin.

Cut out the sole shape. Fix it to the boot with cake gel if you need. Repeat this with the second boot.

Roll more black Pasta Top. I use a quite thick layer as I don’t want to see the structure of the rice through. Smooth it using your hand.

Cut out a flat piece of black Pasta Top and fix it for the heel.

Use a stitching tool to add a pattern around the boots.

Using a cake lace mat pattern of your choice and the pearl ready made lace mix make the edible lace. Mix well and spread the mixture onto the mat. Bake it according to the instructions on the packaging.

Fix the boots on the board. You can stick them using a little ganache. Dust the soles of the boots with white powder to give a worn look.

For the frill to the underskirt make some cuts in the lace. This will help to fix it around the base of the ganached skirt.

Fix with cake gel overlapping the cuts.

For the skirt roll a long piece of black Pasta Top. Cut the shape of the skirt and fix lace around the base.

Dust the lace with black powder.

Fix the skirt to the ganache using cake gel. When fixing try to make ‘waves’ just like a fabric would appear.

Using black Pasta Top cover the top of the dolls body. Fix another piece of lace to cover the joint.

For the head make more Krispie ricde mix and shape this into a ball. Use a pencil to roughly draw the position of the nose, eyes and mouth.

Cut out the eye sockets.

Cover the head with ganache. Using a silicone shaping brush and white modelling chocolate add the shape of the face. First knead and roll a small sauasage shape and put it in the middle of the forehead.

Using the silicone brush smooth the edges and shape a nose.

Repeat this step for the eyes, mouth and cheeks. Use a small amount of modelling chocolate and smooth it with the silicone brush. You will see where you need to add more to achieve the shape. Allow to harden.

Using the modelling chocolate shape it to a pumpkin stem. I used my brush handle to hold the shape. Leave it to harden.

Prepare everything you need to cover the head.

Roll orange Pasta Top. Use a small ball of the paste to carefully push it into all the curves.

Form the eye sockets.

Using the silicone brush shape the lips and cheeks.

Knead white modelling chocolate and roll into two small balls. Add them to the eye sockets.

For painting the eyes, boil water and pour it into a small cup, put a plate over it and place a small amount of cocoa butter and allow to melt. Prepare your dust colours.

Knead orange Pasta Top well and shape it to add eye lids. Use your finger to smooth it out. Mix brown powder with the cocoa butter and paint the iris. Let it dry

Mix black powder colour with cocoa butter and paint the pupil and let it dry for a second. With the brown and yellow colours paint the remainder of the iris. Use a little white paint to add reflection.

Your eyes should look like this.

Prepare dust colours for shading the face. Use your imagination and add colours where you feel they should be. I used orange colour in all the creases and added darker shades.

We want to achieve a shaded look as shown.

Dust the pumpkin stem. When the face is ready, fix the stem to the top of the head with a small piece of well kneaded white modelling chocolate.

Use a silicone brush to smooth it out and blend to the head.

For the arms make more Krispie rice mix and shape them as shown. Fix them with chocolate ganache.

Roll black Pasta Top and cut a rectangle shape. Cover the arms. Roll the edge up to form an egde to the sleeve.

I made a rabbit toy for my pumpkin doll. I fixed the head with chocolate ganache. I then modelled a bigger piece of the chocolate into a teardrop shape and fixed it under the head.

Using a sharp ended tool add a fur texture.

Repeat the process for the two rabbit legs.

For the pumpkin dolls glove roll orange Pasta Top into two sausage shapes. Model two ends to make it look like hands. Cut out a small triangle to form a thumb. Mark the fingers.

Fix the gloved hand in position so it looks like she is holding the rabbit.

Repeat for the other hand. Now make and fix the hands of the rabbit.

If you find any imperfections in your pillow these can always be disguised by adding flowers or foliage.

The head should be dry enough so when you push it onto the dowel it will not break. First step is to position where you want the head. I then made a small hole with a knife. Place over the dowel and gently push the head down until it meets the body.

For the collar make some white pearl lace.

Fold it over in half and shape to a fan.

Add a little cake gel between the body and the head and fix the first layer of lace. I made two layers to give it a fuller look.

And for my final step I used an airbrush to apply a layer of Liquid Shiny glaze to the whole piece. This is not essential but gives a lovely finished look.
Voila! Your amazing 3D pumpkin girl doll is ready!

INGREDIENTS:
EQUIPMENT:
8×5″ round cake or dummy
6×5″ round cake or dummy
4×5″ round cake or dummy
Large rolling pin
Fondant smoother
Sharp knife
Corn starch
Airbrush
Cake Lace mat of your choice
Cake Lace spreading knife
12″ white cake board
Small brush

Prepare the cake lace. Make well in advance as it takes a while to create the amount of lace we need. To cover a 8×5″ size cake you will need at least 2 whole pots of cake lace mix. I recommend having an extra pot ready just in case we don’t have enough to cover our cake.

Stir the cake lace mixture. Place onto a mat and spread using a plastic cake lace knife.

Make sure all grooves are filled and the excess is removed.

Allow to dry. You can leave it outside for a while or place in the oven on a very low heat.

For the middle tier add pink powder colour to white Pasta Top. Knead well to achieve a uniform colour.

Cover the middle tier (cake or dummy).
TIP: Pasta Top is very elastic and can be rolled thinly.

Using white Pasta Top cover the other two tiers. You can use cornstarch on your work surface if required. Trim off excess paste.

Spray the middle pink tier with pink glitter. Careful not to apply too much, we just want to achieve a nice sheen.
TIP: Keep the spray bottle a little distance away from the surface to avoid making concentrated glitter spots.

Prepare your airbrush and gold colour.

Airbrush the top tier. You will need at least two layers to achieve a nice coverage.
TIP: Don’t rush it! Make one layer at a time! Allow to dry before adding the next layer.

Take a sharp knife or scissors and cut off the trim from the lace.

Take a small brush and apply a thin layer of edible glue to the edge of the gold lace trim.

Fix around the top of the tier.

Now it’s time to fix all the lace to the bottom tier. Remember, the best part of this design is the fact that none of it has to be even. The bottom part imitates a skirt so don’t worry if it turns out not exactly perfect. I have made 22 lace sheets using 2 tubs of lace paste.

Take one lace sheet and fold it in half.

Form a little ruffle shape ready for attaching.

Start adding your lace from the bottom to the top. Apply glue on the cake.

Fix the first lace piece around the bottom. Place one end of the lace, bend it and try to shape it like a ruffle skirt pushing a little into the cake as you work around the perimeter.

Repeat around the cake perimeter until we meet where we started.

Repeat this process keeping an even gap between lace bands. Continue until you fix a band around the top of the tier. You are aiming for a ruffle effect as shown.

Your top band should continue onto the top of the tier. Apply a little glue. Fix the pink centre tier over the lace so to cover the joint.

Apply a little glue around the base of the gold top tier.

Fix a lace trim around the bottom.

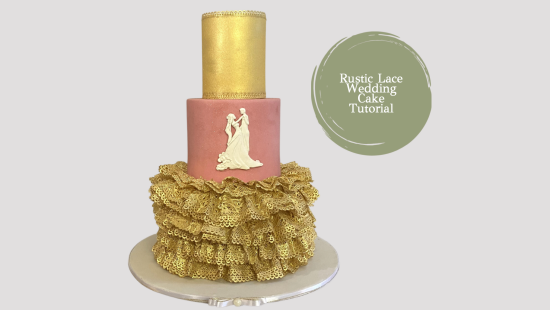
Add a plaque or detail of your choice if required. Your beautiful cake is ready!
