VALENTINE’S CAKE POPS TUTORIAL

VALENTINE’S CAKE POPS TUTORIAL

Skill level: INTERMEDIATE

Chocolate tempering:

White Chocolate:

Heating to 40-45 degrees, cooling to 24-25 degrees, final temperature 27-28 degrees.

Milk chocolate:

Heating to: 40-45 degrees, cooling to 27-28 degrees, final temperature 30-31 degrees.

Dark chocolate:

Heating to: 45-50 degrees, cooling to 28-29 degrees, final temperature 31-32 degrees.

You will need:

INGREDIENTS:

  • Saracino Chocolate drops white 250g
  • Saracino Food Flavouring Pistachio
  • Saracino Pasta Model Pink
  • Saracino Pasta Model White
  • Saracino Dust powder Pink
  • Saracino Gel color Pink
  • Saracino Gel color Black
  • Saracino Cakegel
  • Plain cupcake mix, butter and eggs
  • Sprinkles

EQUIPMENT:

  • Silicone popsicle mini ice cream mould (Silikomart)
  • Popsicle sticks
  • Food thermometer
  • Pan with a thick base
  • Heatproof glass bowl
  • Marble or natural stone slab for chocolate temperingĀ 
  • Spoon
  • Pallet knife
  • Brush
  • Pastry bag
  • Rolling pin
  • Dresden tool
  • Knife
  • Ball tool
  • Round cutter diameter 45mm
  • Leaf cutter 20 x 25mm
    • Ā 

Step 1

Using the Bain Marie technique melt the Saracino chocolate drops. Make sure everything is melted and has a temperature between 40 and 45 degrees. Check the temperature of the chocolate with a food thermometer. Pay attention! The temperature rises quickly. The bottom of the bowl should not touch the hot water. Make sure that no water gets into the chocolate.

Step 2

Now temper the melted chocolate. In this case, you are going to reduce the temperature of the melted white chocolate to 24 to 25 degrees. Do this by working with a pallet knife on a marble or natural stone surface. Use a food thermometer to check the temperature. When you have reached the temperature of 24 to 25 degrees, you heat the chocolate again to 27 to 28 degrees back in the bowl over the water. Pay attention! Tablating or tempering is a cooking technique in which melted chocolate is cooled back, so that crystals are formed in a certain way, which gives the chocolate a structure. This structure is obtained by heating the chocolate above 30°C, causing three of the four crystals to melt. Work meticulously with the temperatures for the best end result. This tutorial includes an overview of the temperatures for tempering white, milk and dark chocolate.

Step 3

Take your silicone ice pop mould and pour a heaped tablespoon of melted chocolate into it. Turn the mould around in a controlled manner so that the chocolate runs along the edges of the mould.

Step 4

Make sure all sides of the mould are covered with chocolate to the edges.

Step 5

Repeat steps 3 and 4 for each section of the mould. For a nicer end result it is better to fill each part separately with chocolate. If you want the chocolate base to be a bit thicker, repeat steps 3 and 4 again for all 4 ice pop shapes.

Step 6

Remove excess chocolate with a pallet knife. Make sure the top edge is nice and smooth.

Step 7

Let the chocolate set in the mould at room temperature.

Step 8

Bake pistachio cupcakes. Make cupcake batter according to the recipe. Add the Saracino pistachio flavouring in proportion to the batter. Bake the cupcakes. Let them cool and crumble 3 cupcakes into a bowl. For 4 cake pop ice creams, take 3 cupcakes made of 35g batter each.

Finely chop pistachio nuts as desired and mix with the crumbs.

Tip:Ā You can play with the flavours. Saracino have 15 to choose from!

Step 9

To achieve a nice workable filling, add 1 tablespoon of Italian Meringue Buttercream or white ganache to the pistachio crumbs. Knead everything well together and divide into 4 equal portions.

Step 10

Using a spoon, gently press the cake mixture into the mould.

Step 11

Carefully slide the sticks into the cake pop through the hole in the mould.

Step 12

Make sure the cake is not above the top surface of the mould and that the top of the cake pop is as smooth as possible.

Step 13

Temper a small amount of white chocolate and cover the top. Smooth with a palette knife and remove any excess chocolate.

Step 14

Let the chocolate set at room temperature.

Step 15

When everything is set, remove the cake pop ice creams from the silicone mould.

TIP: You can put the mould in the freezer for 5 minutes before removing the cake pops.

Step 16

Take a 20 x 25 mm leaf cutter and cut out the shape for the forehead. Use a sharp knife to form the side hair. Keep these cut-out parts.Ā 

Step 17

Shorten the area for the nose by a few millimetres. Take 30g of white Pasta Model. Roll out to 2mm thick and cut out a circle with the cutter and stick the pink part on top with cake gel.

Step 18

Use the pink drop shapes previously cut out to make ears. Roll out a small amount of white Pasta Model thinly and cut out two drop shapes with the leaf cutter. Stick them on the pink part and round off the bottom. Also use the leaf cutter for this. Using your ball tool make two indents in the head where the eyes will be

Step 19

Colour a small amount of white Pasta Model with the black gel colour. Roll two oval balls of 3mm in size for the eyes and one oval ball of 5mm for the nose. Place on the face. Use cake gel to fix.

TIP:Ā You can also use the pre-coloured Pasta Model Black.

Step 20

Dust the tips of the ears and the top of the head with the pink dust powder.

Step 21

For the tail take 10g of pink Pasta Model and roll into a sausage shape. Cut into 2 equal parts. Repeat this step with 10g of white Pasta Model. Stick a pink and white part together with cake gel to form a tail. Leave the white end part a little bit thicker. Use the Dresden tool to add texture to the tail.

Step 22

Dust the middle part of the cake pop ice cream with pink dust powder. Dust so darker in the middle getting lighter outwards.

Step 23

Attach the head and tail to the cake pop ice cream with cake gel. Do not use too much cake gel! You can also attach the parts with melted chocolate.

Step 24

For the heart you will need a small ball of pink Pasta Model. Flatten with your finger and form a notch on one side with a Dresden tool. With your fingers make a point on the other side. Dust the top with pink dust powder.

Step 25

To decorate your cake pop ice cream with chocolate, melt a small amount of white chocolate. While heating, add pink dust powder until you reach the desired colour. Temper the chocolate as shown previously.

Put the chocolate into a piping bag with a small piping nozzle. Pipe lines over the bottom part of the cake pops. Decorate immediately with sprinkles.

Step 26

Vary with different looks. Use your imagination!

Use colours you want to achieve the look you love.

CHRISTMAS TREE TUTORIAL

CHRISTMAS TREE TUTORIAL

Skill level: BEGINNERS

You will need:

  • Threaded bar 8mm diameter x 12cm long. You will need two.

  • Hex nut 8mm x 8Ā 

  • Drums 6ā€ x 2

  • Drum 8ā€Ā 

  • Drill with 8mm bit

  • Wrench 8mm

  • Saracino Pasta Top

  • Saracino modelling paste red

  • Saracino modelling paste white

  • Saracino gel colour green, white and brown

  • Strip cutter

  • Round cutter 6 cm

  • Calyx cutter

  • Rolling pin

  • Palet knife

  • Ribbon green

  • Winter wreath mould Karen Davies

  • Ball tool

  • Cake/Ganache or dummy

  • Paper towel

  • Foam pad

  • Cut off hard brush

  • Cone bud

  • Bendable wire

  • Bamboo / wooden skewerĀ 

  • Sprinkles metallic (silver rods)

  • Sprinkles red and white balls

  • Edible glue

  • Brush

Step 1

On one of the small drums mark the position where you want fix the two legs. Put the three drums on top of each other and drill two 8mm holes through the three drums at the same time (so the holes will be at the same position on all three boards). Lay one small drum aside. Put the two threaded rods through the 6ā€ and 8ā€ drums and put hex nuts at the bottom of each rod beneath the 8ā€ drum. Fix two other hex nuts on top of the 6ā€ drum to create a firm base. Use the spanner to tighten the hex nuts to form a firm base structure.

Step 2

Cover the top of the 6ā€ drum with fondant Pasta Top. Use a cut off stiff brush to give the fondant texture.

Step 3

Cover the two threaded bar legs with modelling paste. Do not cover the top of the threaded bar (as we need to fix the third drum). Thread a hex nut on the top of each bar.

Step 4

Roll red modelling paste and use the strip cutter to create strips

Step 5

Cut the strips into long pieces

Step 6

Glue the strips to the legs to form the stripes on the leggings.

Step 7

For the shoes colour some white modelling paste with the green gel colour, as dark as you want to

Step 8

Create two big tear drop shapes for the shoes.

Step 9

Use a ball tool to form a hole for the legs

Step 10

Cut the end of the shoe (to put around the legs)

Step 11

Glue both shoes around the two legs, and bend the pointy end so you create an elf shoe, glue the cut ends at the back together.

Step 12

Put the second 6ā€drum on top of the two legs and thread the hex nuts on top. Use the spanner to tighten them.

Step 13

Put your cake on top of the drum in a cone shape (13 cm base) and cover it with ganache. I used a dummie instead. If you’re using cake make sure you cover the drum and hex nuts with fondant before placing your cake on the drum.

Step 14

Colour some white Pasta Top fondant with the green gel colour. Use the KD mould to create pine needles. Before putting the paste into the mould apply some Trex to the piece of fondant. Flatten it into the mould with a rolling pin. Trim off the access fondant.

Step 15

Take the fondant out of the mould and glue it on your cake with Trex or a little water. you may want to start at the rear of the cake to practice the look you would like to achieve.

Step 16

Repeat until your cake/dummy is fully covered. Fix a green ribbon around the drum.

Step 17

Roll out red modelling paste to create a bow. Cut out two rectangles of 14cm x 7cm and one rectangle of 10cm x 4cm.

Step 18

Apply a little glue to the ends of the two rectangles and fold the other end over. Place some rolled up paper towel in the bow so that the bow dries forming a round shape. Pinch the ends of the glued side together.

Step 19

Fold the long sides of the small rectangle to the inside and glue the end to the two bows.

Step 20

Glue the rectangle all around and leave it to dry.

Step 21

Roll out some white Pasta Top fondant and cut out circles

Step 22

Use a ball tool to flatten the edges of the fondant on the foam pad. Make sure your tool is half on the foam pad and half on the fondant. That will create a ruffle effect.

Step 23

Fold the circle in half.

Step 24

Fold into three.

Step 25

Remove the access fondant from the base of each ruffle.

Step 26

Fix the bow to the front of the cake. Fix the ruffles around the base of your cake

Step 27

Use a small ball tool to push the ruffles on to the cake. Create three layers of ruffles around the bottom of the cake.

Step 28

Make balls of red modelling paste to glue in your ruffles. As many as you want to.

Step 29

Roll out red modelling paste to a long sausage shape and cover the bottom drum. Use the cut off stiff brush to create texture on the paste. Cut aeay the access fondant. Fix the green ribbon on the side of the drums

Step 30

You will now need the long bamboo skewer and the bendable wire.

Step 31

Twist the wire around the top of the skewer. Form the wire to a circular shape using the 1kg Saracino tub as a modelling tool. Insert the skewer in the cake, leaving the wire out of the top of the cake.


Step 32

Insert a skewer into the bottom of the flower bud.

Step 33

Cut out three circles of Pasta Top fondant and use the ball tool to ruffle the edges.


Step 34

Fix the three ruffled circles one by one around the flower bud. Roll out red modelling paste and cut out a large calyx.

Step 35

Use a ball tool to ruffle the edges of the calyx and glue the calyx on to the flowerbud


Step 36

Using green fondant in the small needle mould cover the top of the skewer and the wire at the top of the tree.

Step 37

We need about 4 moulded small needles. Put some edible glue at the back of the fondant and glue the fondant onto the wired part of the skewer.


Step 38

Glue the flowerbud on the end of the wire. This can be any decoration of your choice. Cover the end of the bud with a small amount of green paste.

Step 39

Use some sprinkles to decorate the Christmas tree cake


Step 40

Use the metallic sprinkles to create a garland look on the cake.

Step 41

Make some red bows using modelling paste or use a bow mould. Use the bows to decorate the cake. Glue some red and white sprinkles on the cake.


Step 42

Colour some modelling paste with the brown gel colour for the pine cones. Use the mould to create the pinecones. Make different sizes of pine cones.

Step 43

Glue the pine cones on to the cake above the red bow and paint the tips with white to give a frosty look


Step 44

Fix pine cones at the base of the bow (or you can glue ruffles). You decorate it the way you would like it to look.

Step 45

Fix pine cones and needles on the drum if you wish.


Step 46

Your Christmas cake is ready to party!

SKINNER BLEND TECHNIQUE

SKINNER BLEND TECHNIQUE

Skill level: INTERMEDIATE

TIP:

Remember to use gloves. Always protect the pieces of paste from drying out. Always pack them in foil or cling film– if you are mixing colours to make it very dark, do it a few hours in advance. Freshly mixed colour will be too soft to use immediately

You will need:

  • Saracino white modelling paste

  • Saracino white modelling chocolate

  • Saracino red powder colour

  • Saracino orange powder colour

  • Saracino white powder colour

  • Saracino black powder colour

  • Saracino green powder colour

  • Saracino brown powder colour

  • Rolling pin

  • Sharp blade

  • Wooden skewer

Step 1

Prepare a mix of Pasta Model and white modelling chocolate 2:1 (2 parts paste and 1 part chocolate). Mix them with a small amount of white powder colour.

Step 2

Colour pieces of the mixed paste with the powdered colours visible on the photo. Leave a larger piece white colour

Step 3

Start by making a flower. Use white, red and orange colour paste. Roll out into strips as shown in the picture. The colours may be different (to your choice), but it is important that each colour is of the same thickness and width.

Step 4

Fold the rolled out strips in half making sure the boundary of each colour overlaps the lighter colour next to it. Roll out again.Ā 

Step 5

Repeat this a number of times to achieve the blended look.

Step 6

When we roll colours the length automatically wants to increase. Each time you roll out the paste remember to push back to the original width using your fingers (look at the arrows)

Step 7

Using your fingers pinch the ends of the fat sausage shape.

Step 8

Gently press and elongate the piece using finger pressure. Be gentle as we don’t want to ruin the blended effect we have achieved.

Step 9

Your paste should be formed to a roll shape like this. The cross section will show the transition blending of the colours.

Step 10

Roll a thin sheet of white paste and fix around the roll by pressing gently.

Step 11

On your work surface roll to extend the paste to a long and thin sausage shape. Divide the length into 4 equal parts. Each part will have to be divided into different lengths as described in the next step.

Step 12

The first piece should be cut into two unequal lengths. One quarter : three quarter (the smallest piece is the centre and the largest is the last largest flower petal)

The second piece should be cut in half (2 pieces)

The third piece should be cut into third’s (3 pieces)

The fourth piece should be cut into quarter’s (4 pieces)

Roll each piece again. They will have different thicknesses but should all be the same length.

Step 13

Then press down on each roll to form a semi circular shape.

Step 14

Keep the two outer edges thin.

Step 15

Repeat to all pieces.

Step 16

Starting with the smallest pieces form around a wooden skewer to curve and form the centre of the flower.

Step 17

Roll up tightly.

Step 18

Add the next piece over the joint of the centre bud.

Step 19

Keep adding more petals with an overlap

Step 20

Repeat until you have used all sizes. You should finish with the largest pieces.

Step 21

Roll a thin length of white paste and fix over the join of the larger petal.

Step 22

Repeat on all of the outer petal joints.

Step 23

Using your hand roll out to give a smooth surround.

Step 24

Cut into two pieces. Set one aside for the larger flowers. Continue rolling the other piece to form a narrower sausage shape (smaller flowers)

Step 25

When you cut make sure you use a very sharp blade to ensure the pattern stays visible and doesn’t ‘blend’.

Step 26

You can repeat all of the above steps to create different flowers if required.

Step 27

The next steps are for the leaves.

Prepare four pieces of green paste in different shades. You will also need a small amount of white and brown paste.Ā Roll the lightest green colour into a sausage shape then press down to form the semi circle shape shown in the picture.

Step 28

Roll out the brown thinly and cover the light green shape previously formed. Trim off any excess paste.

Step 29

Add next green layer (darker shade)

Step 30

Using a sharp blade make two cuts along the length of the piece. The cuts need to be at an angle.

Step 31

Roll out your white paste thinly. Cut into strips. Place a strip of white in each cut.

Step 32

Push together to sandwich the white and then cover using thinly rolled white paste.

Ā 

Step 33

Use a sharp blade to cut in half.

Step 34

Now put them together. And press gently making sure the patterns line up.Ā 

Step 35

Gently press the shape together to make sure there are no voids or air gaps.Ā 

Step 36

Making it longer as you work it.

Step 37

Pinch into a leaf shape.

Step 38

Squeeze it along the entire length as shown in the photo

Step 39

Work the two lengths differently to give you two sizes.

Step 40

Once made the rolls can be stored ready to be used whenever you need them. To prevent drying out wrap them well in cling film and store in an airtight container.

Step 41

If you intend to use patterns to decorate skirts, for example, roll out a piece of white paste

Step 42

You can then fix the pattern to the white paste to the design you require. Use a sharp blade to cut the flowers very thinly.

Step 43

When you have arranged your pattern roll gently with a rolling pin to smooth out. Do not apply too much pressure or it may ruin the blended look of the flowers and leaves.

Step 44

Cut and trim to the size you require.

Step 45

Shape the frills along the entire length

Step 46

Your frilly skirt is now ready to use.

CHOCOLATE BAS RELIEF TULIPS

CHOCOLATE BAS RELIEF TULIPS

Skill level: BEGINNERS

You will need:

Step 1

Modelling chocolate is firm to use so you need to heat it up first to make it possible for rolling. In warm weather your hands should be enough, but if required it can be put in the microwave for a few seconds to soften.

Step 2

Roll the chocolate to about 2mm thickness and cut out two sizes of petals

Step 3

Squeeze the petal into the mould. Pattern well with the veiner section of the mould.

Step 4

Make two sizes of petals for variety. Make as many as you want for your cake.

Step 5

Roll an egg shape for the center of the tulips.

Step 6

Match the petals you have made with the centre oval shape.

Step 7

Use two sizes of petals for variety around your tulip.

Step 8

To fix your petals you can use a little watered down Saracino CMC.

Step 9

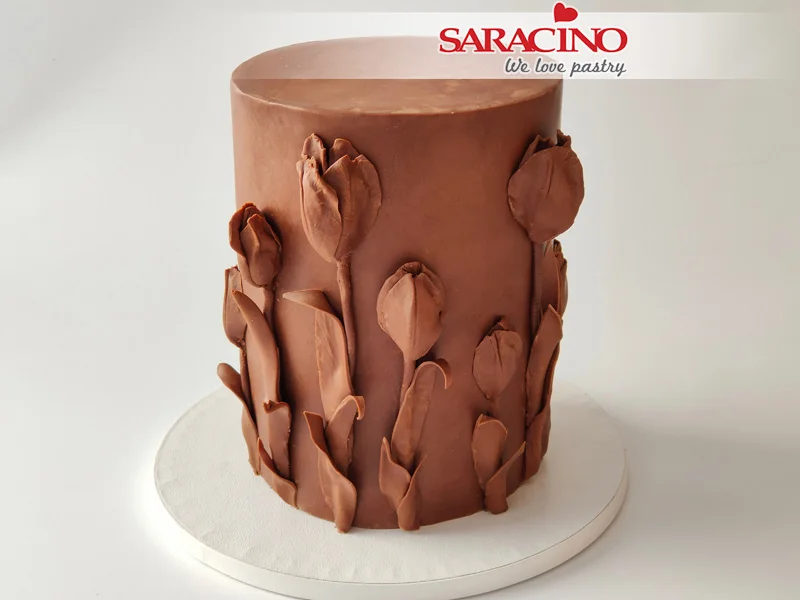
Glue the flowers on at different heights

Step 10

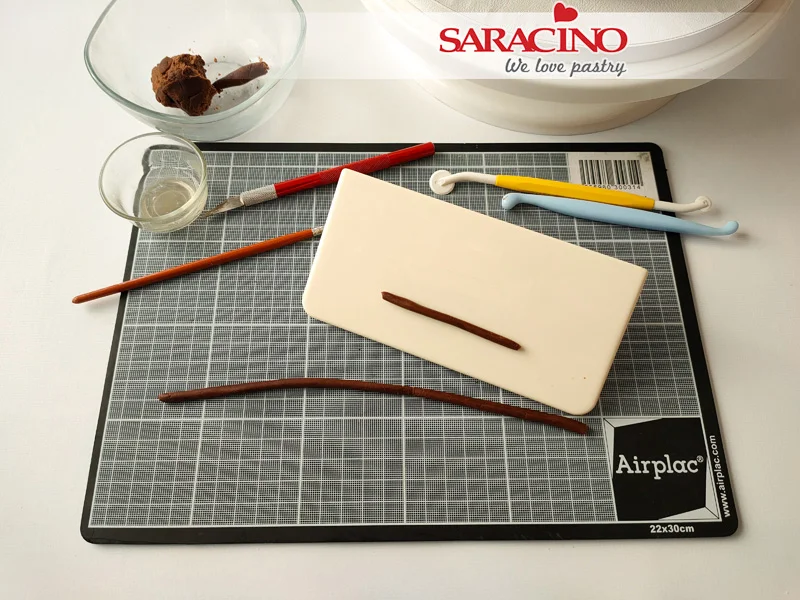
Roll the stalks using a side smoother on your non stick mat.

Step 11

Glue stalks to the sides of the cake below each flower and cut off the excess chocolate

Step 12

Roll more of your chocolate and cut out leaves of different sizes.

Step 13

Apply the watered down CMC glue

Step 14

Stick one or two leaves to each stalk.

Step 15

Bend the leaves to achieve more natural look

Step 16

Tulips glued on at different heights to achieve the look you would like.

Step 17

Finally, mix Powder Pearl Light Gold with the clear alcohol. Now paint the edges of the leaves and petals as required.

Step 18

Your cake is ready