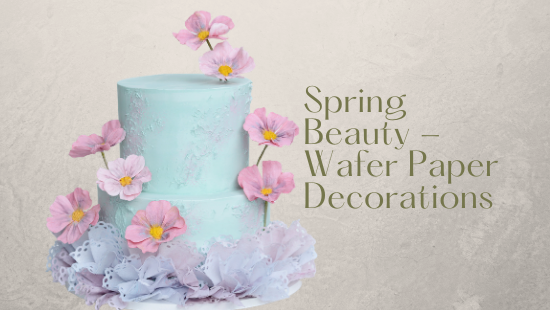
SPRING BEAUTY CAKE TUTORIAL


You will need:
- Saracino Wafer Paper 0.27
- Yellow Saracino Pasta Model
- Saracino powder colours: blue, white, pink, yellow and purple
- Two tier cake finished off using buttercream to a colour of your choice (leave some buttercream aside)
- Flower veiner
- Flower tape
- Scissors
- Pliers
- Flower wire gauge 30 and 20
- Paper puncher
- Brushes
- Clear alcohol
- Modelling tool Cerart 502

Step 1
Cut the wafer paper into wide strips starting from the narrow edge.

Step 2
Fold the cut pieces in half.

Step 3
Cut out petals.

Step 4
Repeat for the whole strip.

Step 5
Prepare white and pink Saracino powder colour and a bowl or painting pallet.

Step 6
Add a little of the powder colours to the bowl. Add clear alcohol and mix till blended. Keep this colour as we will use it later.

Step 6
Take your 30 gauge wire and cut into small pieces.

Step 7
Using the colours and brush paint the petal from one side.

Step 8
Place your wire on the painted petal whilst it is still wet.

Step 9
And cover with another petal so they stick together.

Step 10
Now you can paint it on both sides.

Step 11
Place your petal on a veiner and press gently to achieve a veined effect.

Step 12
They need to have a natural look. Let them dry on a plate or sponge mat.
TIP: If you are in rush you can dry them in the oven at 50C for 10 minutes.

Step 13
Repeat with all petals. The quantity you make depends on the amount of flowers you need.

Step 14
Cut your 20 gauge wire in half.

Step 15
Bend your petals as shown.

Step 16
Fix a few petals around the 20 gauge wire. My flower will have 8 petals.

Step 17
Secure the wires with flower tape.

Step 18
Using yellow Pasta Model, roll a small ball and add to the centre of the flower. Using your modelling tool add texture.

Step 19
Using blue, black and yellow colour powders shade the petals.

Step 20
For the bottom lace, cut the wafer paper into long strips.

Step 21
Using a paper puncher of your choice create a pattern along the edge of each paper strip.

Step 22
In a clean bowl put blue, white and pink powder colours.

Step 23
Using a soft brush shade the edges of the wafer paper.

Step 24
So they look as shown. Don’t aim for all of them to look the same. We want them to look random.

Step 25
Add a tiny bit of water to the bottom edge of the paper and start folding.

Step 26
Connect two pieces together using a little bit of water.

Step 27
Make as many as you require to cover your bottom tier.

Step 28
Take your cake and cover with buttercream to the same colour.

Step 29
Using a spoon, dip it in the cream and dab over the cake to give the textured look.

Step 30
Take the previously mixed colour. There is no need to add more alcohol as it can be used as a dust.

Step 31
And dab over the cake with the brush.

Step 32
Start adding the paper lace. No need to add water if your cake has a buttercream covering.

Step 33
Continue all around the bottom of the cake. Do this twice to give a fuller look appearance.

Step 34
Add the flower randomly where required.

Step 35
Your spring cake is ready!