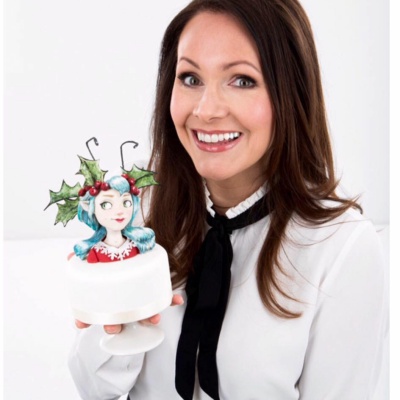
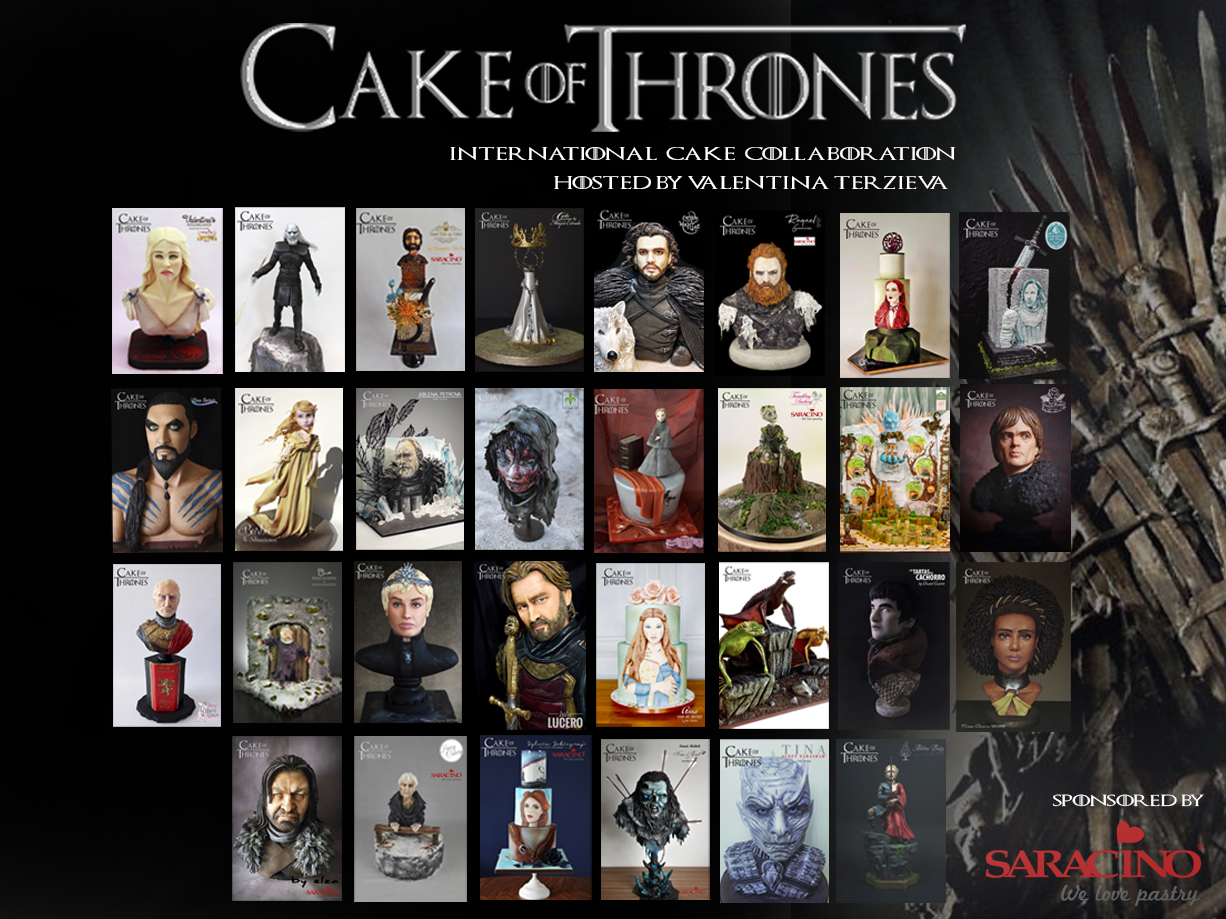
Cake Of Thrones

Cake Of Thrones

Saracino is extremely proud to be a Sponsor of this amazing Game of Thrones collaboration hosted by our Ambassador Valentina Terzieva.

See all the amazing pieces made using our products from amazing sugar Artist’s from around the world. All to celebrate one of the most popular shows on TV ‘Game of Thrones’.

‘Winter has come’ Thanks to


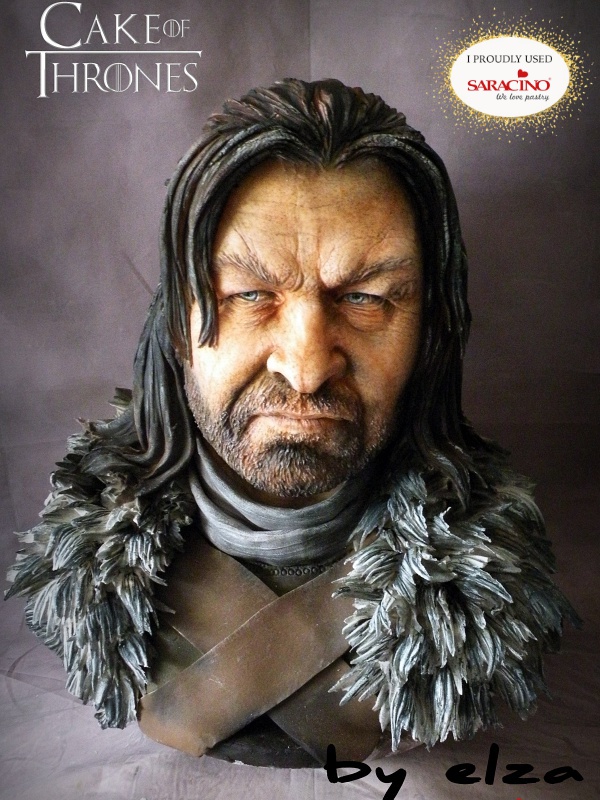
Elza Baldzhiyska aka The Nightwitch ‘s cakes

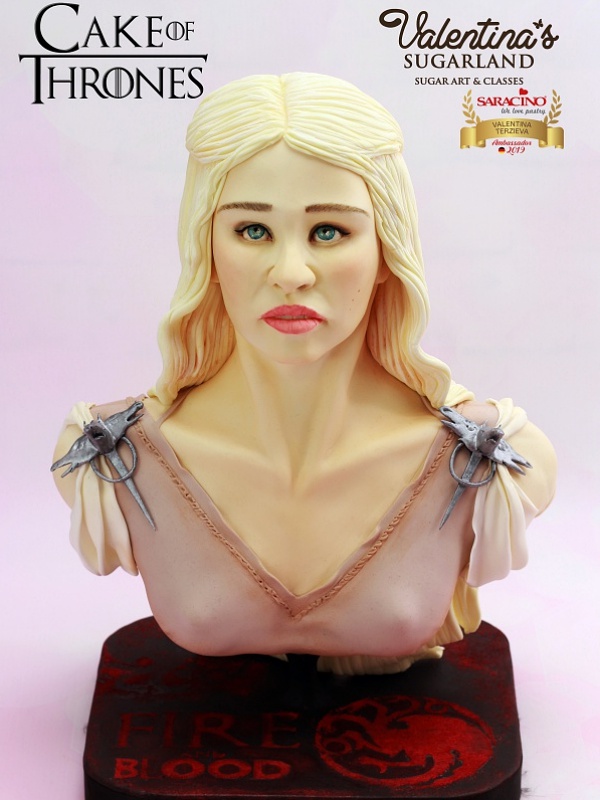
Valentina Terzieva aka Valentia’s Sugarland
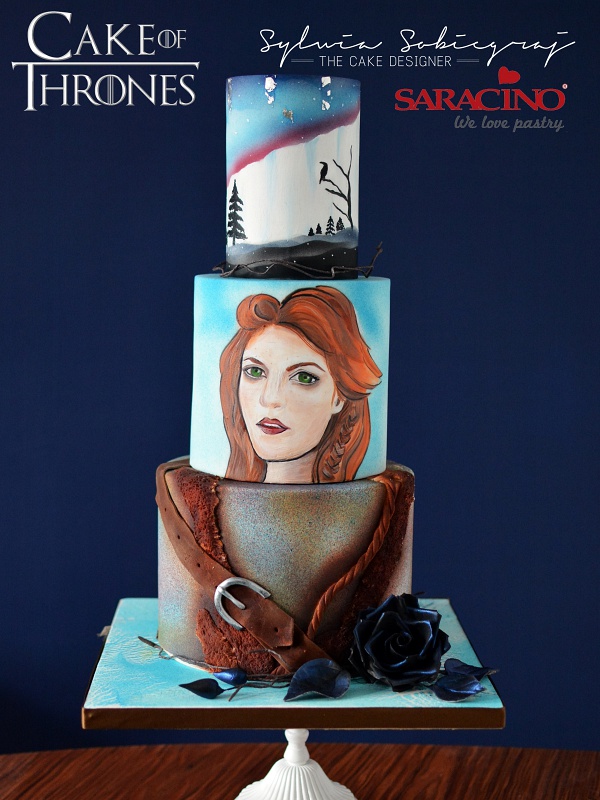
Ainta Cappello aka Fancy Cakery

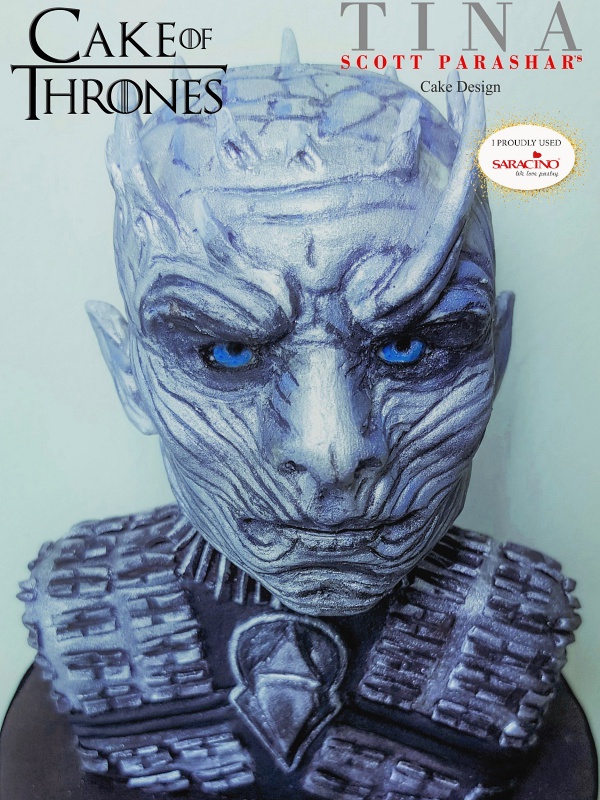
Tina Scott Parashar aka Tina Parashar’s Cake Design

Raquel García aka Raquel García – Cake Art 

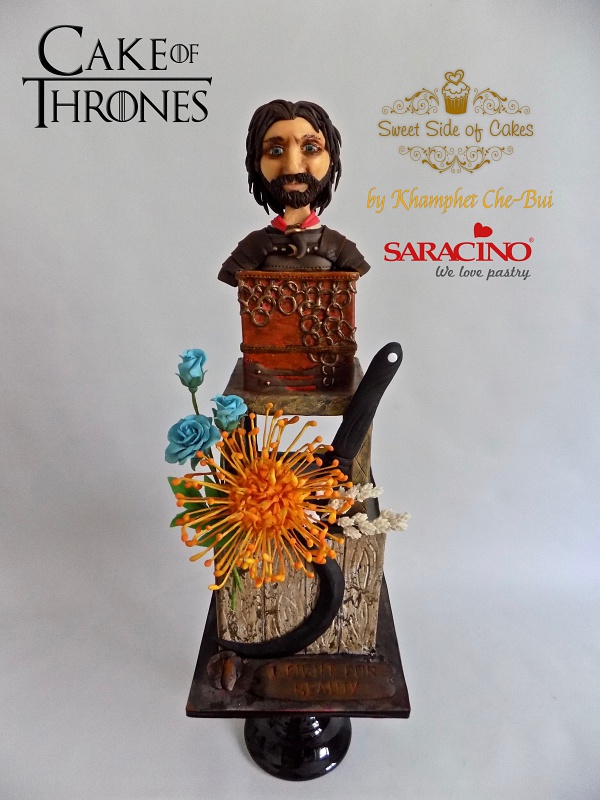
Khamphet Che-Bui aka Sweet Side of Cakes

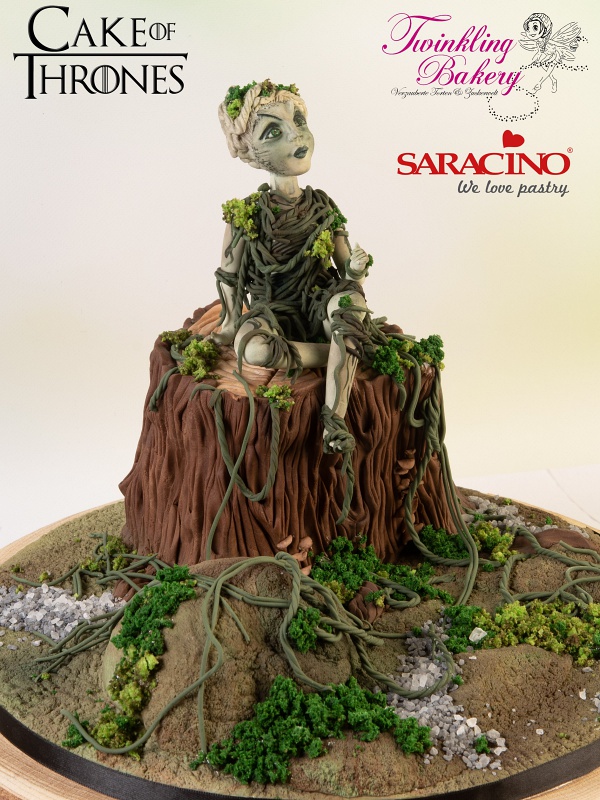
Nadine Globig aka Twinkling Bakery 

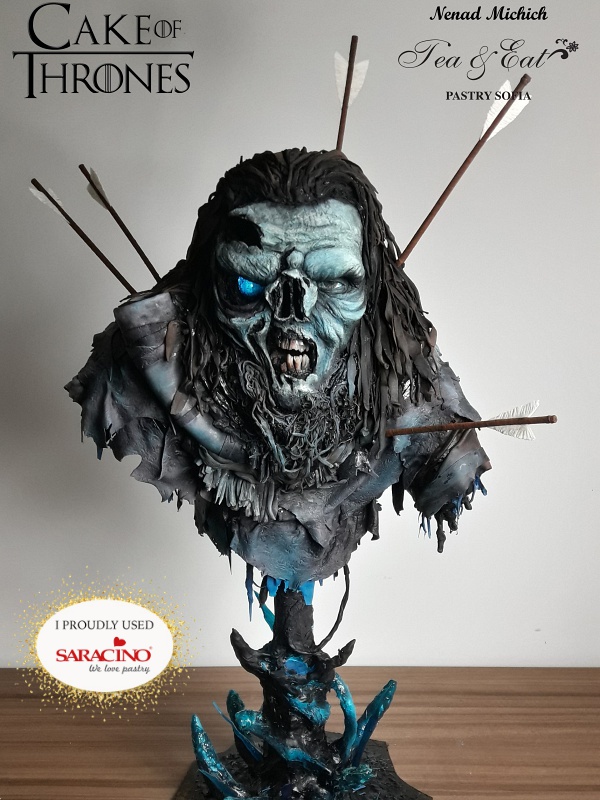
Nena Michich – Tea & Eat Pastry Sofia

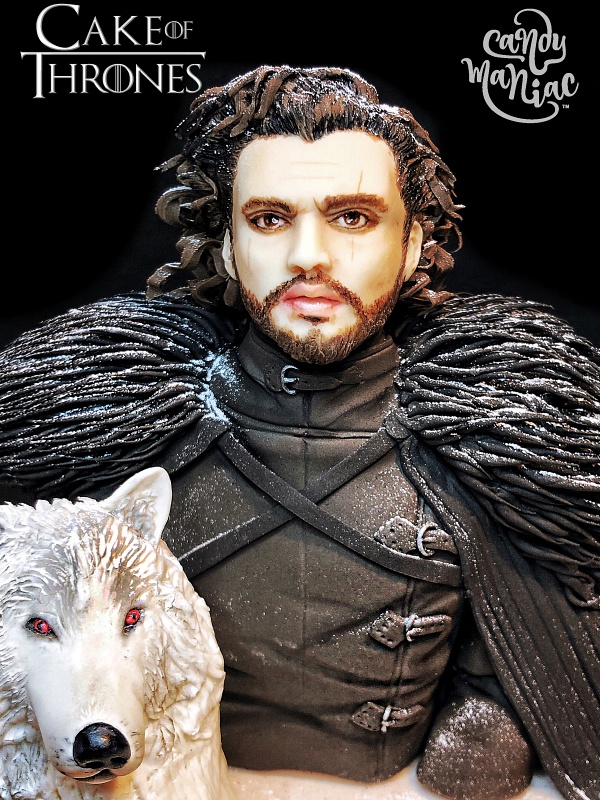
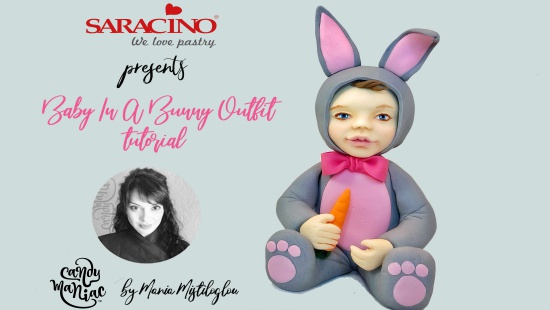
Mania Mistiloglou aka Candymaniac

Congratulations On Your Amazing Creations!

Take Your Time And Enjoy Looking At These Amazing Cakes And Creations.

To Watch Click HERE

Join Our Newsletter

We’d love to send you the latest news, discounts & exclusive offers via email! By signing up below you are confirming you are happy for Saracino to send you marketing emails. We will always treat your personal details with the upmost respect & will never sell your details to other companies for marketing purposes.

• All the latest industry news   • FREE video tutorials   • Exclusive product offers

Products         Tutorials          Ambassadors           Events           Blog           Showcase         Contact

BUNNY TUTORIAL

BUNNY TUTORIAL

Skill level: BEGINNERS

FROM LYNSEY:

Spring is in the air, the flowers are blooming, the sun is shining! All-around preparations are being made for Easter celebrations!

Here our Brand Ambassador Lynsey from Sugarwhizz shows you how to make your very own cute little Bunny hard at work collecting the eggs!

Enjoy!


You will need:

  • Balling tool
  • Dresden tool
  • Small rolling pin
  • Piping tip
  • Paintbrushes
  • Paint palette
  • Cake pop stick
  • Sharp knife
  • Cool boiled water
  • 207g Orange Modelling Paste
  • 80g Light brown Modelling Paste
  • 24g Black Modelling Paste
  • 25g Light blue Modelling Paste
  • 10g Dark green Modelling Paste
  • 6g Pale purple Modelling Paste
  • 5g Yellow Modelling Paste
  • 5g Pink Modelling Paste
  • 5g Light green Modelling Paste
  • 4g Flesh Modelling Paste
  • 1g Dark Brown Modelling Paste
  • 1g White Modelling Paste
  • Gel – Orange, Brown, Black, Green, Violet, Yellow, Pink, Flesh.
  • Dusts – Orange, yellow, Red, Brown, Bronze, Sky Blue, Violet.

Step 1

Roll 120g of orange paste into a ball. You are forming the carrot carriage.

Step 2

Use the palm of your hand to gently flatten the ball.

Step 3

Gently smooth and round off the edges with your fingertips.

Step 4

Gently push the end of a small rolling pin into the top of the carrot. Make small circular motions with the rolling pin to open the top of the carrot up.

Step 5

Use the veining end of the Dresden tool to score grooves around the carrot top. Alternate the sizes and follow the curve of the paste.

Step 6

Roll 10g of orange paste into a small ball and flatten with your fingertip to form a disc of paste. Apply a small amount of water to the top of the disc. Sit the carrot on top of the disc to lift it slightly from the worksurface.

Step 7

Repeat the steps to make two more carrots. For the medium carrot use 50g of orange paste for the top and 5g for the disc. For the small carrot, use 20g Orange paste for the top and 2g for the disc.

Step 8

Place the carrots on a sheet of greaseproof paper. Using a soft bristled paintbrush apply a small quantity of yellow and orange dust to the carrots.  Add a small amount of red and brown dust to the orange dust to create a darker colour and again apply to each carrot.

Step 9

For the large carrot wheels – Take 12g of black paste, knead and soften to warm up and divide equally into two pieces. Roll each piece into a ball. Flatten the ball with your fingertip. Use the large end of the balling tool to indent the middle of the paste. Use the small end of the balling tool to indent the centre further. Use the large end of a piping tip to mark a circle around the indents as shown.

Step 10

Make the wheels for the other carrots in the same way. For the medium carrot, start with 6g and divide into two. For the small carrot, start with 5g and divide into two. Once all the wheels are made, roll 6 small balls of black modelling paste. Apply a small amount of the bronze dust to the palm of your hand and roll each of the balls around in the dust to coat the paste. Roll each ball into a teardrop shape. Apply a small amount of water to the small indent in the centre of each wheel and stick the teardrops into place as shown.

Step 11

Stick a wheel each to each side of the corresponding carrot with a small amount of water, as shown.

Step 12

Take 35g of brown modelling paste, knead and soften to warm up. Roll into a teardrop shape and flatten the top slightly with your fingertip.

Step 13

Take 3g of flesh coloured paste, knead and soften to warm up and roll into a teardrop shape. Flatten slightly with your fingertip. Use the veining end of the Dresden tool to texture the fur.

Step 14

Apply a small amount of water to the top of the body. Stick the fur into place. Use the large end of the balling tool to gently indent the top of the paste ready for the head.

Step 15

Take 30g of brown modelling paste, knead and soften to warm up. Roll into a ball. Roll the top of the ball backwards and forwards between your fingers to narrow the top of the head.

Step 16

First indent each eye position with the large end of the balling tool. Then use the small end of the balling tool to indent each eye socket as shown.

Step 17

Mark the mouth with the veining end of the Dresden tool. Use the smoothing end of the Dresden tool to indent each corner of the mouth.

Step 18

Roll two small balls of black paste for the eyes and stick into place. Roll two tiny balls of white paste and stick to the eyes as shown. Roll a small ball of dark brown paste for the nose and stick into place. Roll two small strands of paste for the eyebrows and stick into place as shown.

Step 19

Apply a small amount of water to the inside of the carrot top and stick the body into place, gently push a cake pop stick down through the centre of the body as shown.

Step 20

Apply a small amount of water to the top of the neck and gently slide the head down the cake pop stick until it rests on the body.

Step 21

Take 6g of brown modelling paste, knead and soften to warm up then divide equally into two pieces. Roll each piece into a long thin sausage that is fatter at one end. Flatten the fat end gently with your fingertip. Use the veining end of the Dresden tool mark the paws as shown. Bend and pinch out the elbow on each arm.

Step 22

Stick the arms into place as shown.

Step 23

Divide 8g of brown modelling paste equally in half. And roll each piece into a long sausage tapered at one end. Divide 1g of flesh modelling paste equally in half. Roll each piece into a long thin sausage and lay on top of the brown paste as shown. Use the smoothing end of the Dresden tool to gently push and smooth the flesh coloured paste into the brown paste as shown.

Step 24

Stick the ears into place as shown.

Step 25

Take 12g of dark green paste, knead and soften to warm up. Roll the paste into a sausage that is tapered at each end as shown. Gently roll up the ends.

Step 26

Apply a small amount of water to the underside of the green paste and stick into place as shown.

Step 27

Take 25g of light blue paste, knead and soften to warm up and roll into an egg shape. Stick into place in the middle carrot.  Mix a small amount of sky-blue dust with a couple of drops of clear alcohol and paint the egg.

Step 28

Take 6g of light purple paste, knead and soften to warm up and roll into an egg shape. Stick into place in the small carrot.  Mix a small amount of violet dust with a couple of drops of clear alcohol and paint the egg.

Step 29

Take small various sized balls of yellow and pink paste. Roll them into thin strands, press and smooth one edge of the strand thinning the paste with your fingertips. Gently roll the strands up to form tiny flowers. Take small various sized balls of light green paste, roll into teardrops and press gently with your fingertip. Use the veining end of the Dresden tool, mark a groove down each leaf.

Step 30

Apply a small cluster of flowers and leaves to the front of the middle and small carrots as shown.

Step 31

Apply a small cluster of flowers to the front and a bigger cluster of flowers to the back of the large carrot as shown.

Step 32

Arrange your completed toppers in order, smallest to biggest! Congratulations your bunny is complete!

SARACINO EASTER CHICK

SARACINO EASTER CHICK

Author: Zoe Smith

Skill level: BEGINNERS

You will need:

  • Saracino white modelling paste
  • Saracino yellow modelling paste
  • Saracino black modelling paste
  • Saracino yellow powder dust
  • Saracino white powder dust
  • Saracino green powder dust
  • Saracino blue powder dust
  • Saracino orange powder dust
  • Cerart flower tool 303
  • Cerart leaf tool 301
  • Sharp knife
  • Fine brush
  • Soft brush

Step 1

Roll 60g of yellow Saracino modelling paste into a ball.

Step 2

Press a straight handled tool across the middle for the eye-line.

Step 3

Smooth the middle in between where the eyes will be with your thumb. 

Step 4

This is what the profile should look like. 

Step 5

With a flower making tool shape one eye in the eye-line that you created. 

Step 6

Work into the eye to create a little depth so there is space for you to add the eyeball later

Step 7

For the other eye draw a semi circle to make it look shut. 

Step 8

Add in some detailing in between the eyes. 

Step 9

Next make two semi circles for cheeks. 

Step 10

Work into the cheeks to build depth. 

Step 11

Smooth the cheeks with your finger.

Step 12

Smooth the section between the cheeks so that the beak will have somewhere to stick to. 

Step 13

Make indentations at either side of where the beak will sit. 

Step 14

Dust the cheeks with Saracino pink powder dust using a soft dry brush. 

Step 15

Dust Saracino yellow powder dust around the eyes using a soft dry brush to add depth. 

Step 16

Use a pea sized amount of Saracino white modelling paste to create a ball. Flatten the ball into an oval shape and attach it to the socket with either a little cooled boiled water, edible glue or piping gel. 

Step 17

Roll a tiny ball of black into an eyelash and attach it to the other eye as shown.


Step 18

Colour a tiny amount of paste with Saracino blue powder dust and flatten it into a circle. Attach to the eyeball. 

Step 19

Add another set of eyelashes to the open eye. 

Step 20

Mix some Saracino white powder dust with some cooled boiled water and paint highlights to the eye – some small lines on the blue iris and two tiny dots on the black pupil. 

Step 21

To make a beak take a small amount of paste and colour it using Saracino orange powder dust and pinch one end and flatten the other.  

Step 22

Next press it as shown using a leaf tool to create a ridge running down the centre to the tip of the beak. Repeat with smaller piece. 

Step 23

Trim both sections. The larger of the two will become the top of the beak and the smaller will be the lower.

Step 24

Glue the beak into place and add two tiny nostrils with the leaf tool. 

Step 25

Take two little pieces of yellow modelling paste and roll them into fine tapered section of feathers. press them onto the head as shown and smooth joins. 

Step 26

Roll a ball of 90g of yellow modelling paste and flatten the base and the top to make the body. 

Step 27

To create the wings use 4g of yellow modelling paste and make two equal flat ovals. Score 5 lines from one end into the oval but all the way across. Then cut along the lines with a sharp knife. Pinch each section into a point as shown. 

Step 28

Glue the wings to the side of the body and smooth joins with flower tool. Make sure that you lift the cut feather pieces away from the body. 


Step 29

Next glue the head to the body. 

Step 30

For the chick’s feet take 4g of paste coloured orange and make two teardrop shapes. Make two cuts into the broader end. 


Step 31

Pinch these ends into points. 

Step 32

Add lines across the toes. 


Step 33

For the bow use 2g of paste coloured with Saracino green powder dust. Roll into two sausages and cut one into 2 equal pieces and the other into 3 pieces, 2 the same size and one smaller. 

Step 34

The section that is cut into 2 should be rolled into long sausage shape and flattened. Repeat with 2 longer sections of the other piece and roll the small piece into a ball for the knot. Add lines using the leaf tool as shown. 


Step 35

Glue to the neck, the larger pieces first, then the shorter and finally attach the knot. 

Step 36

Lastly glue the feet to the body and add two tiny pieces of black paste for eyebrows. 


CREATE LITTLE FAIRY

CREATE LITTLE FAIRY

You will need:

  • Dresden tool
  • Ball tool small size
  • A thin brush
  • A large brush
  • Foam board
  • Exact knife
  • Rolling pin
  • Saracino modelling paste skin color
  • Saracino modelling paste pink color
  • Saracino modelling paste light green color
  • Saracino modelling paste green color
  • Saracino modelling paste yellow color
  • Saracino modelling paste black color
  • Edible glue
  • Wooden skewer
  • Flower wire 22 gauge
  • Saracino Wafer paper 0.27
  • Saracino dust colors pink, black and brown
  • Clear alcohol

Step 1

Take 35g of Saracino modelling paste and roll it to a nice even ball shape.

Step 2

Use the back side of your brush to create a dent in the middle of the ball.

Step 3

Don’t push too much or too little. You must end up with a result like seen in the picture

Step 4

Use your finger to flatten the upper part of the ball

Step 5

Use your dresden tool to shape the nose.

Step 6

Use the sharp end of your dresden tool to cut the mouth

Step 7

Again with the dresden tool press underneath the mouth.

Step 8

Use your fingers to shape the chin

Step 9

Take a ball tool to make 2 holes for the eyes

Step 10

Take small amount of black sugar paste to make tiny balls and place them in the holes of the eyes. 

Step 11

Use a brush and pink color dust to blush the cheeks

Step 12

Mix black dust color with vodka and draw a black line above the eyes for eyelashes

Step 13

Mix brown dust color with vodka and draw the eyebrows

Step 14

Roll 25g of paste into a carrot shape

Step 15

Use the back side of your brush to create a mark on the back of the leg for the foot and the back of the knee.

Step 16

Roll again using the palm of your hand to make each divided part like a carrot shape.

Step 17

Press with your finger to create the heel


Step 18

Repeat the same for both legs and then bend them at the knee and place them on the dummy.

Step 19

Roll 35g sugar paste in a sausage shape 

Step 20

Use your fingers to press the sugar paste to create the neck 

Step 21

You should end up with a shape like you see in the picture 

Step 22

Take a wooden skewer and go through the body from the neck to the other side 

Step 23

Place the body with the skewer above the legs and also support the head

Step 24

Roll 8g of sugar paste into a carrot shape and use your brush to create a mark for the palm of the hand 

Step 25

Press with your finger to shape the palm

Step 26

Use your exact knife to cut the thumb as seen in the picture 

Step 27

Repeat to cut the rest of the fingers by cutting first in the middle and each part again in the middle. This way you will end up with 4 equal parts 

Step 28

Give an angle to the wrist.


Step 29

Roll a piece of rose sugar paste and cut in the shape as shown in the picture

Step 30

Use a foam board and the back side of a thin brush to thin the edge of your rolled sugar paste 


Step 31

Wrap the body with the rolled pink sugar paste

Step 32

Glue the arms on the body with edible glue


Step 33

Roll a small piece of pink sugar paste and cute a v shape in the middle 

Step 34

Wrap the foot with the piece of the fondant  to make the shoe


Step 35

Roll green sugar paste and cut a small strip

Step 36

Wrap the green strip around the ankle


Step 37

Roll a small piece of yellow sugar paste into a ball and place it on the ankle

Step 38

Roll green sugar paste and use the dresden tool to make lines


Step 39

Place the green sugar paste on the head to create the hair 

Step 40

Roll a tiny piece of green sugar paste to a carrot shape


Step 41

Place it over the head for extra details on hair

Step 42

Cut a strip of a dark green sugar paste


Step 43

Place it over the head like a ribbon band.

Step 44

Use a silicone mold to make some flowers 


Step 45

Gently place the flowers on the ribbon

Step 46

Use pink color dust to make shadows on the dress 


Step 47

Take a sheet of Saracino wafer paper and draw the wings 

Step 48

Use the scissors to cut out the wings


Step 49

When you have a pair of wings ready take a small piece of wire place it between the two wings and glue them with some water 

Step 50

Stick the wings in the back of the fairy


BABY IN A BUNNY OUTFIT

BABY IN A BUNNY OUTFIT

Skill level: INTERMEDIATE

You will need:

  • Non stick board
  • Small rolling pin
  • Edible glue
  • Exacto knife
  • Dresden tool
  • Point tool
  • Small flower foam base
  • Tapered point colour sharper No 0
  • Small ball tool
  • Fine brush (No 5/0)
  • Saracino dust colors (light blue, brown, black, pink)
  • Some vodka (or other clear alcohol) for mixing colours
  • Saracino modelling paste (white, skin, pink, grey, fuchsia, orange, green, brown)
  • Toothpicks

Step 1

Take a piece of skin coloured modelling paste, soften it and mould it into a ball shape.

Step 2

With the side of a brush or other appropriate tool press slightly in the middle of the ball.

Step 3

With two small fingers press slightly left and right of the center of the dent to form the nose in the middle.

Step 4

With the dresden tool, form the sides and the end of the nose pushing it upwards

Step 5

With the end of a finger smooth the edge of the nose to make it a bit rounder.

Step 6

Make the two nostrils with the silicon brush or a point tool and form a nice shape.

Step 7

Define the space where the mouth will be by making left-right  diagonal grooves and also horizontal (as a small triangle)

Step 8

Correct it with dresden tool

Step 9

With the point tool we divide this space to create the upper lip and the lower.

Step 10

Cut it slightly with a blade to stand out

Step 11

Soften the edges of the upper lip with the tip of your finger

Step 12

Form the border of the lower lip and the edges of the mouth with the dresden tool

Step 13

Add details with the silicon brush on the lips

Step 14

With the back of a brush, shape the chin pushing it upwards

Step 15

Form a distinct philtrum above the upper lip with a small ball tool

Step 16

Make a dot for the inner eye angle where the eye begins

Step 17

Make a dot for the outer eye angle where the eye ends

Step 18

Unite the two dots with a line

Step 19

Widen the line with the small ball tool

Step 20

Form the eyelids with the silicon brush

Step 21

Repeat same steps for the other eye

Step 22

Now you have the two eye sockets

Step 23

Put some white paste in one of the sockets. 

Step 24

Push it slightly and carefully to cover all space

Step 25

Repeat with the other eye

Step 26

With the back of the dresden tool make the appropriate adjustments on the details of the eyes

Step 27

Now the face is ready to color

Step 28

Start by painting the main colour of the eye using powder colours mixed with clear alcohol.

Step 29

Put some black for the pupil and some white for the light

Step 30

Color the eyelids with light brown for the lashes

Step 31

Give some shadows on the edges of the eyes, nose and lips with light brown dust

Step 32

With a bigger brush dust the cheeks with a light pink colour powder. 

Step 33

The face is ready

Step 34

Roll out some grey paste for the hood

Step 35

Attach the hood to the head using edible glue

Step 36

Roll out with the tips of your fingers some brown paste pieces

Step 37

Put them side by side to make the hair

Step 38

Attach them to the top of the forehead at the edge of the hood

Step 39

Shape the grey paste into a teardrop

Step 40

Roll out the grey paste to form the bunny ears. 

Step 41

Roll out pink modelling paste. Cut a piece of the pink paste to the same shape as the ear but a bit smaller.

Step 42

Attach the pink over the grey with edible glue

Step 43

Cut the excess to form a straight edge.

Step 44

Make a bigger hood using grey modelling paste and cover the head

Step 45

Attach the ear to the hood with edible glue.

Step 46

Repeat with the other ear.

Step 47

Put the head safely on the side ready for later.

Step 48

Take a piece of grey paste and form the body as shown

Step 49

Roll out some pink paste and cut a large petal shape for the tummy

Step 50

Attach it to the body with edible glue

Step 51

Put a toothpick in to the top of the body and attach the head

Step 52

With a piece of grey paste make an L-shaped leg as shown

Step 53

Put some pink details on the shoe pad and do the same for the other leg. Fix them both to the base of the body

Step 54

Roll some grey paste in a sausage shape and cut off the edge diagonally for the arm

Step 55

Bend it in the middle to form an L shape

Step 56

Give some wrinkles to the inside angle with the dresden tool

Step 57

Finish both arms and attach them to the body

Step 58

Roll a small sausage of skin modelling paste and flatten the edge

Step 59

Cut a triangle to form a thumb

Step 60

Separate the rest of the fingers and give them a slight bend to the inside of the fist

Step 61

Attach the hand at the end of the arm. Do the same steps with the other hand

Step 62

Make a small carrot with orange paste

Step 63

Make a pink bow for the neck

Step 64

Attach the carrot and the bow and the figure is ready!!!