

You will need:
- Cake board to put the cake on
- Rectangular drum
- Ganache
- Vanilla cake (or the flavour you prefer)
- Syrup
- Smoother
- Knife
- Steel spatula
- Roller
- Swiss meringue buttercream
- Cutter for the fondant
- Set of round cutters
- Modelling tools
- Paint brushes
- Clear alcohol
- Saracino Le Supreme food flavouring Forest Fruits
- Saracino Le Supreme food flavouring Vanilla De Bourbon
- Saracino blue gel colour
- Saracino powder food colouring: brown, pink, black and blue
- Saracino Cake Gel (edible glue)
- Saracino white Pasta Top
- Saracino black Pasta Top
- Saracino brown modelling paste
- Saracino white modelling chocolate
- Saracino Liquid Shiny (edible varnish)
- Printing templates. Panda- HERE, Glasses – HERE

Step 1
Make a Swiss meringue buttercream and flavour to taste with the Saracino Supreme forest fruit paste.

Step 2
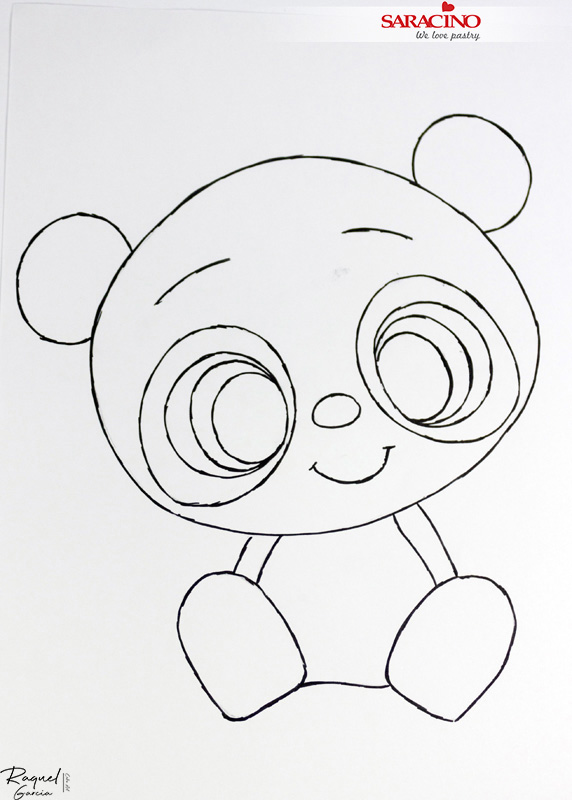
Print the template HERE. Cut out the shape using cardboard or foil in the size you want to make your cake.

Step 3
Flavour each sponge with syrup and layer with the buttercream we made in step one.

Step 4
For the head part of the Panda, add one more layer of sponge cake to give the shape when carving.

Step 5
Mark the eyes using the template and cut the sockets in the cake, with the pieces of cake we have removed mix with buttercream and use to model the nose. Add a layer of sponge to each foot. Allow the cake to chill in the fridge.

Step 6
Cover the cake with chocolate ganache (ideally prepared 24 hours in advance).

Step 7
Roll a thin layer of white Saracino Pasta Top and cover the body of the Panda.

Step 8
Roll black Saracino Pasta Top . Do not roll too thin as we will need to texturise to add the hair effect. We need this to cover the arms and the two legs and feet.

Step 9
Cover the legs and feet. Using a very small ball tool add the texture. Do not texture the top of the feet.

Step 10
Using a fine metal wire modelling tool create a hair texture by finely brushing the whole area.

Step 11
Roll a strip of black paste and fix around each foot.

Step 12
Roll white Saracino Pasta Top for the head.

Step 13
Cover the head. Use your fingers to shape the two eyes and add form for the nose.

Step 14
Using your smoother smooth out the surface of the head.

Step 15
For the cake board colour some white Pasta Top with blue gel colour to achieve the shade you require.

Step 16
Cover your cake drum and smooth.

Step 17
Move the cake to the board. Apply a little edible glue to the board beneath the cake.

Step 18
Cut out the two eyes from the template. Roll some black Saracino Pasta Top and cut out the two black circles with a sharp blade.

Step 19
Using edible glue fix two black circles into the eye sockets.

Step 20
Cut out two white circles smaller and stick them over the black.

Step 21
Roll out and cut the blue, black and white circles. The white will need to be two different sizes.

Step 22
Layer and fix as shown. Add a smaller dot of white if required.

Step 23
Mix blue powder colour with clear alcohol and paint around the outside of the eye as shown.

Step 24
Use a ball tool to mark the nose position.

Step 25
Roll a small ball of black paste for the nose. Fix into place. Add a small dot of white.

Step 26
Using a modelling tool mark the mouth.

Step 27
Mix brown powder colour with clear alcohol and paint the freckles. Mix black powder colour with clear alcohol and paint the mouth we have previously marked.

Step 28
Using pink powder colour and a soft brush lightly dust the cheeks. Be careful not to apply too much colour as it is easy to add more but not so easy to remove!

Step 29
For the helmet roll some brown Saracino modelling paste.

Step 30
Place the rolled paste over the top of the head. Using a sharp knife cut out the shape of the helmet. Leave ‘straps’ either side. Roll a small ball and fix it on the top of the cap.

Step 31
For the goggles download the template HERE. Using a colour of your choice roll out the paste and cut out the goggles. Fix on top of the helmet.

Step 32
Cut a strip of paste about two or three centimetres wide to make the straps for the goggles.

Step 33
Glue two black rectangles of top paste to the inside of the glasses. Fix the goggle straps. Add a black button to the helmet strap.

Step 34
Using Saracino white modelling chocolate model the two ears.

Step 35
Fix the two ears either side of the helmet where required.

Step 36
Cover both ears with black paste and texture as the legs and arms.

Step 37
Using Saracino Liquid Shiny paint the eyes and the two black rectangles inside the goggles to give a shiny effect.

Step 38
Roll white Saracino modelling paste. Draw a cloud and cut out with a sharp knife. Smooth the edges and shape it with your fingers.

Step 39
Glue the cloud to the upper left corner of the board using Saracino cake gel. Make a large cloud with white paste and fix to look like the panda is sitting on it.

Step 40
Using Saracino brown dust colour and a soft brush lightly dust the goggles, hat, tummy and chin. Be careful not to over dust!

Step 41
Roll out white paste and cut white circles with a circular cutter.

Step 42
Fix the white circles to the board. Using blue powder colour and a soft brush dust the clouds.

Step 43
Your Panda pilot is ready to fly to your party!

Step 44
Cut and enjoy!
